
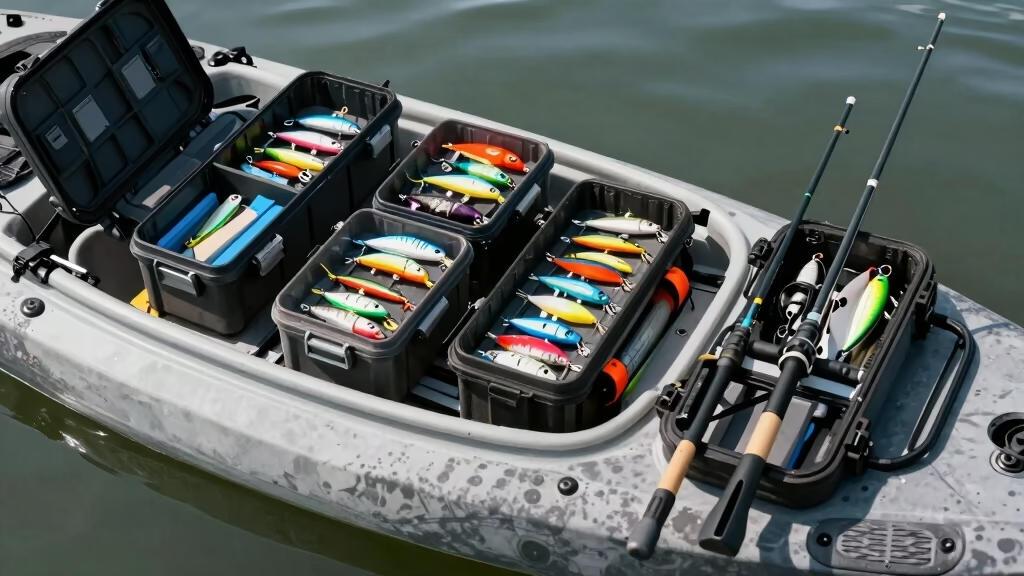
Quick Answer: Organizing tackle on a kayak requires keeping frequently used items within arm’s reach, using waterproof storage containers, and balancing weight evenly across the hull. The best approach combines a milk crate or tackle bag behind the seat for bulk storage, rod holders mounted along the gunwales, and a small waterproof box or tray near the cockpit for lures and tools you’ll need during active fishing.
Key Takeaways
- Keep essentials within reach: Store active lures, pliers, and line cutters in a small waterproof box or tray positioned between your legs or just behind the seat
- Balance your load: Distribute heavy tackle storage evenly across the kayak’s centerline to maintain stability and prevent tipping
- Use vertical space: Milk crates and rod holders maximize storage without cluttering your limited deck space
- Waterproof everything: Even on calm days, splash and spray will reach your gear—use sealed containers for electronics, soft plastics, and anything moisture-sensitive
- Secure all items: Bungee cords, leashes, and tie-downs prevent tackle from sliding overboard during paddling or when fighting fish
- Plan for quick access: Organize by fishing style—keep topwater lures separate from bottom rigs, and pre-rig rods for different techniques
- Start minimal: New kayak anglers should begin with one tackle bag and expand storage as they learn what they actually use on the water
What Is the Best Way to Organize Fishing Tackle on a Kayak?
The best way to organize fishing tackle on a kayak is to create distinct storage zones based on access frequency and item size. Position a primary storage system (milk crate or large tackle bag) behind your seat for bulk items, mount rod holders along the sides for ready-to-use rods, and keep a small waterproof container within arm’s reach for lures and tools you’ll swap throughout the day.
This three-zone approach works because kayak fishing demands quick access while seated. Unlike boat fishing, you can’t stand up and walk to a tackle locker. Everything must be reachable without shifting your weight dramatically or taking your eyes off the water for long periods.
The three essential zones:
- Hot zone (within arm’s reach): Small waterproof box or tray for active lures, pliers, line cutters, and hooks you’re currently using
- Warm zone (behind seat or beside hip): Milk crate, tackle bag, or medium boxes for backup lures, extra line, leaders, and tools
- Cold zone (bow storage or dry hatch): Rain gear, first aid, snacks, and items you won’t need until you’re off the water
Choose your primary storage based on your fishing kayak type. Sit-on-top kayaks with open decks pair well with milk crates and bungee rigging. Sit-inside kayaks with limited deck space benefit more from compact tackle bags and flush-mount rod holders.
Common mistake: Bringing too much tackle on your first trips. Start with one box of lures suited to your target species and expand only after you’ve learned what you actually use. Excess weight reduces kayak stability and makes paddling harder.
Kayak Tackle Storage Ideas for Beginners
Beginners should start with a single waterproof tackle bag (3-4 trays) positioned behind the seat and one or two flush-mount rod holders. This minimal setup keeps costs low, reduces clutter, and forces you to learn which tackle you truly need before investing in elaborate storage systems.
A quality tackle bag designed for kayak fishing typically includes:
- Waterproof or water-resistant exterior
- 3-5 removable utility boxes for lures
- Exterior pockets for pliers, line, and small tools
- Padded shoulder strap for portability
- Attachment points for bungee cords or carabiners
Beginner-friendly storage progression:
- Week 1-4: One tackle bag with basics (10-15 lures, pliers, extra line, hooks)
- Month 2-3: Add a small waterproof box for the cockpit area to hold active lures
- Month 4+: Consider a milk crate or additional rod holders once you know your fishing style
Mount rod holders before your first trip. Even budget flush-mount holders ($15-25 each) dramatically improve your experience by freeing your hands for paddling, landing fish, or retying. Position them within easy reach—typically 12-18 inches behind your seat on each side.
Decision rule: Choose a tackle bag if you fish from multiple kayaks or launch sites where you carry gear to the water. Choose a permanently mounted milk crate if you fish from the same stable kayak and can leave it rigged in your garage or truck bed.
New to kayak fishing? Focus on mastering paddle control and basic casting before adding complex tackle systems. The best organization system is the one that doesn’t distract you from learning core skills.
Milk Crate vs Tackle Box for Kayak Fishing
A milk crate offers more storage capacity and customization options, while a tackle box (or bag) provides better waterproofing and portability. Most experienced kayak anglers use a milk crate as their primary storage behind the seat and supplement it with smaller waterproof boxes for active tackle.
Milk crate advantages:
- Holds multiple tackle boxes, tools, and bulky items (net, fish grippers, bait bucket)
- Accepts vertical rod holders via PVC pipe mounts
- Easy to customize with zip ties, bungee cords, and tool holders
- Costs $10-20 at hardware stores
- Ventilated design lets water drain quickly
Milk crate disadvantages:
- Not waterproof—requires boxes inside for moisture-sensitive items
- Takes up significant deck space (13″ x 13″ footprint)
- Can shift or tip if not secured properly
- Adds wind resistance when paddling
Tackle box/bag advantages:
- Fully waterproof or water-resistant construction
- Compact and portable between vehicles and kayaks
- Organized compartments keep lures separated
- Easier to carry to shore fishing spots after kayaking
Tackle box/bag disadvantages:
- Limited capacity compared to crate systems
- Can’t mount rod holders directly
- More expensive ($40-150 for quality models)
- Fewer customization options
Choose a milk crate if: You fish from the same kayak regularly, target multiple species requiring diverse tackle, and have a stable kayak with at least 32 inches of width. The crate becomes a permanent part of your rigging.
Choose a tackle bag if: You fish from different kayaks, prefer minimalist setups, paddle long distances where weight matters, or fish from an inflatable fishing kayak with limited mounting options.
Many anglers eventually use both: a milk crate for the main storage system and a small waterproof tackle box positioned in the cockpit for lures they’re actively fishing. This hybrid approach combines the capacity of a crate with the weather protection of sealed boxes.

Fishing equipment tackle bags and boxes

Available in Two Sizes: The KastKing HyperSeal Waterproof Tackle Box comes in two different sizes, 3600 and 3700 boxes that fit in popular tackle bags or boat storage systems. Each provides ample space for organizing all your fishing gear, from crankbaits, jerkbaits, spinners, spoons and so much more. Also works great for hooks and terminal tackle.

PLANO GUIDE SERIES 3500 FIELD BOX: Embark on your next adventure with confidence knowing Plano Guide Series cases provide you with the best protection on the water. This waterproof dry box will keep your wallet, phone, and other valuables safe.
How Do You Keep Lures from Tangling on a Kayak?
Keep lures from tangling by storing them in individual compartments within tackle boxes, using hook-and-loop straps or rubber bands to secure treble hooks to rod blanks during transport, and pre-rigging only the rods you’ll use immediately. Proper storage prevents the frustrating tangles that waste fishing time.
Tangle prevention strategies:
- Use compartmentalized boxes: Each lure gets its own slot. Plano, Flambeau, and similar brands make boxes with adjustable dividers specifically sized for crankbaits, soft plastics, and topwater lures.
- Secure hooks to rods: When transporting rigged rods, hook the lure to the lowest guide and reel tight, or use a hook keeper mounted near the reel seat. Never let lures dangle freely.
- Separate soft plastics: Store soft baits in their original packaging or dedicated soft plastic binders. Mixing different plastics can cause chemical reactions that melt baits together.
- Organize by technique: Keep all topwater lures in one box, all jigs in another, all bottom rigs in a third. This system prevents you from digging through mixed tackle while the kayak drifts.
For rod storage during paddling:
Mount rod holders at a slight forward angle (15-20 degrees) so rods lean toward the bow. This position keeps lures away from your body and paddle stroke. Use rod leashes or bungee cords to secure rod butts—a rod bouncing in its holder during rough water will tangle lines with neighboring rods.
Common mistake: Storing multiple rigged rods parallel to each other without separating the lines. Even small waves cause rods to bounce and cross, creating bird’s nests. Space rod holders at least 18 inches apart, or alternate which side of the kayak you mount them on.
For lures with multiple treble hooks (crankbaits, jerkbaits), consider replacing the rear treble with a single inline hook. This reduces snag potential in your tackle box and on the water, and it’s easier to unhook fish quickly—critical when you’re trying to maintain kayak position.
Where to Mount Rod Holders on a Fishing Kayak
Mount rod holders 12-24 inches behind your seat on both sides of the kayak, angled slightly forward at 15-30 degrees from vertical. This position keeps rods within easy reach while seated, prevents them from interfering with your paddle stroke, and allows you to monitor rod tips for bites without turning around.
Optimal rod holder placement:
- Primary holders (2): Directly behind seat, one on each side, 12-18 inches back
- Secondary holders (2-4): Further back along the gunwales, 24-36 inches from seat
- Vertical holders (optional): Mounted on milk crate or tank well for storage during paddling
The exact position depends on your kayak’s length and your arm reach. Sit in your kayak and extend your arm backward naturally—you should be able to grab a rod handle without twisting your torso more than 45 degrees.
Mounting options by kayak type:
- Sit-on-top kayaks: Flush-mount or clamp-on holders attached to gunwales or existing track systems
- Sit-inside kayaks: Clamp-on holders attached to cockpit rim or deck rigging
- Kayaks with gear tracks: Adjustable track-mount holders that slide into position and lock
- Milk crate systems: PVC pipe holders inserted into crate holes
Angle considerations:
- 15-20 degrees forward: Best for trolling or monitoring rods while paddling
- 30-45 degrees forward: Better for storing rods during active casting to keep them out of your way
- Vertical (90 degrees): Storage only—not functional for fishing, but saves deck space during transport
Before drilling holes for permanent mounts, test positions with clamp-on holders or tape. Fish for a full day to confirm the placement works for your casting style and doesn’t interfere with landing fish or accessing other gear.
Edge case: If you fish in heavy cover (lily pads, submerged timber), mount holders closer to your seat and at steeper forward angles. This keeps rod tips higher and reduces snags when paddling through vegetation.
Most fishing kayaks can accommodate 4-6 rod holders without crowding the deck. Start with two primary holders and add more only after you’ve established your fishing patterns. More holders aren’t always better—they add weight and clutter if you don’t use them.
Best Waterproof Tackle Storage for Kayaks
The best waterproof tackle storage for kayaks includes Plano Guide Series boxes (with O-ring seals), Pelican cases for electronics and expensive reels, and dry bags for clothing and items that must stay completely dry. For most tackle, water-resistant boxes with tight-fitting lids provide sufficient protection at lower cost than fully waterproof cases.
Waterproof vs water-resistant:
- Waterproof (IP67+ rating): Survives full submersion for 30 minutes. Necessary for electronics, phones, and items that fail if wet.
- Water-resistant: Keeps out splash and rain but not full immersion. Adequate for most lures, line, and tools.
Top waterproof storage options:
- Plano Guide Series Tackle Boxes ($15-30): Water-resistant with DriLoc seals, multiple sizes, clear lids for visibility
- Pelican Cases ($40-200): Fully waterproof, crushproof, ideal for fish finders, cameras, and expensive reels
- Dry bags ($10-40): Roll-top waterproof bags for clothing, first aid, and backup gear
- Waterproof phone pouches ($10-20): Touch-screen compatible, allows phone use while protected
- Plano Hydro-Flo boxes ($8-15): Ventilated design for live bait or wet lures, drains water while keeping contents contained
What needs waterproof protection:
- Electronics (fish finders, GPS, phones)
- Spare reels and reel maintenance tools
- First aid supplies and medications
- Soft plastics (some formulas break down in water)
- Hooks and terminal tackle (prevents rust)
What can use water-resistant storage:
- Hard-bodied lures (crankbaits, topwater plugs)
- Pliers and fish grippers (stainless steel)
- Extra line and leaders
- Fishing license and documentation (in a ziplock bag inside a box)
Common mistake: Assuming all tackle boxes are waterproof. Most budget boxes ($5-10) have loose-fitting lids that leak during splash or capsize. Check for O-ring seals or gaskets if waterproofing matters for that box’s contents.
Store your most expensive or critical items in a Pelican case secured inside a dry hatch or bungeed to the deck. Even if you capsize, these cases float and protect contents. For everyday tackle, quality water-resistant boxes inside a milk crate or tackle bag provide adequate protection for typical kayak fishing conditions.

Built for Marine Use: Store and protect boat tools, dock gear, and small equipment with this dry box water resistant designed for on boat storage resists rust, dust, and moisture in harsh saltwater and freshwater environments.

PLANO GUIDE SERIES 3600 FIELD BOX: Embark on your next adventure with confidence knowing Plano Guide Series cases provide you with the best protection on the water. This waterproof dry box will keep your wallet, phone, and other valuables safe.

Waterproof Tackle Box: Equipped with rubber liner in the edge of the lid to seal water out, always keep your stuff dry and secure. Must-have accessory while you going to the beach or being out on the water.
How to Organize Soft Plastics on a Kayak
Organize soft plastics in dedicated storage binders with individual sleeves or in original packaging stored inside a larger waterproof box. Keep frequently used colors and styles in a small utility box within arm’s reach, and store backup bags in your main tackle system. This prevents baits from melting together and makes color selection quick.
Soft plastic storage methods:
- Binder systems ($20-40): Zippered binders with clear plastic sleeves, each holding one bag of soft plastics. Keeps baits organized by type and color, prevents mixing.
- Original packaging: Leave baits in factory bags and store multiple bags in a larger waterproof box. Simple and effective for anglers who use fewer styles.
- Utility boxes with dividers: Plano 3700-size boxes with adjustable compartments. Works for opened bags or bulk soft plastics.
- Tube storage: Specialized tubes for stick baits and worms, keeps them straight and prevents tangling.
Why soft plastics need special care:
Different plastic formulas react chemically when stored together. Mixing brands or types can cause baits to melt, discolor, or become sticky and unusable. Salt-impregnated baits are especially prone to this reaction.
Organization strategy:
- Active box: Small utility box (3600 or 3700 size) with 6-10 colors you’re fishing that day
- Main storage: Binder or large box in your milk crate/tackle bag with full soft plastic inventory
- Rigged baits: Pre-rigged jig heads or Texas rigs stored in a separate box with foam inserts to hold hooks
Color organization tips:
- Group by water clarity: natural colors together, bright colors together, dark colors together
- Organize by technique: all drop-shot baits in one section, all Texas rig baits in another
- Keep duplicates in main storage, singles in your active box
Edge case for tournament anglers: Pre-rig multiple rods with different soft plastic colors and styles. Store rigged rods in holders so you can switch techniques without retying. This approach trades deck space for time efficiency.
Store soft plastic binders flat in your kayak rather than standing upright. This prevents baits from sliding to one end of the sleeves and maintains organization. Secure the binder with a bungee cord to prevent it from sliding during paddling.
Common Mistakes When Setting Up Kayak Tackle Storage
The most common mistakes when setting up kayak tackle storage include bringing too much tackle (reducing stability and increasing clutter), failing to secure items properly (leading to lost gear overboard), and placing heavy storage too far forward or aft (affecting kayak trim and paddling efficiency). Start minimal and expand based on actual needs.
Top setup mistakes:
Overloading the kayak: Bringing every lure you own adds unnecessary weight and reduces stability. Stick to 2-3 tackle boxes maximum for day trips.
Poor weight distribution: Placing a heavy milk crate far behind the seat lifts the bow and makes paddling harder. Position heavy storage close to your seat, centered on the kayak’s midpoint.
Not securing gear: Tackle boxes, tools, and bags slide around during paddling or tip overboard during fish fights. Use bungee cords, carabiners, or rod leashes on everything.
Ignoring access patterns: Storing frequently used items in hard-to-reach spots forces awkward movements that destabilize the kayak. Keep active tackle within arm’s reach.
Blocking paddle stroke: Mounting rod holders or storage too close to your seat interferes with paddling. Test clearance before permanently mounting anything.
No backup for essentials: Losing your only pair of pliers or line cutters ends your trip. Carry backup tools in a separate location.
Mixing incompatible plastics: Storing different soft plastic brands together causes chemical reactions that ruin baits.
Drilling without planning: Permanent mounts can’t be easily moved. Use clamp-on or track-mount systems first to test positions.
Decision rule for adding storage: If you haven’t used an item in your last three trips, leave it home. Kayak fishing rewards efficiency over preparedness for every possible scenario.
Testing your setup:
Before your first fishing trip, load your kayak completely and paddle for 30 minutes. Note what’s in your way, what you can’t reach, and what shifts around. Make adjustments on land before you’re dealing with these issues while trying to fish.
Practice a controlled capsize drill (in shallow water with a buddy) to see what stays attached and what floats away. This reveals which items need better securing and whether your waterproofing strategy works.
Do I Need a Crate or Just a Tackle Bag for Kayak Fishing?
You need a crate if you fish frequently from the same kayak, target multiple species requiring diverse tackle, or want to mount vertical rod holders for storage. You need just a tackle bag if you fish occasionally, prefer minimalist setups, or move your gear between multiple kayaks or fishing locations. Many anglers eventually use both.
Choose a crate-based system if:
- You fish 2+ times per month from the same kayak
- You target bass, walleye, pike, or other species requiring 20+ lure varieties
- Your kayak has a large tank well or deck space behind the seat (12″ x 12″ minimum)
- You want to mount 2-4 vertical rod holders for storage
- You fish all day and need space for lunch, drinks, and extra gear
- You have secure storage (garage, truck bed) where the rigged kayak stays
Choose a tackle bag system if:
- You fish from multiple kayaks or rent kayaks
- You paddle long distances where weight and wind resistance matter
- Your kayak has limited deck space (narrow or sit-inside designs)
- You prefer quick setup and breakdown at launch sites
- You fish for 2-4 hours and don’t need extensive gear
- You walk significant distances from parking to launch
Hybrid approach (recommended for serious anglers):
Use a milk crate for main storage and rod holders, plus a small waterproof tackle bag positioned in the cockpit for active lures and tools. This combines the capacity of a crate with the weather protection and quick access of a bag.
Cost comparison:
- Crate system: $10 crate + $30-60 in tackle boxes + $20-40 for rod holder materials = $60-110 total
- Tackle bag system: $40-150 for quality bag (includes boxes) + $30-50 for separate rod holders = $70-200 total
The crate system offers better value if you’re building a permanent setup. The tackle bag system offers better versatility if your fishing style or kayak might change.
Edge case: If you fish from a pedal kayak or tandem fishing kayak, you likely have more deck space and stability for a crate system. If you fish from a 10 foot kayak or narrower model, a tackle bag prevents overcrowding the limited deck.

Dimension: The EXOCRATE is specially made to accommodate any standard milkcrate 13 in. x 13 in. It can also be used without a crate due to the panels included with each bag.
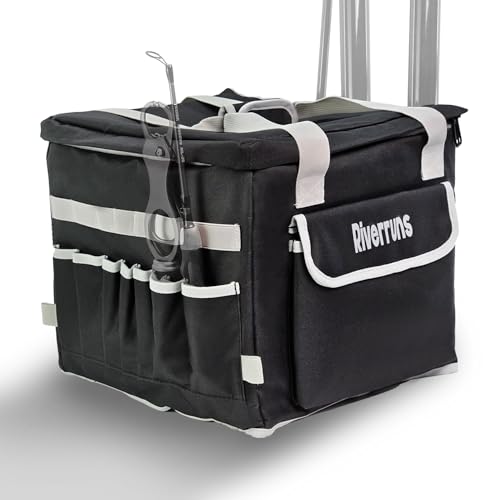
Budget-Friendly Fishing: Our product not only excels in functionality but is also incredibly budget-friendly. With just a standard milk crate, you'll have a fully featured, durable fishing solution that is more affordable than specialized kayak fishing crates.

How to Access Tackle Quickly While Kayaking
Access tackle quickly by keeping a small waterproof utility box (3600 size) positioned between your legs or in a dashboard-style mount within arm’s reach. Pre-rig 2-3 rods with different lure types and store them in rod holders so you can switch techniques without retying. This setup minimizes the time you spend digging through storage while the kayak drifts.
Quick-access setup:
- Cockpit box: 3600 or 3700 utility box with 6-12 lures you’re actively fishing, plus spare hooks and weights
- Tool tether: Pliers, line cutters, and hook remover on retractable tethers clipped to your PFD or kayak
- Pre-rigged rods: 2-3 rods ready with different techniques (topwater, jig, Texas rig)
- Leader wallet: Pre-tied leaders stored in a small wallet or box for quick changes
Positioning strategies:
- Between legs: Small box sits on the deck between your knees, secured with a bungee cord
- Dashboard mount: Some kayaks have molded recesses or track-mounted trays in front of the seat
- Magnetic strips: Mount magnetic tool holders on the side of your seat or crate for pliers and cutters
- PFD pockets: Store small items (extra hooks, split rings, swivels) in PFD pockets for instant access
Time-saving techniques:
- Pre-tie leaders: Spend 30 minutes at home tying 10-15 leaders with hooks, swivels, and weights. Store them in a leader wallet and snap them on via a loop-to-loop connection.
- Color-code boxes: Use different colored utility boxes for different techniques (red for topwater, blue for bottom fishing). Grab the right box instantly.
- Minimize retying: Use snap swivels or loop knots that allow lure changes without cutting line.
Common mistake: Storing your active tackle box in the milk crate behind you. This forces you to twist around, unbalance the kayak, and take your eyes off the water every time you want to change lures. Keep active tackle in front of or beside you.
For drift fishing or trolling:
Mount a small tackle tray on a RAM mount or track system positioned at dashboard height. This keeps lures visible and accessible without looking down, allowing you to monitor your drift and surroundings while selecting your next bait.
Practice changing lures and retying knots while seated in your kayak on land. This builds muscle memory for the confined space and awkward angles you’ll face on the water. The faster you can make changes, the more time you spend fishing instead of rigging.
Kayak Tackle Organization for Small Kayaks with Limited Space
Small kayaks with limited space require vertical storage solutions, multi-purpose gear, and ruthless tackle selection. Use a compact tackle bag (12″ x 8″ or smaller) positioned behind the seat, flush-mount rod holders instead of bulky crate systems, and a single small utility box for active tackle. Prioritize versatile lures that cover multiple techniques over specialized baits.
Space-saving strategies for kayaks under 10 feet or 28 inches wide:
- Vertical rod storage: Flush-mount or clamp-on rod holders keep rods upright and out of your paddling space
- Soft-sided storage: Tackle bags compress and conform to available space better than hard crates
- Minimalist tackle selection: 1-2 boxes maximum, focusing on proven lures for your target species
- Multi-tool approach: One quality multi-tool replaces separate pliers, cutters, and knife
- Deck bag: Small waterproof bag (3-5 liters) bungeed to the bow for non-tackle items (phone, snacks, first aid)
Recommended setup for small kayaks:
- Main storage: One tackle bag (3-4 trays) secured behind seat with bungee cords
- Active tackle: One 3600 utility box positioned in cockpit area
- Rod storage: 2 flush-mount holders, one on each side, 12 inches behind seat
- Tools: Pliers and cutters on retractable tethers clipped to PFD
- Extras: Small dry bag (5L) for phone, keys, wallet
Tackle selection for limited space:
Focus on versatile lures that work in multiple situations:
- Soft plastics: 3-4 colors in 2-3 styles (stick baits, creature baits, paddle tails)
- Jigs: 3-5 jig heads in different weights with interchangeable trailers
- Topwater: 1-2 proven topwater lures (popper, walking bait)
- Crankbaits: 2-3 depths (shallow, medium, deep)
- Spinnerbaits: 2 colors (white, chartreuse or natural)
What to leave home:
- Backup reels (unless fishing remote locations)
- Lures you “might” use (stick to proven producers)
- Bulky items like large tackle boxes or full-size coolers
- Redundant tools (one good pair of pliers beats three mediocre ones)
Edge case: If you fish from an inflatable fishing kayak, avoid permanent mounts that require drilling. Use clamp-on rod holders, adhesive mounts, or track systems designed for inflatables. Keep weight minimal to maintain the kayak’s performance and portability advantages.
Small kayaks force you to become a more efficient angler. You’ll learn which tackle you actually use versus what you carry “just in case.” This focused approach often leads to more fish because you spend less time managing gear and more time fishing.
What Tackle Should I Keep Within Reach on a Kayak?
Keep pliers, line cutters, a small selection of active lures (6-12), spare hooks, split shot weights, and a hook remover within arm’s reach on a kayak. These items get used repeatedly throughout a fishing session and need to be accessible without shifting your weight or digging through main storage. Everything else can stay in your primary tackle system behind the seat.
Essential within-reach items:
- Pliers (needle-nose): Unhooking fish, crimping weights, opening split rings
- Line cutters or scissors: Trimming tag ends, cutting line for retying
- Hook remover or forceps: Removing deeply hooked fish quickly
- Active lure box: 6-12 lures you’re rotating through based on conditions
- Spare hooks: 5-10 hooks in sizes you’re currently using
- Split shot or bullet weights: For adjusting presentation depth
- Snap swivels: Quick lure changes without retying
Positioning options:
- PFD pockets: Tools and small items in zippered pockets
- Tool tethers: Retractable tethers clipped to PFD or kayak deck rigging
- Cockpit utility box: 3600-size box positioned between legs or in dashboard area
- Magnetic strips: Mounted on seat or gunwale for metal tools
- Deck bag: Small waterproof pouch bungeed to deck rigging in front of seat
What doesn’t need to be within reach:
- Backup lures and full tackle boxes
- Extra line spools
- Fish grippers or landing nets (can be clipped to deck rigging)
- First aid kit
- Snacks and drinks
- Rain gear or extra clothing
Decision rule: If you use an item more than once per hour while actively fishing, it should be within reach. If you use it once per trip or less, it can stay in main storage.
Common mistake: Keeping too many items within reach, creating clutter that gets in the way of casting, landing fish, and paddling. Limit your immediate-access items to true essentials. You can always retrieve something from your main storage during a lull in the action.
For tools like pliers and cutters, use brightly colored models or add fluorescent tape. If you drop them on the kayak deck, you’ll spot them instantly against the hull color. Dark-colored tools disappear against most kayak decks and can slide overboard unnoticed.
How to Prevent Tackle from Falling Overboard on a Kayak
Prevent tackle from falling overboard by securing all boxes and bags with bungee cords or carabiners, using tool tethers for pliers and cutters, choosing tackle boxes with locking latches, and developing a habit of closing boxes immediately after use. Even small waves or sudden movements can send unsecured items into the water.
Securing strategies:
- Bungee cord rigging: Crisscross bungee cords over milk crates and tackle bags to hold them in place
- Carabiner clips: Clip tackle bag handles to deck rigging or D-rings
- Tool tethers: Retractable tethers (like fly fishing zingers) for pliers, cutters, and other tools
- Rod leashes: Coiled leashes connecting rod handles to kayak to prevent lost rods
- Locking latches: Tackle boxes with secure latches that won’t pop open if dropped
- Non-slip mats: Rubber or foam mats under tackle boxes to prevent sliding
High-risk items that need securing:
- Pliers and line cutters (most commonly dropped overboard)
- Small utility boxes (can slide off deck during turns)
- Rods not in holders (especially during fish fights)
- Loose lures and hooks (keep them in boxes, not loose on deck)
- Phones and electronics (use waterproof pouches with lanyards)
Habit development:
- Close boxes immediately: Don’t leave tackle boxes open while fishing
- One item at a time: Take out one lure, close the box, then rig the lure
- Secure before moving: Before paddling or repositioning, check that everything is secured
- Tether expensive items: Anything over $20 should have a backup attachment
What to do if something falls overboard:
Most tackle boxes and tools sink immediately. If you drop something valuable, mark the spot with your paddle or a mental landmark and consider whether it’s worth attempting retrieval (shallow water, clear bottom, valuable item). In most cases, accept the loss and continue fishing—capsizing while trying to retrieve a $10 lure isn’t worth the risk.
Edge case: In rough water or when fishing standing up (on stable platforms), double your securing efforts. Use both bungee cords and carabiners on main storage, and keep your active tackle box in a recessed area or between your feet where it can’t slide.
Consider bright-colored tackle boxes and tools. If something does go overboard in shallow, clear water, you’ll have a better chance of spotting it on the bottom. Fluorescent yellow, orange, and lime green show up well against most lake and river bottoms.
DIY Kayak Tackle Storage Solutions
DIY kayak tackle storage solutions include milk crate systems with PVC rod holders ($20-30 total cost), homemade tackle trays using foam board and waterproof boxes ($10-15), magnetic tool strips mounted on gunwales ($5-10), and bungee cord rigging using eye bolts and shock cord ($10-15). These projects require basic tools and save 50-70% compared to commercial kayak-specific products.
Popular DIY projects:
Milk Crate Rod Holder System
Materials: Milk crate ($10), 2-4 sections of 2-inch PVC pipe ($8), zip ties ($3), bungee cords ($5)
Steps:
- Cut PVC pipes to 12-inch lengths
- Insert pipes into crate holes at desired angles
- Secure with zip ties through crate holes
- Attach crate to kayak tank well with bungee cords
Cost: $20-30 vs. $80-120 for commercial crate systems
Foam Tackle Tray
Materials: Waterproof utility box ($8), foam board or pool noodles ($5), hot glue gun
Steps:
- Cut foam to fit inside utility box
- Create slots for lures by cutting channels in foam
- Glue foam to box bottom
- Store rigged lures with hooks embedded in foam
Cost: $10-15 vs. $25-40 for commercial foam inserts
Magnetic Tool Strip
Materials: Magnetic knife strip ($8), marine adhesive or stainless bolts ($3)
Steps:
- Position strip on gunwale or seat side within arm’s reach
- Attach with marine adhesive or drill and bolt
- Store pliers, cutters, and other metal tools on strip
Cost: $10-15 vs. $30-50 for kayak-specific tool holders
Custom Bungee Rigging
Materials: Eye bolts with backing plates ($8), shock cord ($5), cord locks ($3)
Steps:
- Drill holes and install eye bolts at strategic points
- Thread shock cord through eye bolts in desired pattern
- Add cord locks for adjustable tension
- Use to secure tackle bags, dry bags, and other gear
Cost: $15-20 vs. $40-60 for pre-installed rigging systems
DIY advantages:
- Significant cost savings (50-70% less than commercial products)
- Customization to your specific kayak and fishing style
- Satisfaction of building your own system
- Easy to modify or expand as needs change
DIY disadvantages:
- Requires basic tools (drill, saw, measuring tape)
- Takes time to plan and build
- May void kayak warranty if drilling holes
- No guarantee of fit or function like commercial products
Safety consideration: When drilling holes in your kayak for DIY mounts, stay above the waterline and use marine-grade sealant on all holes. Improper drilling can compromise hull integrity or create leak points. If unsure, use clamp-on or adhesive mounts instead.
For more kayak gear ideas and beginner kayak fishing tips, check out our other guides on setting up your fishing kayak for success.
FAQ
How much tackle should I bring on a kayak fishing trip?
Bring 1-2 tackle boxes (3600 or 3700 size) with 15-25 lures, one set of backup terminal tackle (hooks, weights, swivels), and essential tools (pliers, cutters). This covers most situations without overloading your kayak or creating clutter.
Can I use regular tackle boxes on a kayak or do I need waterproof ones?
Regular tackle boxes work if stored inside a milk crate or dry area, but water-resistant boxes with tight seals are better for kayak fishing. Fully waterproof boxes are necessary only for electronics and items that fail when wet.
Where should I store my phone while kayak fishing?
Store your phone in a waterproof pouch with a lanyard, clipped to your PFD or secured in a dry bag within reach. Never leave it loose on the deck or in an open pocket where it can fall overboard.
How do I organize tackle if my kayak doesn’t have a tank well?
Use a compact tackle bag positioned behind your seat and secured with bungee cords to deck rigging. Add flush-mount or clamp-on rod holders to the sides. Sit-inside kayaks work well with this minimalist approach.
Should I pre-rig multiple rods or tie knots on the water?
Pre-rig 2-3 rods with different techniques if you have the rod holders and deck space. This saves time and keeps you fishing instead of retying. For kayaks with limited space, pre-tie leaders at home and use loop-to-loop connections for quick changes.
What’s the best way to organize soft plastics to prevent them from melting together?
Store soft plastics in their original bags or in a binder system with individual sleeves. Never mix different brands or formulas in the same compartment—chemical reactions cause baits to melt and become unusable.
How do I keep my tackle organized when fishing multiple species in one trip?
Use separate utility boxes for each species or technique, color-coded for quick identification. Keep all bass tackle in one box, all panfish tackle in another, for example. Store boxes in your milk crate or tackle bag and swap them into your active position as needed.
Do I need a fish finder and where should I mount it?
A fish finder isn’t necessary for kayak fishing success but helps locate structure and fish in unfamiliar water. Mount it on a RAM mount or track system in front of your seat at eye level. Store the transducer in a scupper hole or mount it on the hull. For more details, see our guide on how to read a fish finder screen.
What tackle should I prioritize if I can only bring one small box?
Prioritize soft plastics (3-4 colors in versatile styles), 3-5 jig heads in different weights, a few hooks and weights, and one proven topwater lure. This minimal setup covers most bass, walleye, and panfish situations.
How do I prevent rust on hooks and metal tackle in a kayak?
Store hooks and metal tackle in water-resistant boxes with tight seals. Add silica gel packets to absorb moisture. Rinse saltwater tackle with freshwater after each trip and dry thoroughly before storage.
Can I use a backpack as kayak tackle storage?
A fishing backpack works well for kayak tackle if it’s water-resistant and has external attachment points for securing to the kayak. Position it behind your seat and secure with bungee cords. This approach works especially well for anglers who hike to remote launch sites.
What’s the minimum tackle organization I need to start kayak fishing?
Start with one tackle bag or box (3-4 trays), one flush-mount rod holder, pliers on a tether, and a small utility box for active lures. This $50-80 setup covers the essentials while you learn what else you need.
Conclusion
Organizing tackle on a kayak comes down to three principles: keep essentials within reach, secure everything to prevent loss, and balance your load for stability. Start with a simple system—one tackle bag or milk crate, a couple of rod holders, and a small box for active lures—then expand based on your actual fishing patterns.
The best tackle organization system is the one you’ll actually use and maintain. Complicated setups with dozens of boxes and specialized holders often create more problems than they solve, especially for anglers new to kayak fishing. Focus on accessibility and security over capacity.
Your next steps:
Assess your current kayak: Measure available deck space, identify mounting points, and determine whether you have room for a milk crate or need a compact tackle bag system.
Choose your primary storage: Decide between a milk crate (for capacity and customization) or tackle bag (for portability and weather protection) based on your fishing frequency and style.
Install rod holders: Mount 2-4 rod holders in positions you can reach comfortably while seated. Test with clamp-on holders before drilling permanent mounts.
Build your active tackle box: Select 10-15 lures you’ll actually use and organize them in a small waterproof utility box for the cockpit area.
Add securing systems: Install bungee cords, tool tethers, and rod leashes to prevent gear loss. Test everything during a practice paddle before your first fishing trip.
Refine over time: After 3-5 trips, evaluate what you used, what got in the way, and what you wished you had. Adjust your system accordingly.
Remember that tackle organization isn’t about having every possible lure and tool on the water—it’s about having the right items accessible when you need them. A well-organized kayak with 20 lures will outfish a cluttered kayak with 200 lures every time.
The water is waiting. Get your tackle organized, launch your fishing kayak, and focus on what matters most: catching fish.





