
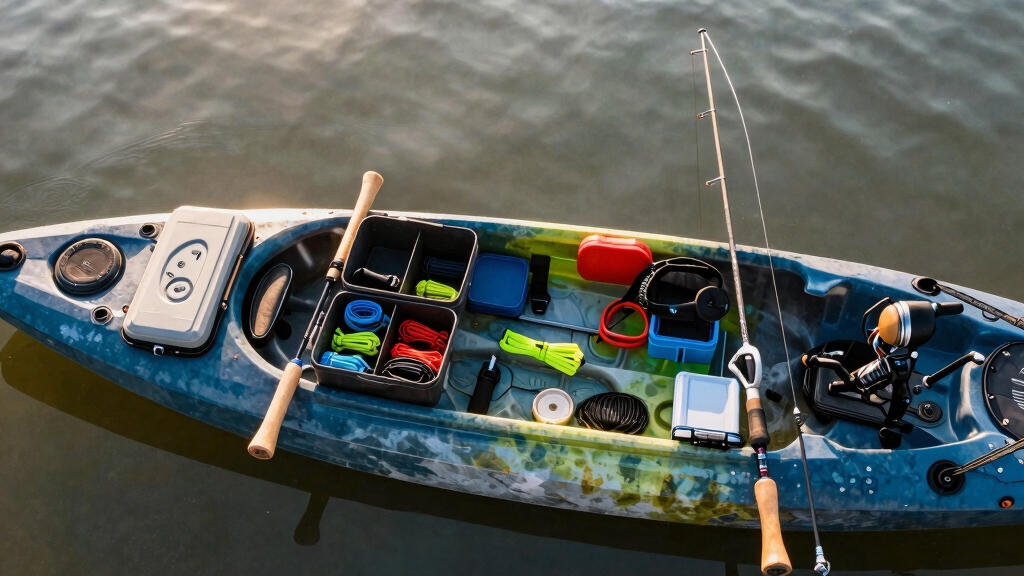
A fully rigged fishing kayak costs $2,000-$5,000 from the factory, but you can transform a basic recreational kayak into a functional fishing platform for under $200 using DIY rod holders, a milk crate system, and homemade anchor gear. Learning how to rig a kayak for fishing on a budget means prioritizing essential modifications first—rod storage, basic fish-finding tools, and anchor control—while skipping expensive electronics and pre-built accessories that triple your costs without improving your catch rate.
Key Takeaways
- Start with what you have: Most recreational kayaks work fine for fishing with simple modifications; you don’t need a dedicated fishing kayak to get started
- DIY rod holders cost $5-15 each using PVC pipe or flush-mount bases, compared to $40-80 for pre-installed factory systems
- Milk crate setups provide storage and rod holders for $10-20 total, matching the function of $150+ commercial crate systems
- Homemade anchor systems using paracord, a carabiner, and a 3-5 lb weight cost under $15 versus $60-120 for trolley kits
- Budget fish finders under $100 offer basic depth and fish-arch detection without the mapping features that drive prices to $300+
- No-drill mounting solutions preserve your kayak’s hull integrity and resale value while keeping modification costs low
- Essential beginner gear (rod, tackle box, PFD, paddle) matters more than electronics for your first season on the water
What Does Rigging a Kayak for Fishing Actually Mean?
Rigging a kayak for fishing means adding storage, rod holders, anchoring systems, and fish-finding tools to a basic kayak so you can fish hands-free, stay positioned over productive water, and manage multiple rods and tackle efficiently. The goal is creating a stable, organized platform that lets you focus on fishing instead of constantly managing gear or fighting wind and current.
For budget-conscious anglers, rigging focuses on three core systems:
- Rod management: Holders that secure rods while paddling and allow quick access when fish strike
- Gear storage: Waterproof containers, crates, or bags that keep tackle, tools, and safety equipment organized and accessible
- Position control: Anchor systems or drift socks that hold you over structure, weed lines, or drop-offs
The difference between a recreational kayak and a rigged fishing kayak isn’t the hull—it’s the accessories. A $300 recreational kayak with $150 in smart modifications outperforms a $1,500 fishing kayak with no added gear. The key is knowing which modifications actually improve your fishing versus which just add weight and complexity.
Common mistake: New kayak anglers often buy expensive electronics before mastering basic boat control and fish-finding skills. Start with anchor systems and rod holders; add a fish finder only after you’ve learned to read water, structure, and weather patterns from the kayak seat.
Can You Fish from a Regular Recreational Kayak or Do You Need a Fishing Kayak?
You can absolutely fish from a regular recreational kayak—thousands of anglers do it successfully every season. The main differences between recreational and dedicated fishing kayaks are factory-installed rod holders, wider hulls for stability, and pre-drilled mounting points, but you can add these features to any kayak for a fraction of the cost of buying a fishing-specific model.
Recreational kayaks work best for calm water fishing (ponds, lakes, slow rivers) where you’re casting light to medium tackle. They’re narrower than fishing kayaks, which means less initial stability but better speed and tracking. If you already own a recreational kayak, rig it first and fish a full season before deciding whether you need a dedicated fishing platform.
Choose a recreational kayak if:
- You’re fishing protected water with minimal wind and current
- You already own one and want to test kayak fishing before investing more
- You value speed and distance over standing stability
- Your budget is under $500 total for kayak plus rigging
Upgrade to a fishing kayak when:
- You’re fishing open water, tidal areas, or rivers with strong current
- You want to stand and sight-cast to fish
- You need to carry heavy gear (coolers, multiple rods, camping equipment)
- You’ve confirmed kayak fishing is a long-term commitment
For more guidance on choosing the right platform, check our fishing kayak buying guide.
Sit-On-Top vs Sit-Inside Kayak for Fishing on a Budget
Sit-on-top kayaks are better for fishing on a budget because they’re self-draining, easier to re-enter after a capsize, and offer more deck space for mounting rod holders and gear. Sit-inside kayaks cost less upfront but require spray skirts in rough water, offer limited storage access while fishing, and trap water in the cockpit if you flip.
For budget rigging, sit-on-top designs win because:
- Scupper holes drain water automatically—no bilge pump needed
- Open deck allows DIY mounting anywhere without worrying about cockpit access
- Easier to fish in warm weather without feeling trapped in a cockpit
- Simpler self-rescue if you capsize (just climb back on)
Sit-inside kayaks make sense only if you’re fishing cold water where hypothermia is a risk and you need the cockpit for warmth, or if you already own one and can’t justify buying a second kayak. Even then, fishing from a sit-inside requires more gear (spray skirt, bilge pump, float bags) that adds cost.
Budget tip: Used sit-on-top kayaks from big-box brands (Lifetime, Sun Dolphin, Perception) sell for $150-$300 on Craigslist and Facebook Marketplace. Look for models 10-12 feet long with molded-in rod holders and tank wells—these give you a head start on rigging without paying for a premium fishing brand.
Learn more about the pros and cons of different hull styles in our sit-on-top kayak guide.

UV-Protected HDPE Construction for Durability: Built with high-density polyethylene (HDPE) plastic, this kayak is both lightweight and highly durable, offering long-lasting protection against UV rays for years of use in various conditions. Paddle included.

Powerful & Responsive Propeller Drive System: Take control with our smooth kayak propeller drive system, offering hands-free power, quiet acceleration, and easy reverse maneuvering. Perfect for tight spaces, docks, or mangrove fishing

Ergolounge seating system : Extra-thick cushioning and an extra high and wide padded backrest.
How to Rig a Kayak for Fishing on a Budget: Essential Steps
Rigging a kayak for fishing on a budget follows a logical sequence: secure your gear first, add rod holders second, install position control third, and consider electronics last. This order prioritizes safety and function over convenience, ensuring you can fish effectively even if you never add the “nice-to-have” upgrades.

Budget-Friendly Fishing: Our product not only excels in functionality but is also incredibly budget-friendly. With just a standard milk crate, you'll have a fully featured, durable fishing solution that is more affordable than specialized kayak fishing crates.

VERSATILE STORAGE CONTAINERS - Containers can be used around the home, office, dorm, RV, or on shelves in the garage; great for sporting equipment, tools, or food organization; perfect boxes for moving
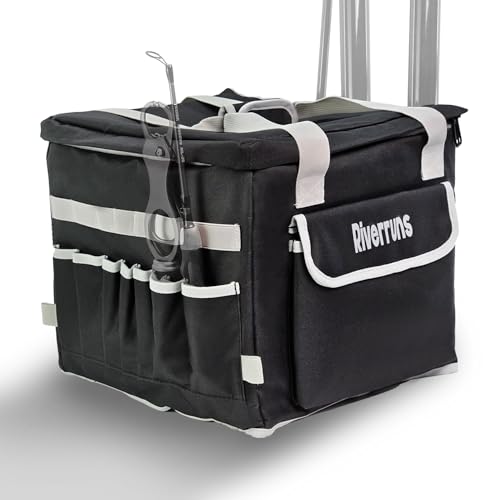
Budget-Friendly Fishing: Our product not only excels in functionality but is also incredibly budget-friendly. With just a standard milk crate, you'll have a fully featured, durable fishing solution that is more affordable than specialized kayak fishing crates.
Step 1: Add a Milk Crate or Gear Storage System
A plastic milk crate zip-tied to your rear tank well provides instant rod storage, tackle organization, and a raised platform for mounting additional accessories. Buy a standard dairy crate for $10-15 at a farm supply store, drill 1/4-inch holes in the bottom corners, and secure it to your kayak’s deck rigging or scupper holes with heavy-duty zip ties or bungee cord.
Milk crate advantages:
- Holds 3-4 rods vertically when you’re paddling between spots
- Creates compartments for tackle boxes, pliers, and safety gear
- Costs 90% less than commercial kayak crates ($150-200)
- Easily removable for transport or when fishing from shore
DIY upgrade: Cut 2-inch PVC pipe into 12-inch sections and zip-tie them vertically to the crate sides for dedicated rod holders. Total cost: $5 for 10 feet of PVC pipe.
Step 2: Install Rod Holders
Rod holders let you troll lures while paddling, secure rods while landing fish, and keep multiple rods rigged and ready. For budget rigging, you have two main options: flush-mount holders that sit in the kayak deck, or rail-mount holders that clamp to existing tracks or gunwales.
Cheapest option: PVC rod holders ($5-10 each)
- Cut 2-inch PVC pipe at a 30-degree angle, 8-10 inches long
- Mount to kayak deck using stainless steel U-bolts or hose clamps
- Angle toward the stern so rods lean back when inserted
- Seal the bottom end with a PVC cap to prevent water intrusion
No-drill option: RAM rod holders with Scotty mounts ($25-35 each)
- Use existing scupper holes or gear tracks for mounting
- Fully adjustable angle and position
- Removable for transport or when not fishing
- Preserves kayak resale value (no permanent holes)
Where to mount rod holders:
- Behind the seat (within arm’s reach while paddling)
- On the gunwales near your hips (for quick access while casting)
- In the tank well (for storage while moving between spots)
For detailed installation guidance, see our beginner kayak fishing resource.
Step 3: Create a Homemade Anchor System
An anchor system holds your kayak over productive structure, prevents wind drift, and lets you fish vertically under the boat. A basic DIY anchor setup costs $10-15 and works as well as commercial trolley systems that run $60-120.
Materials needed:
- 50-75 feet of 3/8-inch paracord or marine rope ($8-12)
- One heavy-duty carabiner ($3-5)
- 3-5 lb weight (dumbbell, dive weight, or mushroom anchor) ($5-10 used)
- Optional: small foam float to mark anchor location ($2)
How to make a kayak anchor system with rope and weights:
- Tie one end of the rope to your kayak’s bow or stern carry handle using a bowline knot
- Clip the carabiner to the other end of the rope
- Attach your weight to the carabiner
- Deploy by lowering the weight to the bottom, then cleat off excess rope to a deck cleat or wrap around a paddle
Pro tip: Tie a small foam float or empty water bottle 5 feet above your weight. If you need to release the anchor quickly (sudden weather, snag, or emergency), you can cut the rope and retrieve your anchor later by spotting the float.
This system lacks the convenience of a pulley-based anchor trolley (which lets you adjust anchor position from bow to stern while seated), but it costs 80% less and works perfectly for still-water fishing where you’re not fighting current or wind.
Step 4: Add Basic Fish-Finding Tools
Fish finders help you locate structure, depth changes, and suspended fish, but budget models under $100-150 provide 90% of the functionality of $400+ units. For kayak fishing on a budget, a basic sonar unit beats no electronics at all, and it beats expensive mapping units if you’re fishing small lakes and ponds where you can learn structure through exploration.
Best budget fish finder options for kayak under $200:
- Garmin Striker 4 ($120-150): 3.5-inch screen, basic sonar, waypoint marking
- Humminbird PiranhaMAX 4 ($100-130): 4.3-inch screen, dual-beam sonar, fish ID
- Lowrance Hook2-4x ($130-160): Wide-angle sonar, simple menu, good in shallow water
Where to mount a fish finder on a kayak without spending a lot:
Mount your transducer (the sonar sensor) in a scupper hole using a scupper transducer mount ($15-25) or inside the hull using marine epoxy and a shoot-through installation (free, but permanent). Mount the display screen on a RAM ball mount ($20-30) attached to your kayak’s gear tracks or a Scotty mount in a scupper hole.
Total fish finder setup cost: $150-200 including unit, transducer mount, and display mount.
Alternative: Skip the fish finder entirely your first season and learn to read water visually. Look for depth changes (color shifts from light to dark), structure (downed trees, weed lines, docks), and surface activity (baitfish jumping, birds diving). Many successful kayak anglers fish for years without electronics by focusing on visible structure and seasonal patterns.
For help interpreting sonar data once you do add a fish finder, read our guide on how to read a fish finder screen.
How to Install Rod Holders Without Drilling Holes in Your Kayak
Installing rod holders without drilling preserves your kayak’s structural integrity, maintains its resale value, and avoids potential leaks from improperly sealed holes. The three best no-drill methods are scupper mounts (using existing drain holes), rail mounts (clamping to gear tracks), and adhesive mounts (using marine-grade epoxy or 3M VHB tape).
Scupper hole mounts ($15-30):
- Fit into the kayak’s self-draining scupper holes
- Accept Scotty or RAM mounting systems
- Fully removable and adjustable
- Work only on sit-on-top kayaks with accessible scuppers
Gear track mounts ($20-40):
- Clamp or slide into factory-installed gear tracks
- Offer infinite positioning along the track length
- Require a kayak with existing track systems (common on fishing kayaks, rare on recreational models)
Adhesive mounts ($10-20 plus adhesive):
- Use marine epoxy or 3M VHB double-sided tape
- Create permanent (or semi-permanent) mounting points
- Work on any kayak surface (deck, gunwales, tank well)
- Require careful surface prep (clean with alcohol, dry completely, apply in warm weather)
Installation steps for scupper mounts:
- Choose a scupper hole within arm’s reach of your seat
- Insert the scupper mount base (it should fit snugly)
- Attach your rod holder to the mount using the manufacturer’s hardware
- Adjust angle so rods lean back 30-45 degrees when inserted
- Test by inserting a rod and paddling—adjust if the rod bounces or falls out
Common mistake: Over-tightening scupper mounts can crack the kayak hull. Tighten until snug, then back off a quarter turn. The mount should be secure but not crushing the plastic.
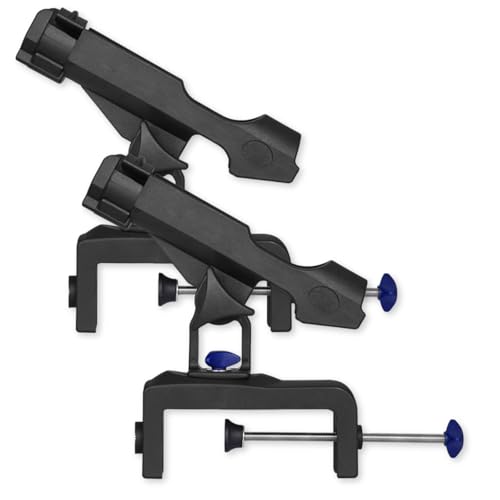
ZENFUN set of 2 adjustable boat rod holders for fishing with large clamp opening, including stainless steel screws hardware. Clamp max opening is 4.7in. Fishing rod holder gives you versatility and convenience while fishing.

【Durable and UV-Resistant】: Made from high-strength materials, it offers excellent UV resistance and corrosion resistance, maintaining structural integrity even under intense sunlight or in saltwater environments, and is resistant to brittleness over long-term use.
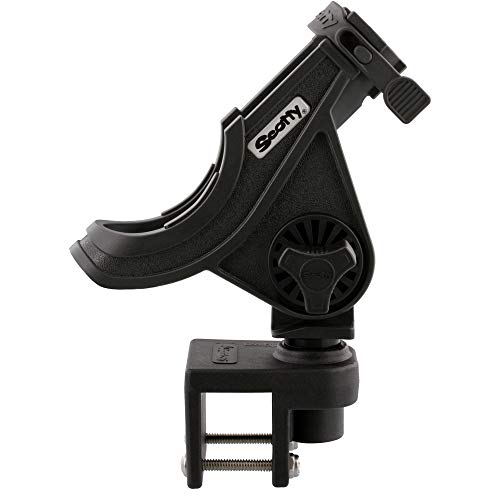
Holds a baitcaster reel in a cushioned cradle and a slot at the front also allows for a spinning reel to be securely held in position
What Fishing Gear Do You Actually Need for Kayak Fishing as a Beginner?
Beginner kayak anglers need a rod and reel, basic tackle, a personal flotation device (PFD), a paddle, and a way to secure caught fish—everything else is optional for your first season. Total cost for essential gear runs $150-250 if you shop smart and avoid the “kayak-specific” marketing that doubles prices without adding function.
Essential gear checklist:
- Rod and reel combo ($50-80): 6.5-7 foot medium-action spinning rod, good for bass, panfish, and light saltwater
- Basic tackle box ($20-30): Soft plastics, jigs, crankbaits, hooks, weights, and line in sizes appropriate for your target species
- PFD (life jacket) ($40-60): USCG-approved Type III with pockets for tools and safety gear
- Paddle ($40-80): 220-240 cm length for most kayak anglers; often included with used kayaks
- Stringer or fish bag ($5-15): To secure your catch without taking up cooler space
- Pliers and line cutters ($10-15): For hook removal and cutting line
- Dry bag ($15-25): For phone, keys, wallet, and other items that can’t get wet
Optional but helpful:
- Anchor system ($10-15 DIY)
- Rod holders ($5-30 each)
- Milk crate storage ($10-20)
- Fish finder ($100-150)
What you don’t need: Kayak-specific fishing rods (regular rods work fine), expensive tackle (fish don’t care about brand names), or a fishing kayak (a recreational kayak works for most situations). Focus your budget on a quality PFD and a reliable rod—these directly affect your safety and success.
For more on getting started, visit our kayak fishing hub.
Do You Really Need an Anchor System for Kayak Fishing?
You need an anchor system if you’re fishing structure (drop-offs, weed edges, submerged timber) or dealing with wind and current that push you off productive water. For calm-water fishing in small ponds or when drift-fishing open flats, you can skip the anchor and save the weight and hassle.
When an anchor is essential:
- Vertical jigging over structure or suspended fish
- Fishing precise locations (dock pilings, weed pockets, rock piles)
- Windy days when drift speed exceeds your casting range
- Current-heavy rivers where you need to hold position
When you can skip the anchor:
- Drift-fishing large flats where covering water is the goal
- Calm mornings with no wind
- Fishing from shore or shallow water where you can beach the kayak
- Trolling (moving while fishing)
Budget alternative to anchors: A drift sock (sea anchor) slows your drift without stopping you completely. DIY versions cost $5-10 using a 5-gallon bucket with holes drilled in the bottom, tied to 20 feet of rope. Deploy it off the stern to slow wind drift by 50-70%.
Milk Crate Kayak Setup vs Expensive Crate Systems
A standard milk crate zip-tied to your kayak’s tank well provides 80% of the function of a $150-200 commercial kayak crate at 10% of the cost. The main differences are aesthetics, custom rod holder integration, and mounting hardware—none of which significantly improve your fishing success.
Milk crate advantages ($10-20 total):
- Holds 3-4 rods vertically
- Stores tackle boxes, pliers, and safety gear
- Easily removable for transport
- Customizable with DIY rod holders and tool clips
Commercial crate advantages ($150-250):
- Molded rod holders at optimal angles
- Integrated mounting systems (no zip ties)
- Better aesthetics and color matching
- Slightly lighter weight (molded plastic vs. solid crate)
How to upgrade a milk crate for fishing:
- Drill 1/4-inch holes in the bottom corners for drainage and mounting
- Zip-tie or bungee the crate to your kayak’s deck rigging or tank well
- Add 2-inch PVC rod holders to the sides (cut at 30-degree angles, 10-12 inches long)
- Attach a small dry bag or mesh bag inside for small tackle and tools
- Clip a rod leash to the crate handle to prevent losing rods overboard
Total DIY cost: $15-25 including crate, zip ties, PVC pipe, and hardware.
When to buy a commercial crate: If you’re rigging a high-end fishing kayak and want a polished look, or if you need a crate that mounts to a specific track system. Otherwise, save your money for rods, tackle, and gas to the lake.
DIY Kayak Fishing Setup Under $100
A complete DIY kayak fishing setup under $100 includes a milk crate for storage, two PVC rod holders, a homemade anchor system, and basic safety gear. This assumes you already own a kayak and paddle; if you’re starting from scratch, look for a used recreational kayak ($150-300) and add these modifications.
$100 budget breakdown:
- Milk crate ($10-15): Storage and rod holder base
- PVC rod holders (2) ($10-15): 2-inch PVC pipe, U-bolts, and caps
- Anchor system ($10-15): Paracord, carabiner, and 3-5 lb weight
- Dry bag ($15-20): For phone, keys, and wallet
- Rod leash ($8-12): Prevents losing rods overboard
- Zip ties and bungee cord ($10-15): For securing gear and crate
- Remaining budget ($15-30): Tackle (soft plastics, jigs, hooks, weights)
What this setup lets you do:
- Store and transport 3-4 rods safely
- Hold position over structure with the anchor
- Keep gear organized and accessible
- Protect valuables from water damage
What you’ll add later (when budget allows):
- Fish finder ($100-150)
- Additional rod holders ($25-35 each for no-drill mounts)
- Upgraded anchor trolley system ($60-80)
- Kayak cart for transport ($50-80)
This bare-bones setup is enough to catch fish consistently. Many kayak anglers fish this way for years before upgrading to electronics or premium accessories.
Common Mistakes When Rigging a Fishing Kayak for the First Time
First-time kayak riggers often over-accessorize, drill unnecessary holes, or mount gear in locations that interfere with paddling and balance. The biggest mistake is adding weight and complexity before understanding how you’ll actually fish from the kayak.
Top rigging mistakes to avoid:
- Drilling holes before testing gear placement: Use temporary mounts (scupper mounts, adhesive mounts, zip ties) for your first season to learn where you actually need rod holders and accessories
- Mounting rod holders too far forward: Rods mounted ahead of the seat catch your paddle stroke and create snag points; keep holders behind your hips or in the tank well
- Adding too much gear: Every pound of accessories reduces speed, stability, and range; start minimal and add only what you use regularly
- Ignoring weight distribution: Heavy gear (coolers, batteries, tackle boxes) should sit low and centered to maintain stability; avoid stacking weight high in a milk crate
- Skipping a test paddle: Rig your kayak, then paddle it in calm water before fishing to identify balance issues, paddle interference, and access problems
Pro tip: Take photos of your rigging setup before and after each fishing trip. Over time, you’ll notice which gear you actually use and which just adds weight. Remove anything you haven’t touched in three trips.
Is Kayak Fishing Worth It If You’re on a Tight Budget?
Kayak fishing is worth it on a tight budget because the total cost of entry ($300-500 for a used kayak plus basic rigging) is 90% less than a bass boat and gives you access to water that’s off-limits to larger boats. You’ll catch the same fish as anglers in $40,000 boats, often in less-pressured water, while spending a fraction of the money on fuel, maintenance, and storage.
Budget kayak fishing advantages:
- Low entry cost: $300-500 total for used kayak and DIY rigging
- No trailer, registration, or insurance: Most states don’t require registration for kayaks under 10-12 feet
- Access to small water: Ponds, creeks, and backwaters that boats can’t reach
- Minimal maintenance: Rinse after use, store out of sun—that’s it
- Easy transport: Roof rack, truck bed, or even inside an SUV
Budget kayak fishing disadvantages:
- Limited range: 2-5 miles per trip depending on fitness and conditions
- Weather-dependent: Wind, waves, and current limit fishing days
- Gear constraints: Less storage than a boat; must prioritize essentials
- Physical demand: Paddling and fishing simultaneously requires fitness
Is it worth it? If you fish 10+ times per season, kayak fishing pays for itself in saved boat launch fees, fuel, and maintenance within the first year. If you fish less than 5 times per season, consider renting kayaks or fishing from shore until you’re sure kayak fishing fits your lifestyle.
For more insights on getting started, check out our fishing kayak comparison guide.
Frequently Asked Questions
How much does it cost to rig a kayak for fishing on a budget?
You can rig a basic kayak for fishing for $50-150 using DIY rod holders, a milk crate, and a homemade anchor system. Adding a budget fish finder increases the total to $200-300. This assumes you already own a kayak and paddle.
Can I use a cheap kayak for fishing?
Yes, budget kayaks from brands like Lifetime, Sun Dolphin, and Pelican work fine for fishing in calm water. Look for sit-on-top models 10-12 feet long with molded-in rod holders and tank wells. Avoid ultra-cheap inflatable kayaks under $150—they lack the stability and durability for fishing.
Do I need to drill holes in my kayak to add rod holders?
No, you can use scupper mounts, gear track mounts, or marine adhesive to install rod holders without drilling. These no-drill methods preserve your kayak’s hull integrity and resale value while providing secure mounting points.
What’s the best DIY rod holder for a kayak?
PVC pipe rod holders are the cheapest and most customizable DIY option. Cut 2-inch PVC at a 30-degree angle, 8-10 inches long, and mount it to your kayak deck using U-bolts or hose clamps. Total cost is $5-10 per holder.
How do I keep my kayak from drifting while fishing?
Use a homemade anchor system (paracord, carabiner, and 3-5 lb weight) to hold position over structure. Deploy the anchor off the bow or stern and cleat off excess rope. For less than $15, this setup stops wind and current drift effectively.
Can you fish from a kayak without a fish finder?
Yes, many kayak anglers fish successfully without electronics by reading water visually (depth changes, structure, surface activity) and focusing on seasonal patterns. A fish finder helps but isn’t essential, especially in small lakes and ponds where you can learn structure through exploration.
What size kayak is best for fishing on a budget?
A 10-12 foot sit-on-top kayak offers the best balance of stability, storage, and affordability for budget fishing. Shorter kayaks (under 10 feet) lack storage and speed; longer kayaks (over 12 feet) cost more and are harder to transport.
How do I transport a fishing kayak on a budget?
Use foam blocks or pool noodles under the kayak hull and cam straps over the roof of your car. This costs $20-30 versus $150-300 for a roof rack system. For more transport ideas, see our DIY kayak transport guide.
Do I need a kayak cart to launch my fishing kayak?
A kayak cart helps if you’re launching from parking lots far from the water, but it’s not essential. Many anglers carry their kayak short distances or drag it on grass using the hull’s built-in handles. DIY carts cost $30-50 using PVC pipe and wheels from a hardware store.
What’s the cheapest way to add storage to a fishing kayak?
Zip-tie a plastic milk crate to your rear tank well for $10-15. This provides rod storage, tackle organization, and a platform for mounting additional accessories. It’s 90% as functional as $150-200 commercial crate systems.
How long does it take to rig a kayak for fishing?
A basic DIY rigging setup (milk crate, PVC rod holders, anchor system) takes 2-4 hours to complete. Installing a fish finder adds another 1-2 hours. Most modifications can be done in a single afternoon with basic tools.
Can you stand and fish from a budget kayak?
Most budget recreational kayaks are too narrow (under 30 inches wide) for safe standing. If standing is important, look for a used fishing kayak 32+ inches wide, or stick to seated fishing in your budget kayak. Standing isn’t necessary to catch fish from a kayak.
Conclusion
Learning how to rig a kayak for fishing on a budget opens up miles of productive water without the cost and complexity of a bass boat. By focusing on essential modifications—DIY rod holders, a milk crate storage system, and a homemade anchor—you can transform a basic recreational kayak into a functional fishing platform for under $200. Skip the expensive electronics and pre-built accessories until you’ve spent a full season on the water and know exactly what you need.
Your next steps:
- Test your current kayak (if you own one) by fishing from it with minimal gear to see what modifications you actually need
- Start with storage and rod holders—these provide the biggest improvement in fishing efficiency for the lowest cost
- Add an anchor system once you’ve identified productive structure and need to hold position
- Consider a fish finder only after you’ve mastered reading water visually and understand your local fishing spots
The best rigging setup is the one you’ll actually use. Start simple, fish often, and add gear only when you’ve identified a specific problem to solve. Your catch rate depends far more on time on the water and fishing skill than on expensive accessories.
For more guidance on getting started with kayak fishing, explore our beginner kayak fishing resources and fishing gear recommendations.





