
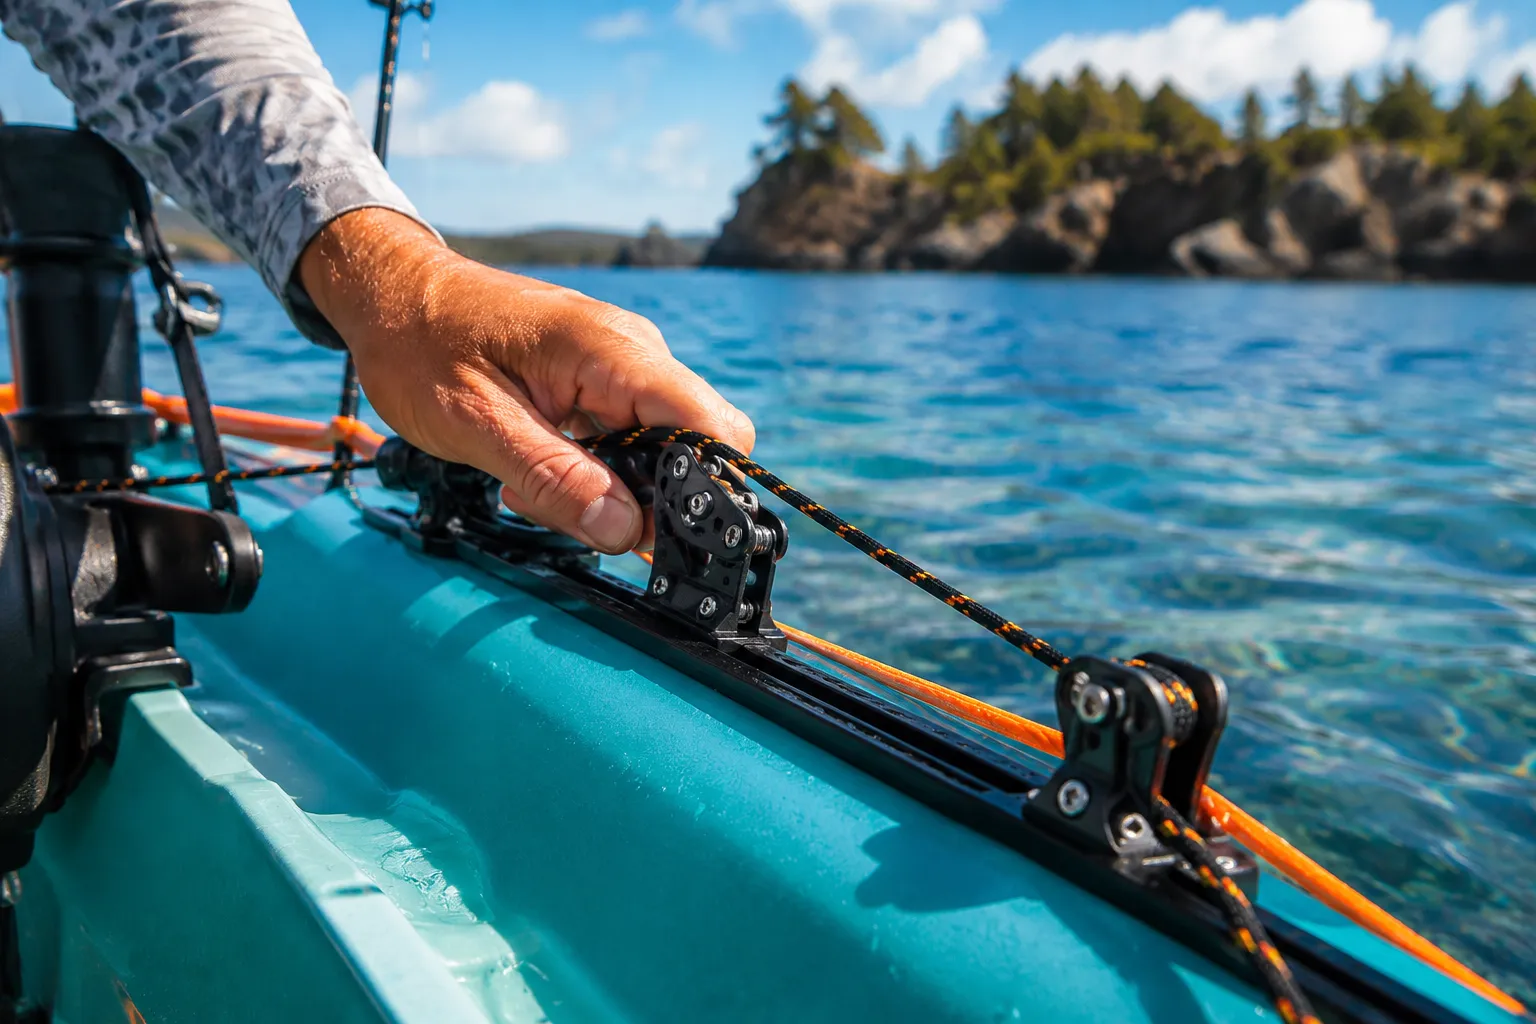
Quick Answer
An anchor trolley is a rope-and-pulley system mounted along the side of a kayak that lets you adjust where your anchor line attaches from bow to stern. Instead of anchoring from a fixed point, you slide the attachment point along the trolley to position your kayak at the best angle for wind, current, or casting. Most kayak anglers who fish in current, wind, or need precise boat positioning will benefit from an anchor trolley, while casual recreational paddlers in calm water rarely need one.
Key Takeaways
- An anchor trolley allows you to reposition your anchor attachment point along the kayak’s length without pulling up the anchor
- The system uses a continuous rope loop running through pulleys at bow and stern, with a ring or clip that slides along it
- Kayak anglers fishing in current or wind gain better boat control and casting angles compared to fixed-point anchoring
- Installation costs $30-$80 for a complete kit and takes 1-2 hours with basic tools
- Sit-on-top kayaks are easier to rig with anchor trolleys than sit-inside models due to accessible gunwales
- The trolley prevents dangerous side anchoring, which can capsize a kayak in current or waves
- Recreational paddlers who only anchor in calm, protected water may not need the added complexity
- Common mistakes include mounting pulleys too close together, using rope that’s too thin, and not securing the trolley line properly
What Is an Anchor Trolley System for Kayaks?
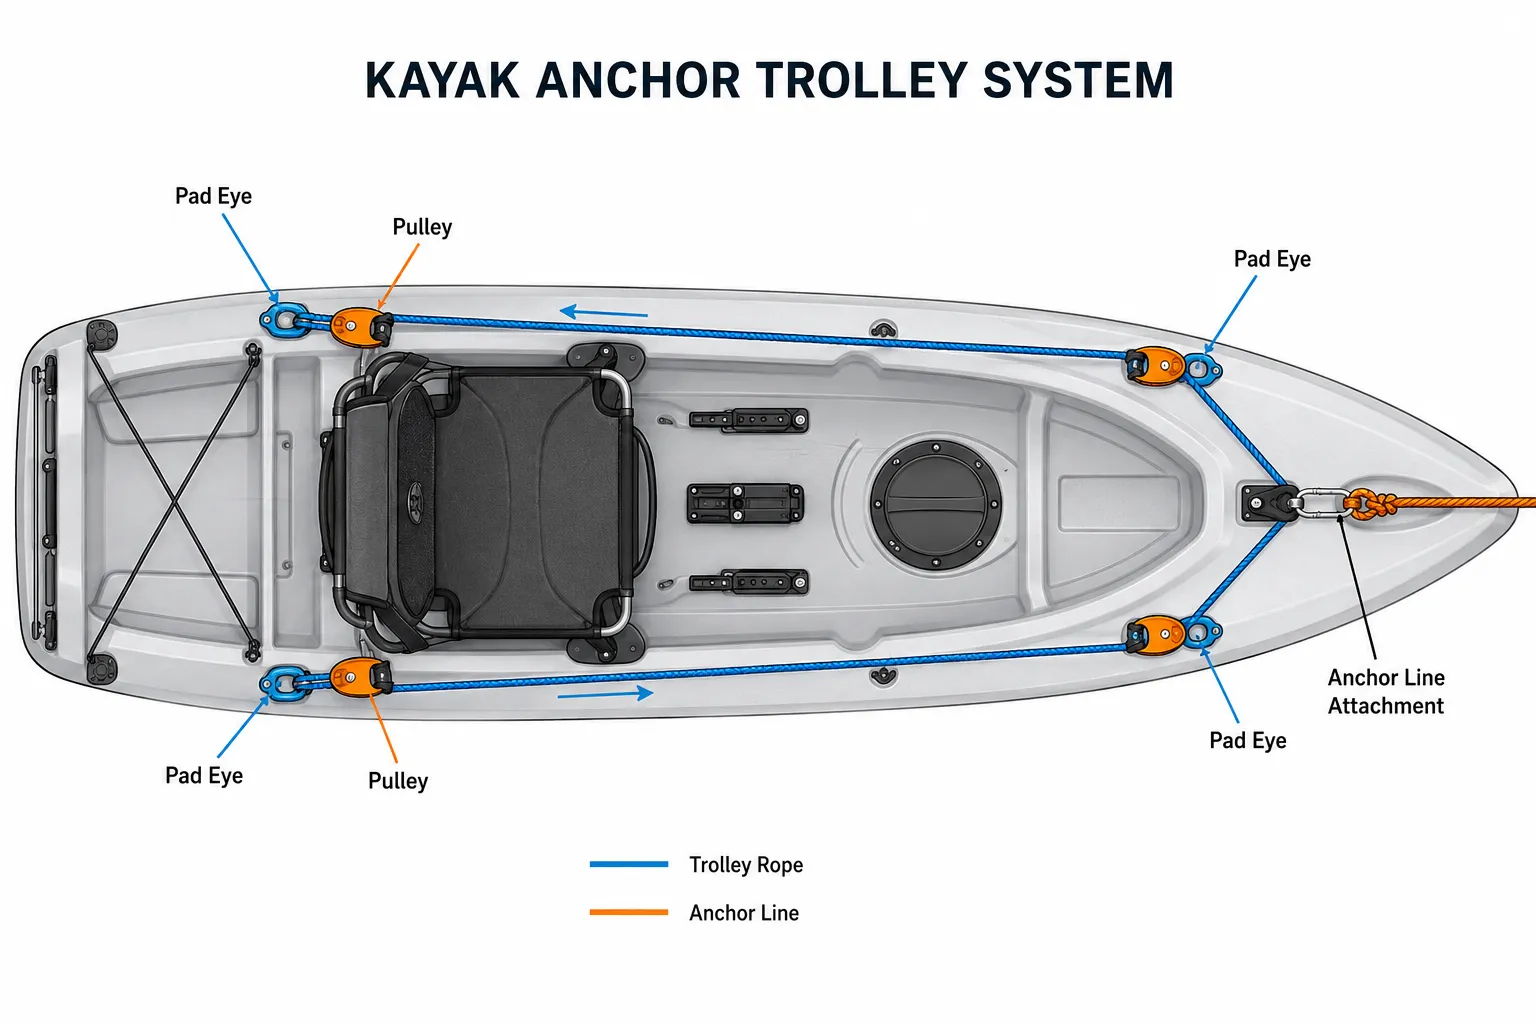
An anchor trolley system is a mechanical setup that runs the length of your kayak, allowing you to move your anchor attachment point from bow to stern while the anchor stays on the bottom. The system consists of a continuous loop of rope threaded through pulleys or pad eyes mounted at each end of the kayak, with a ring or carabiner that slides along the rope to connect your anchor line.
The basic components include:
- Two pulleys or pad eyes mounted at bow and stern
- Continuous rope loop (typically 30-50 feet depending on kayak length)
- Sliding ring or carabiner that connects to your anchor line
- Cleat or cam cleat to lock the trolley position (optional but recommended)
When you drop anchor, you can pull the trolley rope to slide the attachment point forward, backward, or anywhere in between. This positions your kayak at the optimal angle to the wind or current without having to pull up the anchor and reset it. The system works because the anchor stays fixed on the bottom while you adjust which part of your kayak the anchor line pulls from.
Choose an anchor trolley if: you fish in areas with current, wind, or changing conditions where boat positioning matters for casting or bait presentation.
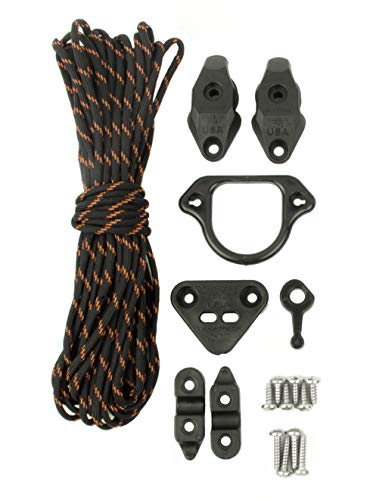

Anchor ring,pad eyes and carabiner of the kayak anchor trolley system are all made of 316 stainless steel,which is more anti-rust and wear resistance,strong and durable,enhance the stability and safety of the anchor trolley system.
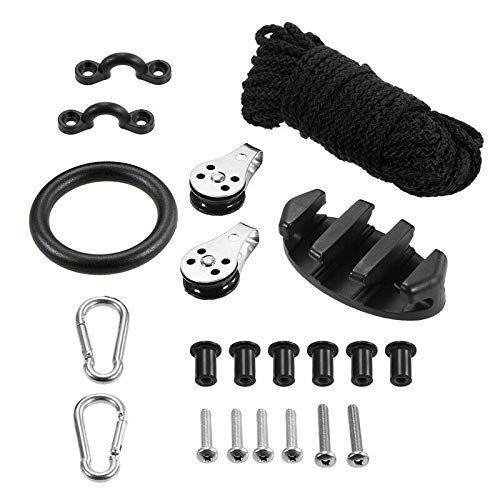
✔Feature:Durable, Seaworthy Materials: Made of tough, corrosion-proof stainless steel, nylon hardware and an ultra-strong paracord (USA made) with a reflective tracer that adds visibility in low-light situations.
How Does an Anchor Trolley Work on a Kayak?
An anchor trolley works by creating a movable attachment point along your kayak’s length using a rope-and-pulley system. When you pull one side of the trolley rope, the ring slides toward that end of the kayak, changing where the anchor line pulls from and rotating your kayak to a different angle.
Here’s the step-by-step process:
- Drop your anchor from the side of the kayak as usual
- Clip your anchor line to the ring on the trolley system
- Pull the trolley rope toward the bow or stern to slide the ring
- Watch your kayak rotate as the anchor point moves along the side
- Lock the position using a cleat or by holding the rope when you reach the desired angle
The physics is simple: your anchor creates a fixed point on the bottom, and by changing where that force pulls on your kayak, you control which direction the boat points. Pull the trolley forward and your bow swings into the current or wind. Pull it back and your stern faces the flow.
Common mistake: Not using a cleat or locking mechanism. Without one, the trolley can slip when you’re fighting a fish or dealing with waves, and your boat position changes unexpectedly.
The system shines in situations where conditions change throughout the day. Morning might have wind from the east, then it shifts south by afternoon. Instead of pulling anchor and resetting multiple times, you adjust the trolley in seconds and keep fishing.
Anchor Trolley vs Regular Anchor Setup
A regular anchor setup attaches your anchor line to a single fixed point on your kayak, usually a cleat or pad eye at the bow. An anchor trolley adds adjustability by letting you move that attachment point anywhere along the kayak’s side, giving you control over boat angle and position.
Fixed-point anchoring:
- Anchor line ties to one location (typically bow)
- Kayak always points the same direction relative to anchor
- Simple, fewer components, nothing to adjust
- Works fine in calm water with no current
- Dangerous if anchored from the side in current
Anchor trolley system:
- Anchor line clips to a sliding ring
- Kayak angle adjusts by moving the ring position
- More components, slightly more complex
- Essential for fishing in wind or current
- Prevents side-anchoring accidents by design
The biggest safety advantage is that a trolley naturally prevents you from anchoring from the side of your kayak, which is the most dangerous anchoring mistake. Side anchoring in current can flip your kayak because water pushes against the broadside while the anchor holds you in place. With a trolley, you always anchor from a point along the length of the boat, keeping you stable.
Choose a regular setup if: you only paddle calm lakes, rarely anchor, or want the simplest possible system.
Choose a trolley if: you fish moving water, deal with wind, need precise boat positioning, or want maximum versatility.
Do I Really Need an Anchor Trolley for Kayak Fishing?
You need an anchor trolley for kayak fishing if you regularly fish in current, wind, or situations where boat angle affects your success. Anglers targeting structure, drifting specific lines, or presenting baits in current will find a trolley essential, while those fishing calm ponds or protected coves can often skip it.
You definitely need a trolley if:
- You fish rivers or tidal areas with current
- Wind regularly affects your boat position
- You target specific structure and need precise positioning
- You drift fish and want to control your drift angle
- You fish from a standing position and need stability
You can probably skip a trolley if:
- You only fish small, protected ponds
- You rarely anchor (prefer drifting or paddling)
- You’re a recreational paddler, not focused on fishing
- Your fishing style doesn’t require precise boat positioning
- You’re trying to keep your kayak as simple as possible
The decision often comes down to your local conditions. A kayak angler in Florida fishing tidal flats needs a trolley. Someone fishing a calm mountain lake for trout might never miss it. Consider your worst fishing day last season: would adjusting your boat angle without pulling anchor have helped? If yes, you need a trolley.
Real-world example: Bass fishing around docks requires casting parallel to the structure. Without a trolley, you’re stuck with whatever angle your bow-mounted anchor gives you. With a trolley, you slide the attachment point to position your kayak perfectly parallel to the dock, giving you the ideal casting angle for every pocket.
How Much Does a Kayak Anchor Trolley Cost?
A complete kayak anchor trolley kit costs between $30 and $80 depending on quality and components, with most anglers spending around $50 for a reliable setup. DIY installations using individual parts from a hardware store can run as low as $20-$30, while premium kits with stainless steel hardware and specialized marine components reach $80-$100.
Budget breakdown:
| Component | Budget Option | Mid-Range | Premium |
|---|---|---|---|
| Complete kit | $30-$40 | $50-$60 | $70-$100 |
| Pulleys (pair) | $8-$12 | $15-$20 | $25-$35 |
| Rope (50 ft) | $5-$8 | $10-$15 | $15-$25 |
| Pad eyes/cleats | $5-$10 | $10-$15 | $15-$20 |
| Hardware/screws | $5-$8 | $8-$12 | $10-$15 |
What affects the price:
- Material quality: Plastic pulleys vs stainless steel or anodized aluminum
- Rope type: Basic nylon vs marine-grade UV-resistant line
- Kit completeness: Some include all hardware and tools, others just the basics
- Brand: Name-brand marine companies charge more than generic hardware store parts
Most kayak anglers find that mid-range kits ($50-$60) offer the best balance of durability and value. Budget kits work fine for occasional use but may need replacement sooner. Premium kits make sense if you fish saltwater regularly or want components that will last a decade.
Installation costs: If you’re not comfortable drilling into your kayak, some kayak shops will install a trolley for $50-$100 in labor, bringing your total investment to $80-$180.

Premium Materials: Our kit comes with a solid 0.39in x 32.81ft Rope, providing ample length and exceptional durability. The stainless steel pulley blocks offer resistance to rust and wear, boasting a robust structure manufactured through a stringent process, ensuring reliability and longevity. Additionally, the versatile nylon cleat can be used alongside ropes to securely fix paddles, nets, poles, and other items on your kayak, boat, or canoe.

EASY INSTALL: The trolley kit is easy and quick to install and comes with detailed installation instructions, it only takes 10 minutes to achieve standard installation. And we provide installation guidance, which will solve your troubles

MAKE EASIER TO FISH WHEN WINDY: This Kayak Anchor System can easily adjust the direction of the fishing kayak in wind or waves, work with anchor pole can allowing you to always adapt to the current or wind direction. Let you fully enjoy the fishing time
How to Install an Anchor Trolley on a Kayak
Installing an anchor trolley takes 1-2 hours and requires drilling two to four holes in your kayak, mounting pulleys or pad eyes at bow and stern, and threading rope through the system. The process is straightforward with basic tools, but careful measurement and waterproof sealing are critical to avoid leaks.
Tools and materials needed:
- Anchor trolley kit or individual components
- Drill with bits (typically 1/4″ or size specified by kit)
- Marine sealant (silicone or 3M 5200)
- Measuring tape and marker
- Screwdriver or wrench
- Sandpaper (optional, for surface prep)
Step-by-step installation:
Plan your mounting points: Measure and mark pulley locations at bow and stern, typically 6-12 inches from each end, positioned where you can reach them while seated. The pulleys should be high enough on the side that the rope clears your thigh when paddling.
Drill pilot holes: Use a bit smaller than your mounting screws to drill pilot holes at each marked location. Drill slowly to avoid cracking the plastic.
Apply marine sealant: Coat the mounting hardware threads and the back of each pulley or pad eye with marine sealant before installation. This prevents water from entering through the holes.
Mount the hardware: Install pulleys or pad eyes at bow and stern, tightening screws firmly but not over-tightening (which can crack plastic). Wipe away excess sealant.
Thread the rope: Run your trolley rope through the bow pulley, down the side of the kayak, through the stern pulley, and back up the other side to create a continuous loop. The rope should run along the gunwale or rail where it won’t interfere with paddling.
Attach the ring: Add your sliding ring or carabiner to the rope loop. This is what your anchor line will clip to.
Add a cleat (optional but recommended): Mount a small cleat near your seat where you can easily reach it to lock the trolley position.
Test the system: Pull the rope to slide the ring back and forth. It should move smoothly without binding. Adjust rope tension if needed.
Common installation mistakes:
- Mounting pulleys too close together (reduces adjustment range)
- Not using marine sealant (leads to leaks)
- Using rope that’s too thin (wears out quickly, hard to grip)
- Positioning pulleys where they interfere with paddle strokes
- Over-tightening screws and cracking the kayak hull
Pro tip: Before drilling, sit in your kayak and simulate reaching for the trolley rope in different positions. Make sure you can comfortably adjust it while seated and while dealing with a fish.

Effortless Single-Handed Control: Say goodbye to complicated anchor adjustments. With an intuitive lock-and-release mechanism, you can secure your position with one hand, leaving the other free for paddling, fishing, or relaxing.

Folding Grapnel Boat Anchor: Perfect for small boats, kayaks, canoes, dinghies, paddle boards, and more. Whether you're anchoring for SUP yoga, jet skiing, or kayak fishing, this versatile anchor ensures stability and reliability on the water.

【You Will Get】Kayak anchor trolley kit include:1 x 5mm diameter,33ft length reflective rope,1 x zig zag cleat,1 x rigging o ring,2 x stainless steel snap hooks,2 x pulleys,4 x nylon pad eyes,8 x M5x25mm screws,2 x M5x30mm screws,10 x M5 rubber nut.
Can You Use an Anchor Trolley in Strong Current?
You can use an anchor trolley in strong current, and it actually becomes more valuable as current speed increases because it lets you position your kayak to minimize drag and maintain stability. However, strong current requires a heavier anchor, proper technique, and awareness that even with a trolley, there are current speeds where anchoring becomes unsafe.
How trolleys help in current:
- Reduce drag: Position your kayak bow-first into current to present the smallest profile
- Prevent broaching: Adjust angle if current shifts direction
- Maintain stability: Keep the pull along your kayak’s length, not from the side
- Control drift: Fine-tune your position over structure without re-anchoring
Technique for strong current:
- Approach from downstream: Paddle upstream past your target spot, then drift back while deploying anchor
- Use adequate anchor weight: Strong current needs 3-5 pounds more than calm water
- Set the trolley forward: Pull the ring toward the bow so your kayak points upstream
- Monitor your position: Current can shift, so check that you’re not swinging into danger
- Have a quick-release: Use a carabiner or quick-release clip so you can detach instantly if needed
Safety limits: If the current is strong enough that you struggle to paddle upstream at all, it’s probably too strong to anchor safely. A good rule is if you can’t make forward progress paddling at 75% effort, the current is too strong for anchoring.
When to skip anchoring in current:
- Current speed exceeds 2-3 mph (varies by kayak and anchor)
- Debris is flowing downstream (logs, vegetation)
- You’re alone and conditions feel marginal
- Water depth exceeds your anchor line length by more than 3:1 ratio
Edge case: In tidal areas, current speed changes throughout the tide cycle. You might anchor successfully at slack tide, but as current builds, you may need to reposition or pull anchor entirely. Always monitor conditions and have an exit plan.
Anchor Trolley for Sit-On-Top vs Sit-Inside Kayak
Anchor trolleys are easier to install and more practical on sit-on-top kayaks because the gunwales and rails provide accessible mounting points and the rope runs outside the cockpit. Sit-inside kayaks can use trolleys but require more careful planning to route the rope around the cockpit opening and may need deck-mounted pulleys instead of side-mounted ones.
Sit-on-top kayak advantages:
- Gunwales provide natural mounting locations for pulleys
- Rope runs along the outside rail, easy to access
- No cockpit to work around when routing rope
- Simpler installation with fewer compromises
- Most fishing kayaks are sit-on-top, so kits are designed for them
Sit-inside kayak considerations:
- Rope must route around the cockpit opening
- May need deck-mounted pad eyes instead of side pulleys
- Harder to reach trolley rope while seated in cockpit
- Rope can interfere with paddle strokes if not positioned carefully
- Better suited for touring kayaks with deck rigging already in place
Installation differences:
For sit-on-top kayaks, mount pulleys on the side rails at bow and stern, and run the rope along the gunwale. The rope stays outside the seating area and is easy to grab.
For sit-inside kayaks, mount pad eyes on the deck near bow and stern, and route the rope along the deck edge or through existing deck rigging. The rope needs to stay out of the cockpit but remain accessible, which often means running it closer to the centerline.
Which works better? If you’re choosing between kayak types and plan to use an anchor trolley regularly, sit-on-top designs are more practical for this specific feature. If you already own a sit-inside kayak, a trolley is still possible but expect a more complex installation and slightly less convenient operation.
What Are Common Mistakes When Setting Up an Anchor Trolley?
The most common anchor trolley mistakes include mounting pulleys too close together (limiting adjustment range), using rope that’s too thin or slippery (making it hard to grip and control), failing to seal mounting holes properly (causing leaks), and not including a cleat or locking mechanism (letting the trolley slip when you need it locked).
Top installation and setup mistakes:
1. Pulleys mounted too close together
- Reduces the range of adjustment
- Limits your ability to position the kayak at extreme angles
- Fix: Mount pulleys as far apart as practical, typically 6-12 inches from bow and stern tips
2. Wrong rope choice
- Too thin: hard to grip, wears out quickly, cuts into hands
- Too thick: doesn’t run smoothly through pulleys
- Too slippery: slides when you want it locked
- Fix: Use 3/16″ to 1/4″ marine-grade rope with some texture
3. No marine sealant on mounting holes
- Water enters through screw holes
- Can cause rot in foam-core kayaks or damage to internal components
- Fix: Always use marine sealant on threads and under hardware
4. Missing cleat or locking mechanism
- Trolley slips when fighting fish or in waves
- Boat position changes unexpectedly
- Fix: Add a small cleat near your seat to lock the rope
5. Rope too loose or too tight
- Too loose: sags into water, creates drag, gets tangled
- Too tight: hard to slide the ring, binds under load
- Fix: Adjust tension so rope is snug but ring slides smoothly
6. Pulleys positioned where they interfere with paddling
- Rope catches on paddle blade
- Pulleys hit your hands during forward stroke
- Fix: Test paddle clearance before drilling final holes
7. Using the trolley as the anchor line
- Some beginners tie the anchor directly to the trolley rope
- This puts all anchor load on the pulleys, which aren’t designed for it
- Fix: Always use a separate anchor line that clips to the trolley ring
8. Not testing before heading out
- First time using the trolley is on the water in current
- Discover problems when it’s too late to fix them
- Fix: Test the system in your driveway or calm water first
Edge case: In saltwater, metal components corrode if you don’t rinse them. Even stainless steel benefits from a freshwater rinse after each trip. Corroded pulleys bind and make the trolley frustrating to use.
Anchor Trolley Alternatives for Kayak Anchoring
Alternatives to anchor trolleys include bow-only anchoring (simplest but least versatile), stern anchoring (useful for specific situations), dual anchor systems (maximum stability but complex), drift socks or sea anchors (for controlled drift without bottom anchoring), and stake-out poles (for shallow water).
Bow-only anchoring:
- Single anchor attached to bow cleat or pad eye
- Kayak always points bow into wind/current
- Best for: calm water, simple setup, beginners
- Limitations: no angle adjustment, not ideal for casting in all directions
Stern anchoring:
- Anchor attached to stern instead of bow
- Kayak points stern into wind/current
- Best for: fishing while facing forward, specific current situations
- Limitations: less stable than bow anchoring, harder to paddle away if needed
Dual anchor system:
- Two anchors, one at bow and one at stern
- Locks kayak in place with minimal swing
- Best for: extreme wind, precise positioning over structure
- Limitations: complex to deploy and retrieve, expensive, time-consuming
Drift sock (sea anchor):
- Parachute-like device that drags in water to slow drift
- Doesn’t anchor to bottom, just slows your movement
- Best for: controlling drift speed, deep water where anchoring isn’t practical
- Limitations: doesn’t hold you in one spot, requires current or wind to work
Stake-out pole:
- Long pole that pushes into bottom in shallow water
- Quick to deploy and adjust
- Best for: flats fishing, water under 6 feet deep with soft bottom
- Limitations: only works in shallow water, doesn’t work on hard or rocky bottom
Power pole or micro anchor:
- Mechanical pole that deploys with a button or lever
- Holds kayak in place in shallow to medium depth
- Best for: anglers who want convenience and fish shallow water regularly
- Limitations: expensive ($300-$800), adds weight, requires installation
Which alternative is best? For most kayak anglers, a stake-out pole is the best alternative to a trolley if you fish shallow water regularly. It’s faster to deploy and adjust than any anchor system. For deeper water or situations where you need to hold position in current, a trolley remains the most versatile option.
Is Anchor Trolley Worth It for Recreational Kayaking?
An anchor trolley is usually not worth it for recreational kayaking if you rarely anchor, paddle mostly calm water, or don’t need precise boat positioning. Recreational paddlers who occasionally stop to swim, take photos, or rest can use a simple bow anchor or even just tie off to shore, making the added complexity and cost of a trolley unnecessary.
Skip the trolley if:
- You paddle for exercise or sightseeing, not fishing
- You rarely anchor (less than once per trip)
- You paddle calm lakes or protected bays
- You prefer simplicity and minimal gear
- Your kayak doesn’t have fishing features already
Consider a trolley even for recreation if:
- You often anchor to swim or rest in current
- You take photos and need specific boat angles
- You’re adding fishing to your recreational paddling
- You paddle tidal areas where current affects positioning
- You plan to upgrade your kayaking over time
Cost-benefit analysis for recreational use: A trolley costs $50 and 2 hours to install. If you anchor fewer than 5 times per season and don’t need angle adjustment, that’s a poor return on investment. If you anchor every trip and wish you could adjust your position, it’s worth it.
The simplicity factor: Recreational kayaking appeals partly because it’s simple. Every piece of gear you add is something else to maintain, adjust, and potentially fail. A trolley adds complexity that many recreational paddlers don’t want or need.
Middle ground: If you’re unsure, start with a basic bow anchor setup. After a season, you’ll know whether you wish you could adjust your boat angle. If yes, add the trolley. If you never think about it, you saved the money and hassle.
Anchor Trolley Setup for Windy Conditions
Setting up an anchor trolley for windy conditions requires positioning the attachment point to minimize wind resistance and maintain control, typically by pulling the trolley forward so your bow faces into the wind. Wind affects kayaks more than current because of the high profile above water, making proper trolley adjustment critical for stability and comfort.
Wind-specific technique:
- Assess wind direction before dropping anchor
- Position upwind of your target fishing spot
- Deploy anchor and let wind push you back to position
- Pull trolley forward to position the ring near the bow
- Fine-tune angle by adjusting trolley position slightly forward or back
- Lock the position with your cleat once set
Why bow-forward works in wind: Your kayak’s bow is designed to cut through water and has less surface area than the stern (which is wider to accommodate seating). Pointing the bow into wind presents the smallest profile and keeps you most stable.
When to adjust off-center: If wind and current come from different directions, you may need to position the trolley ring between bow and center to balance both forces. This takes experimentation, but the trolley lets you find the sweet spot without pulling anchor.
Extreme wind situations:
- Gusts over 15 mph: Consider whether anchoring is safe at all
- Shifting wind: Be ready to adjust trolley as wind direction changes
- Whitecaps: If you see whitecaps, conditions are probably too rough for comfortable anchored fishing
- Quick-release: Always have a way to detach from anchor instantly if conditions deteriorate
Gear considerations: In windy conditions, use a heavier anchor than you would in calm water. Wind can drag a light anchor across the bottom, especially in sand or mud. Add 1-2 pounds to your normal anchor weight when wind exceeds 10 mph.
Edge case: Some kayak anglers prefer stern-into-wind when fishing with certain techniques (like trolling live bait behind the kayak). The trolley makes this possible by pulling the ring to the stern, though it’s less stable than bow-first positioning.
Anchor Trolley Not Staying in Place: How to Fix
An anchor trolley that won’t stay in place usually slips because there’s no cleat to lock it, the rope is too slippery, the pulleys are worn or incorrectly sized, or there’s not enough friction in the system. Adding a cleat or cam cleat near your seat is the most effective fix, followed by switching to a rope with better grip characteristics.
Diagnosis and fixes:
Problem: Rope slides through your hand when you try to hold it
- Cause: Rope is too smooth or thin
- Fix: Replace with textured marine rope (3/16″ to 1/4″ diameter) that provides grip
Problem: Ring slides on its own under anchor load
- Cause: No locking mechanism, rope too slippery
- Fix: Install a cleat or cam cleat to lock the rope in position
Problem: Trolley slips when fighting a fish
- Cause: Sudden loads overcome friction, no mechanical lock
- Fix: Add a cleat and make it a habit to lock the trolley before casting
Problem: Rope binds in pulleys then suddenly releases
- Cause: Pulleys too small for rope diameter, or pulleys worn/damaged
- Fix: Replace pulleys with correct size (pulley should be 3-4x rope diameter)
Problem: System works fine in calm water but slips in waves
- Cause: Wave action creates dynamic loads that overcome friction
- Fix: Install a cleat and use it religiously in rough conditions
Adding a cleat (best solution):
- Choose location: Mount cleat within easy reach of your seated position, typically on the gunwale or side of the seat
- Use a cam cleat: These lock rope with a simple push and release with a pull
- Position correctly: The cleat should be positioned so you can lock/unlock it without looking
- Test under load: Make sure the cleat holds when you pull hard on the anchor line
Temporary fix: If you’re on the water and your trolley keeps slipping, tie a simple overhand loop in the trolley rope near where you want it locked. The loop creates enough bulk that it won’t slide through the pulley easily. This isn’t a permanent solution but works in a pinch.
Maintenance tip: Rinse your trolley system after each trip, especially in saltwater. Salt crystals and grit build up in pulleys and on rope, causing binding and uneven movement that leads to slipping.
Best Anchor Trolley Kit for Beginners
The best anchor trolley kit for beginners includes all necessary components, clear instructions, and quality hardware that will last multiple seasons, typically in the $40-$60 range from brands like YakGear, Scotty, or Harmony. Look for kits that include pulleys (not just pad eyes), marine-grade rope, a ring or carabiner, and all mounting hardware.
What to look for in a beginner kit:
- Complete components: Pulleys, rope, ring, screws, and washers all included
- Clear instructions: Step-by-step guide with photos or diagrams
- Quality pulleys: Smooth operation, corrosion-resistant materials
- Adequate rope: At least 40 feet of 3/16″ or 1/4″ marine rope
- Stainless or coated hardware: Won’t rust after a few trips
- Reasonable price: $40-$60 range offers good value
Recommended features for beginners:
- Pre-cut rope: Saves you from measuring and cutting
- Color-coded components: Makes installation easier to follow
- Includes a cleat: Saves you from buying separately
- Video instructions: Many brands now offer online installation videos
What beginners don’t need:
- Premium materials: Titanium or aerospace-grade components are overkill
- Adjustable pulleys: Fixed pulleys work fine and cost less
- Fancy rings: A basic stainless ring or carabiner does the job
Red flags to avoid:
- No-name brands with no reviews: Quality is unpredictable
- Kits under $25: Usually missing components or using poor materials
- Rope-only kits: You’ll spend more buying pulleys and hardware separately
- Kits without instructions: Installation is harder than it looks
DIY vs kit for beginners: While experienced kayakers can source components from a hardware store for less money, beginners should buy a complete kit. The time saved and reduced chance of buying wrong components is worth the extra $10-$20.
After installation: Test your trolley in calm water near shore before heading out on a real fishing trip. Practice adjusting it, locking it with the cleat, and clipping/unclipping your anchor line. Familiarity with the system makes it much more useful when conditions get challenging.
Frequently Asked Questions
How long should anchor trolley rope be?
Anchor trolley rope should be 1.5 to 2 times your kayak’s length to create a complete loop with proper tension. For a 12-foot kayak, use 40-50 feet of rope. Longer is better than shorter since you can always trim excess, but too-short rope won’t complete the loop properly.
Can you install an anchor trolley without drilling holes?
You can install a no-drill anchor trolley using existing scupper holes, gear tracks, or clamp-on hardware, but these methods are less secure and may not work on all kayak models. Drilling and properly sealing holes remains the most reliable installation method for long-term use.
What size rope is best for anchor trolley?
The best rope size for anchor trolleys is 3/16 inch to 1/4 inch diameter marine-grade line. This size provides good grip, runs smoothly through pulleys, and has adequate strength for the loads involved. Thinner rope is hard to grip and wears quickly; thicker rope binds in pulleys.
Should anchor trolley be on left or right side?
Install your anchor trolley on the side opposite your dominant casting hand so the anchor line doesn’t interfere with your casts. Right-handed anglers typically mount trolleys on the left side, and left-handed anglers on the right side. Some kayakers install trolleys on both sides for maximum versatility.
How much anchor line do you need with a trolley?
You need anchor line equal to 3 times the maximum depth you’ll fish, plus the height from water to your trolley ring. For fishing in 10 feet of water, carry at least 35-40 feet of anchor line. The 3:1 ratio ensures proper anchor angle and holding power.
Can anchor trolley rope be too tight?
Yes, anchor trolley rope that’s too tight will bind and make the ring hard to slide, especially under load. The rope should have slight slack when no anchor is attached, allowing smooth movement while preventing excessive sagging into the water. You should be able to slide the ring with one hand using moderate effort.
Do you need a cleat for anchor trolley?
A cleat is not technically required but is highly recommended because it locks the trolley position and prevents slipping under load. Without a cleat, you must hold the rope constantly or rely on friction alone, which often fails when fighting fish or in rough conditions. A small cam cleat costs $10-$15 and dramatically improves usability.
What’s the difference between anchor trolley and anchor wizard?
An anchor trolley is a rope-and-pulley system you adjust manually by pulling the rope, while an Anchor Wizard is a specific product that uses a ratcheting mechanism for easier adjustment. Both serve the same purpose of moving your anchor attachment point, but the Anchor Wizard offers quicker, easier adjustment at a higher price point.
Can you use anchor trolley in saltwater?
You can use anchor trolleys in saltwater, but you must rinse all components with freshwater after each trip to prevent corrosion. Use stainless steel or anodized aluminum hardware rather than plain steel, and inspect the system regularly for rust or wear. Saltwater accelerates wear on all components.
How do you maintain an anchor trolley?
Maintain your anchor trolley by rinsing it with freshwater after each use, inspecting pulleys and rope for wear every few trips, applying silicone spray to pulleys if they start binding, and replacing rope annually if you fish frequently. Check mounting hardware for looseness and retighten as needed.
Will anchor trolley void kayak warranty?
Installing an anchor trolley by drilling holes may void your kayak warranty depending on the manufacturer’s policy. Check your warranty terms before drilling, and consider waiting until the warranty period expires if you’re concerned. Some manufacturers explicitly allow modifications while others don’t.
Can you retrofit anchor trolley to any kayak?
You can retrofit an anchor trolley to almost any kayak that has sufficient side rail or gunwale space for mounting pulleys. Sit-on-top fishing kayaks are easiest, while narrow touring kayaks or inflatables may not have suitable mounting locations. The kayak needs at least 8-10 feet of accessible side length for a functional trolley.
Conclusion
An anchor trolley transforms how you control your kayak when anchored, giving you the ability to adjust boat angle and position without pulling anchor. For kayak anglers who fish in current, wind, or around structure where precise positioning matters, a trolley is one of the most valuable additions you can make to your setup. The system costs $30-$80, installs in 1-2 hours, and provides benefits every time you drop anchor.
The decision to install a trolley comes down to your fishing style and conditions. If you regularly wish you could adjust your boat angle while anchored, or if you fish moving water where positioning affects your success, install a trolley. If you rarely anchor or only fish calm, protected water, the added complexity may not be worth it.
Next steps:
- Assess your needs: Review your last few fishing trips and note how often you anchored and whether boat positioning was an issue
- Choose your approach: Decide between a complete kit ($40-$60) or DIY components ($20-$30)
- Plan installation: Set aside 2 hours and gather tools (drill, marine sealant, measuring tape)
- Test before heading out: Install the trolley and test it in calm water near shore before your next fishing trip
- Practice adjustment: Get comfortable sliding the ring and locking the cleat so it becomes second nature
The anchor trolley is a simple mechanical system that solves a real problem for kayak anglers. Once you’ve used one in current or wind, you’ll wonder how you ever managed without it.





