A dead fish finder mid-trip costs you the best fishing hours. Learning how to wire a kayak battery system correctly means your electronics stay powered all day, your connections stay dry, and you avoid the frustration of troubleshooting electrical problems on the water. This guide walks you through battery selection, wire sizing, waterproofing, and the exact steps to build a reliable electrical system for your fishing kayak.
Key Takeaways
- Battery size matters: A 12V 10Ah battery powers a basic fish finder for 8-10 hours, but adding lights or a trolling motor requires 20-35Ah capacity
- Wire gauge prevents voltage drop: Use 16-gauge wire for fish finders drawing under 1 amp, 14-gauge for accessories up to 5 amps, and 10-gauge for trolling motors
- Fuse protection is mandatory: Every circuit needs an inline fuse rated 25-50% above normal draw, placed within 7 inches of the battery positive terminal
- Waterproofing saves systems: Marine heat shrink tubing and dielectric grease on all connections prevent corrosion that kills 80% of kayak electrical systems
- Lithium beats AGM for kayaking: Lithium batteries weigh 60% less, last 3-5 times longer, and maintain voltage better under load, though they cost 2-3 times more upfront
- Series wiring doubles voltage: Connect batteries positive-to-negative for 24V trolling motors; parallel wiring (positive-to-positive) doubles runtime at 12V
- Battery switches add safety: A marine battery disconnect switch prevents parasitic drain and provides emergency shutoff capability
- Mounting location affects performance: Position batteries low and centered in sit-on-top kayaks, typically in the tank well or front hatch, to maintain stability
What Size Battery Do I Need for a Kayak Fish Finder and Lights?
A 12V 10Ah battery provides enough power for a typical fish finder (0.5-1 amp draw) and LED strip lights (0.3-0.5 amp combined) for a full 8-10 hour fishing day. If you run a fish finder continuously at 0.8 amps plus lights at 0.4 amps, your total draw is 1.2 amps per hour, consuming roughly 12Ah over 10 hours with a safety margin.
For extended trips or power-hungry electronics, calculate your needs:
Step 1: Add up amp-hour consumption
- Fish finder: 0.8A × 10 hours = 8Ah
- LED lights: 0.4A × 5 hours = 2Ah
- Total needed: 10Ah
Step 2: Add 20-30% safety margin
- 10Ah × 1.25 = 12.5Ah minimum battery capacity
Step 3: Account for battery type
- Lithium batteries: Use 80-90% of rated capacity safely
- AGM batteries: Use only 50% of rated capacity to preserve lifespan
- For AGM, double your calculated need (12.5Ah × 2 = 25Ah battery)
Common battery sizes for kayak fishing:
- 10Ah: Basic fish finder only, 6-8 hours
- 20Ah: Fish finder + lights, full day
- 35Ah: Fish finder, lights, livewell pump, 12+ hours
- 50Ah+: Add small trolling motor or multiple high-draw accessories
Choose lithium if weight matters (typical 10Ah lithium weighs 2-3 pounds vs. 7-8 pounds for AGM). For beginner kayak fishing setups, a 10-20Ah battery covers most needs without adding excessive weight.
Lithium vs AGM Battery for Kayak Fishing: Which Is Better?
Lithium batteries outperform AGM for kayak fishing in weight, lifespan, and voltage stability, but cost 2-3 times more upfront. A 20Ah lithium battery weighs 4-5 pounds and lasts 2,000-3,000 charge cycles, while a comparable AGM weighs 12-15 pounds and lasts 300-500 cycles before capacity drops below 80%.
Lithium advantages:
- Weight savings: 60-70% lighter than AGM at same capacity
- Usable capacity: Safely discharge to 20% vs. 50% for AGM
- Voltage stability: Maintains 12.6-13V under load; AGM drops to 11.8-12V
- Lifespan: 5-10 years of regular use vs. 2-3 years for AGM
- Fast charging: Full charge in 2-4 hours vs. 8-12 hours for AGM
AGM advantages:
- Lower cost: $40-80 for 20Ah vs. $120-200 for lithium
- Cold tolerance: Works in freezing temps; lithium needs warming
- Proven technology: Widely available, easy to replace
- No special charger needed: Standard 12V chargers work fine
Choose lithium if:
- You paddle long distances and weight matters
- You fish 20+ days per year (cost amortizes over lifespan)
- You need consistent voltage for sensitive electronics
- You want minimal maintenance
Choose AGM if:
- Budget is tight and upfront cost matters most
- You fish in cold weather (below 40°F regularly)
- You’re building your first system and want simplicity
- Your kayak has ample weight capacity
For most serious kayak anglers, lithium pays for itself within 2-3 seasons through longer lifespan and better performance. Casual anglers fishing 5-10 times per year can save money with AGM without significant drawbacks.

[Superior Performance]: Discover superior performance with our upgraded 12V 20Ah LiFePO4 battery. This rechargeable lithium battery offers impressive energy density, long cycle life, and advanced safety features. Equipped with a built-in 20A BMS protection system, it guards against overcharging, over-discharging, over-current, and short circuits. Additionally, its low self-discharge rate ensures trouble-free storage for up to one year

KEEP YOUR DEVICES POWERED ON ANY ADVENTURE: Whether you’re out fishing, kayaking, or exploring the great outdoors, the Nocqua Pro Power Kit is here to keep your essential devices powered and ready. With this reliable 12 volt lithium battery, you’ll no longer have to worry about running out of power during your adventures. Ideal for 12v marine battery powered electronics, fish finders, and GPS, this compact and portable kit ensures you're always prepared for your next adventure.
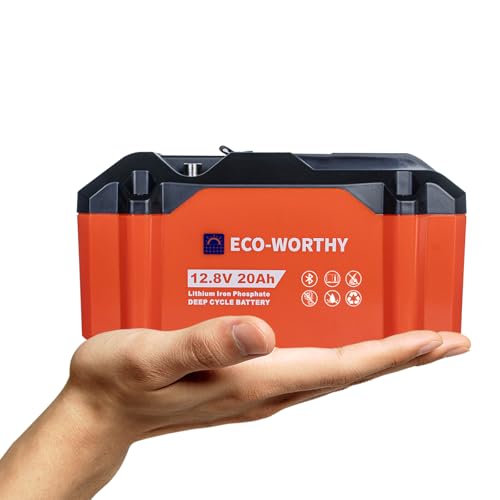
[Compact and Portable]The ECO-WORTHY 20Ah Marine Battery, measuring 8.70 x 4.45 x 4.61 inches, is perfect for small kayaks, traps and amateur radio equipment. Its ergonomic grip design ensures easy handling and portability, providing a reliable power option for amateur radio enthusiasts and campers
What Gauge Wire Should I Use for Kayak Electronics?
Use 16-gauge marine wire for fish finders and accessories drawing under 1.5 amps, 14-gauge for devices pulling 1.5-5 amps, and 10-gauge for trolling motors or high-draw equipment above 5 amps. Wire that’s too thin creates voltage drop, causing electronics to shut off or perform poorly, especially on wire runs longer than 10 feet.
Wire gauge selection chart:
| Device | Typical Draw | Wire Gauge | Max Run Length |
|---|---|---|---|
| Fish finder | 0.5-1.5A | 16 AWG | 15 feet |
| LED lights | 0.3-0.8A | 18-16 AWG | 12 feet |
| Livewell pump | 2-4A | 14 AWG | 10 feet |
| Small trolling motor | 5-15A | 10 AWG | 8 feet |
| Large trolling motor | 20-40A | 8 AWG | 6 feet |
Voltage drop matters: A 1-amp fish finder on 20 feet of 18-gauge wire loses 0.6V, dropping battery voltage from 12.6V to 12V at the device. This 5% loss causes intermittent shutdowns. Upgrading to 16-gauge reduces drop to 0.3V, keeping voltage above the 11.5V minimum most electronics need.
Always use marine-grade tinned copper wire with UV-resistant insulation rated for wet environments. Standard automotive wire corrodes quickly in kayak applications. Buy pre-made marine wire in red (positive) and black (negative) from marine supply stores, or purchase bulk spools if wiring multiple accessories.
For a typical fishing kayak setup with a fish finder and lights, 16-gauge wire handles both circuits with room to spare. Keep wire runs as short as possible by mounting batteries close to electronics.

Heavy Duty 16 Gauge Marine Wire:Our 16 AWG marine wire is made of tinned copper to make sure good conductivity,corrosion resistance, high durability,flexibility,stability for a long-lasting performance

High Quality:Our marine grade wire is made of tinned copper to make sure good conductivity,Anti-corrosion, high durability,flexibility,stability for a long-lasting performance

HIGH QUALITY: CONEPY marine wire is crafted from high-precision, oxygen-free tinned copper strands, offering excellent conductivity, stability, and corrosion resistance. Its current-carrying capacity is 2-5% greater than that of aluminum wire, effectively preventing interference and ensuring a long service life
How to Wire a Kayak Battery System: Step-by-Step Installation
Wiring a kayak battery system requires connecting your battery to accessories through fused circuits with waterproof connections. Start by mounting your battery in a waterproof box, then run marine-grade wire to each accessory with inline fuses near the battery positive terminal.
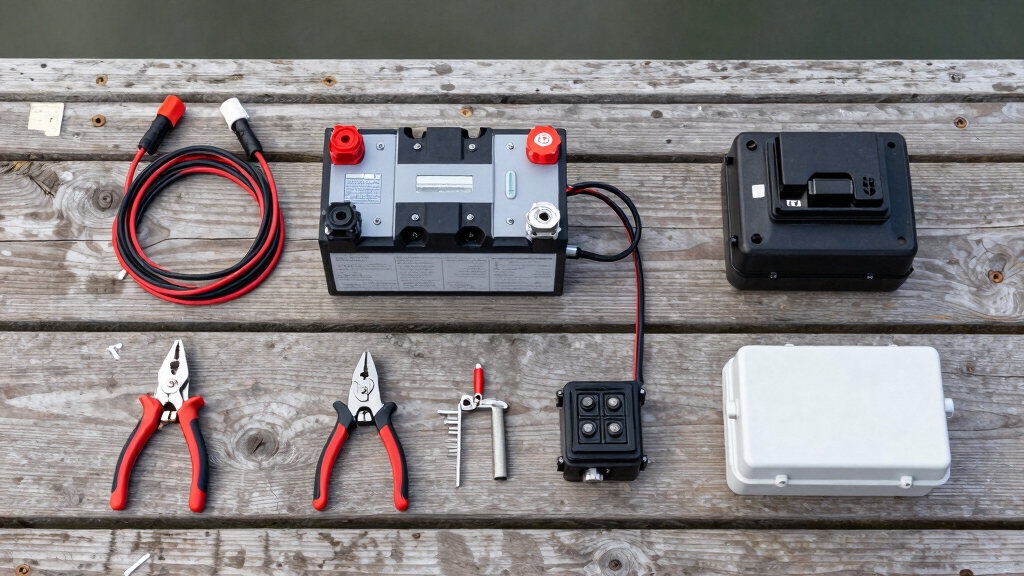
Tools and materials needed:
- Marine battery box (waterproof, sized for your battery)
- Marine-grade tinned copper wire (16-14 gauge)
- Inline fuse holders and fuses (match to accessory draw)
- Ring terminals (sized for wire gauge)
- Marine heat shrink tubing with adhesive
- Wire strippers and crimping tool
- Dielectric grease
- Cable ties and adhesive mounts
Installation steps:
1. Mount the battery box
Choose a location low and centered in your kayak for stability. On sit-on-top kayaks, the tank well or front hatch works best. Secure the box with bolts through the kayak deck or heavy-duty adhesive mounts. Ensure the lid seals completely and add a foam pad under the battery to prevent movement.
2. Prepare wire runs
Measure wire length from battery to each accessory, adding 20% extra for routing and connections. Cut wire in pairs (red positive, black negative). Strip 3/8 inch of insulation from each end.
3. Attach ring terminals
Slide marine heat shrink tubing onto wire before crimping. Crimp ring terminals onto wire ends using a proper crimping tool (not pliers). Heat the shrink tubing until it seals completely around the connection. Apply dielectric grease inside each terminal before connecting.
4. Install fuses on positive wires
Place an inline fuse holder on each positive (red) wire within 7 inches of the battery terminal. Use fuses rated 25-50% above normal draw: 2-amp fuse for 1-amp fish finder, 5-amp fuse for 3-amp accessory. This protects against shorts without nuisance tripping.
5. Connect to battery
Attach negative (black) wires to battery negative terminal first, then positive (red) wires with fuses to positive terminal. Tighten ring terminals securely but don’t overtighten (strip threads). Apply dielectric grease to exposed terminals.
6. Route and secure wires
Run wires through kayak channels or along the hull, securing every 12 inches with cable ties. Avoid sharp edges that can cut insulation. Keep wires away from moving parts like pedal drives on pedal kayaks.
7. Connect accessories
Attach the other end of each wire pair to its accessory using appropriate connectors. Most fish finders use bullet connectors or terminal blocks. Seal all connections with marine heat shrink tubing and dielectric grease.
8. Test the system
Before sealing everything, test each accessory. Check voltage at the device with a multimeter (should read within 0.5V of battery voltage). Verify all connections are secure and no bare wire is exposed.
This basic setup works for most single-battery kayak systems. For more complex installations with multiple accessories, consider adding a fuse block or distribution panel.

Through Hull Wiring Kit for Kayaks --- Through hull wiring kit is perfect for popular removable pods like the Bonafide Kayaks Dry Pod or Wilderness Systems Flex Pod. Kayak Wiring Kit is perfect for run wires through the hull of your kayak or boat, keep clean and water resistant.
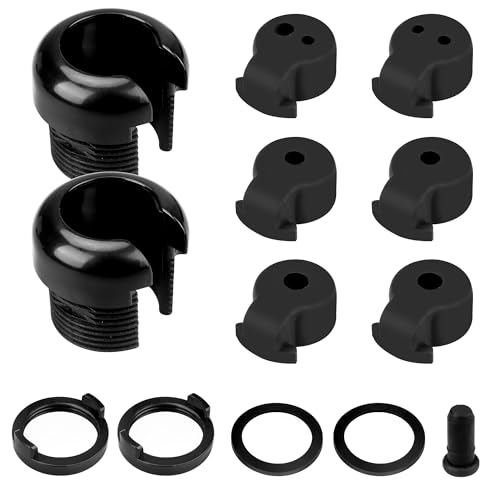
Through Hull Wiring Kit for Kayaks: The through hull wiring kit is perfect for installs of fish finders, lighting kits, motors, transducer, battery and anything involving running wiring through the hull of your kayak or boat. Reduces clutter by allowing you to hide cables inside your hull, and prevents snagging and tripping
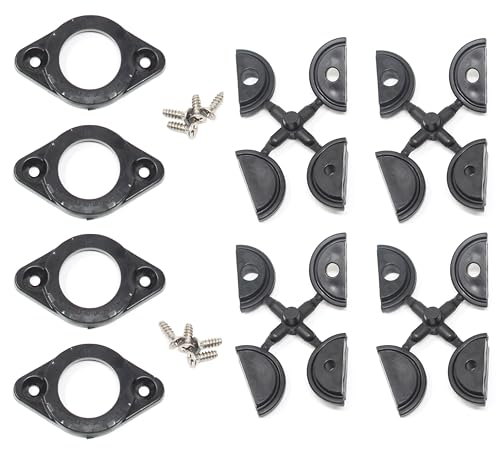
New Aftermarket Through Hull Wiring Kit for Kayaks
Do I Need a Fuse Box for My Kayak Battery Setup?
A fuse box (marine fuse block) is necessary when wiring three or more accessories to one kayak battery, as it organizes circuits, simplifies troubleshooting, and provides individual circuit protection in a compact waterproof housing. For single-accessory setups, an inline fuse on the positive wire is sufficient.
Benefits of a marine fuse block:
- Organized wiring: One positive and negative connection to battery, multiple outputs for accessories
- Individual circuit protection: Each accessory gets its own fuse, preventing one short from killing the entire system
- Easy troubleshooting: Blown fuse immediately identifies the problem circuit
- Cleaner installation: Eliminates wire clutter at battery terminals
- Expandability: Add accessories without modifying battery connections
When to use inline fuses instead:
- Single fish finder setup
- Two accessories maximum
- Temporary or minimalist installations
- Budget constraints (inline fuses cost $3-5 vs. $25-60 for fuse blocks)
Choosing a fuse block:
Look for marine-grade blocks with:
- Waterproof or water-resistant housing (IP65 rating minimum)
- Blade-style fuses (easier to replace than glass tube fuses)
- 6-12 circuits (more than you need now for future expansion)
- Built-in LED indicators showing which circuits are active
- Negative bus bar for clean ground connections
Mount the fuse block inside your battery box if space allows, or in a separate waterproof enclosure near the battery. Connect the fuse block input directly to battery terminals with 12-14 gauge wire and a main fuse (rated for total system draw), then run individual circuits to accessories.
For kayak fishing rigs with fish finder, lights, livewell pump, and camera, a 6-circuit fuse block keeps everything organized and protected.
How to Waterproof Battery Connections on a Kayak
Waterproof all kayak battery connections using marine-grade heat shrink tubing with adhesive lining, dielectric grease on terminals, and sealed connectors rated IP67 or higher. Exposed connections corrode within weeks in the wet kayak environment, causing intermittent failures and complete system shutdown.
Waterproofing method for each connection type:
Ring terminals (battery connections):
- Slide 3:1 ratio marine heat shrink tubing over wire before crimping terminal
- Crimp terminal with proper tool (not pliers)
- Apply dielectric grease inside terminal barrel and on threads
- Heat shrink tubing until adhesive oozes from both ends
- Apply additional dielectric grease to exposed terminal after connection
Bullet connectors and spade terminals:
- Use marine-grade connectors with built-in seals
- Apply dielectric grease before mating connectors
- Cover entire connection with marine heat shrink tubing
- For extra protection, wrap with self-fusing silicone tape
Wire splices:
- Solder wires together (crimp connectors alone aren’t waterproof)
- Cover solder joint with marine heat shrink tubing
- Add second layer of heat shrink for critical connections
- Alternatively, use waterproof wire splice connectors (Posi-Lock or similar)
Fuse holders:
- Choose inline fuse holders with rubber boots or sealed housings
- Apply dielectric grease to fuse contacts before inserting fuse
- Ensure rubber boot seals completely around wire entry points
- Mount fuse holders in protected locations, not exposed to direct spray
Battery terminals:
- After connecting all wires, coat terminals with dielectric grease
- Cover with terminal boots or heat shrink tubing
- For maximum protection, use battery terminal protector spray (creates waxy coating)
Common waterproofing mistakes:
- Using automotive heat shrink without adhesive lining (water wicks through)
- Skipping dielectric grease (corrosion starts immediately)
- Over-tightening connections (cracks insulation, creates water entry points)
- Mounting connections in bilge areas where water pools
Check all connections monthly during fishing season. White or green powder (corrosion) means water is penetrating. Clean with baking soda solution, dry completely, and re-waterproof.
Proper waterproofing adds 30-60 minutes to installation but extends system life from months to years. It’s the difference between reliable electronics and constant troubleshooting on the water.
Can I Wire Multiple Accessories to One Kayak Battery?
Yes, you can wire multiple accessories to one kayak battery by connecting each device to the battery through its own fused circuit, either using individual inline fuses or a marine fuse block. A 20Ah battery easily powers a fish finder, LED lights, and a small pump simultaneously as long as total amp draw stays below the battery’s discharge rating.
Calculating total system draw:
Add up the amp draw of all accessories you’ll run simultaneously:
- Fish finder: 0.8A
- LED lights: 0.4A
- Livewell pump: 2.5A (when running)
- Total simultaneous draw: 3.7A
Most 20Ah batteries handle 10-20A continuous draw safely, so this 3.7A load is well within limits. Runtime calculation: 20Ah ÷ 3.7A = 5.4 hours of continuous use (longer in practice since the pump cycles on/off).
Wiring methods for multiple accessories:
Method 1: Individual inline fuses (2-3 accessories)
- Run separate positive and negative wire pairs from battery to each device
- Install inline fuse on each positive wire near battery
- Connect all negative wires to battery negative terminal
- Connect all positive wires to battery positive terminal
- Simple but creates wire clutter at battery terminals
Method 2: Fuse block (3+ accessories)
- Install marine fuse block with one main connection to battery
- Run individual circuits from fuse block to each accessory
- Each circuit gets appropriate fuse size for that device
- Cleaner installation, easier troubleshooting
Method 3: Battery distribution post
- Use a marine battery distribution post (brass stud with multiple connection points)
- Allows 4-6 ring terminals on one battery post
- Cheaper than fuse block but no individual circuit protection
- Best for low-current accessories under 2A each
Wire sizing for multiple accessories:
When running multiple devices, the main wire from battery to fuse block must handle total system draw. If your accessories total 8A maximum draw, use 12-gauge wire for the main battery connection, even if individual accessory wires are 16-gauge.
Load management tips:
- Don’t run high-draw accessories (pumps, trolling motors) continuously
- Turn off lights during daylight to extend runtime
- Monitor battery voltage; most fish finders show input voltage
- Carry a backup 10Ah battery for critical electronics on long trips
For complex setups on fishing kayaks with many accessories, consider a dual-battery system with one battery dedicated to the trolling motor and another for electronics.
Series vs Parallel Wiring for Kayak Batteries
Series wiring connects batteries positive-to-negative to double voltage (two 12V batteries become 24V), while parallel wiring connects positive-to-positive and negative-to-negative to double capacity while maintaining 12V. Use series wiring only for 24V trolling motors; use parallel wiring to extend runtime for 12V accessories.
Series wiring (12V + 12V = 24V):
- Connect Battery 1 positive to Battery 2 negative
- Battery 1 negative becomes system negative
- Battery 2 positive becomes system positive
- Voltage doubles, capacity stays the same
- Use for: 24V trolling motors only
- Don’t use for: 12V fish finders, lights, or other 12V accessories (will destroy them)
Parallel wiring (12V + 12V = 12V with double capacity):
- Connect Battery 1 positive to Battery 2 positive
- Connect Battery 1 negative to Battery 2 negative
- Voltage stays at 12V, capacity doubles
- Two 20Ah batteries in parallel = 40Ah at 12V
- Use for: Extending runtime for all 12V accessories
- Batteries should be same type, age, and capacity
Critical series wiring mistake:
Never tap 12V accessories off one battery in a series pair. If you connect a fish finder to Battery 1 in a series setup, it drains that battery faster, creating voltage imbalance that damages both batteries and can cause thermal runaway in lithium batteries.
When to use each configuration:
Series (24V):
- You have a 24V trolling motor
- You need more thrust efficiency (24V motors are more efficient than 12V)
- You’re willing to carry two batteries
Parallel (12V):
- You want all-day runtime for 12V accessories
- You run high-draw 12V equipment (large fish finder, multiple lights, pumps)
- You want redundancy (if one battery fails, the other keeps working)
Single battery (simplest):
- Basic fish finder and lights setup
- Weight is a concern
- You fish 6-8 hours maximum
Most kayak anglers use a single 12V battery for electronics and a separate 12V battery for a trolling motor (if equipped). This keeps systems independent and simplifies troubleshooting. Only wire batteries in series if you specifically have a 24V trolling motor.
Do I Need a Battery Switch or Just Connect Directly?
A marine battery disconnect switch is recommended for kayak battery systems to prevent parasitic drain, provide emergency shutoff capability, and extend battery life, but direct connection works for simple setups with no parasitic draw. Install the switch on the positive wire between battery and fuse block, within 12 inches of the battery terminal.
Benefits of a battery switch:
Prevents parasitic drain: Many fish finders and accessories draw 0.01-0.05A even when “off,” draining a 10Ah battery completely in 8-20 days of storage. A battery switch eliminates this drain, keeping batteries charged between trips.
Safety shutoff: If a wire shorts or accessory malfunctions, flip the switch to kill power instantly without disconnecting terminals. Critical for lithium batteries, which can overheat during shorts.
Extends battery life: Lithium batteries last longest when stored at 50-70% charge with no load. A switch ensures zero drain during off-season storage.
Simplifies maintenance: Disconnect power for winter storage or when working on electrical system without removing terminals.
When you can skip the battery switch:
- Single fish finder with physical power button (no standby mode)
- You disconnect battery terminals after every trip
- Temporary or minimalist setup
- Budget is extremely tight ($15-25 for a quality switch)
Choosing a battery switch:
Look for:
- Continuous rating: Match or exceed your total system draw (50-100A for most kayak setups)
- Waterproof housing: IP67 rated minimum, with sealed toggle or rotary mechanism
- Compact size: Fits in battery box or nearby mounting location
- Quality construction: Brass or copper contacts, not cheap pot metal
Installation location:
Mount the switch on the positive wire between battery positive terminal and your fuse block or first accessory. Keep the switch accessible so you can flip it without opening the battery box (mount on outside of box or nearby bulkhead).
Wiring a battery switch:
- Cut positive wire from battery to fuse block
- Connect battery-side wire to switch input terminal
- Connect fuse block-side wire to switch output terminal
- Secure switch in accessible location
- Label switch clearly (“BATTERY ON/OFF”)
For kayak safety and system longevity, a battery switch is a small investment that prevents dead batteries and provides peace of mind. Install one unless your setup is extremely basic.
Where to Mount a Battery on a Sit-On-Top Kayak
Mount kayak batteries low and centered in the tank well, front hatch, or center console area of sit-on-top kayaks to maintain stability and keep weight near the waterline. Position the battery in a waterproof box secured with bolts or heavy-duty adhesive mounts, with the box lid accessible for battery removal and maintenance.
Best mounting locations by kayak type:
Tank well (most common):
- Behind seat, between rod holders
- Lowest point in kayak, best for stability
- Easy access for battery swaps
- Protected from paddle drips
- Use bungee cords or cargo net over battery box for security
- Drawback: Takes up prime gear storage space
Front hatch:
- Inside sealed bow hatch compartment
- Excellent weight distribution for solo paddling
- Protected from elements
- Drawback: Harder to access, requires longer wire runs, may affect kayak trim
Center console (pedal kayaks):
- Built-in battery compartment in center console
- Optimal weight placement
- Integrated into kayak design
- Drawback: Only available on specific kayak models
Milk crate or custom mount:
- Battery box secured inside milk crate in tank well
- Allows storage around battery
- Easy to remove entire crate with battery
- Drawback: Raises center of gravity slightly
Mounting best practices:
Secure the battery box firmly: Batteries shifting during paddling affect stability and can damage connections. Use:
- Through-bolts with backing plates (strongest)
- Marine-grade adhesive mounts rated for 20+ pounds
- Ratchet straps through kayak scupper holes
- Combination of methods for heavy batteries (30+ pounds)
Keep battery level: Tilted batteries can leak (AGM) or trigger low-voltage protection (lithium). Use foam padding to level the battery in the box.
Ensure ventilation: AGM batteries off-gas hydrogen during charging. Don’t seal battery box completely airtight; drill small vent holes near the top.
Plan wire routing: Choose mounting location that minimizes wire length to accessories. Fish finder typically mounts near seat, so tank well placement keeps wire runs under 6 feet.
Test stability: After mounting, sit in kayak on land and rock side-to-side. Battery should not shift. On water, paddle in calm conditions first to verify stability before heading to fishing spots.
Weight distribution for solo paddling: Mount battery slightly forward of seat for better tracking. For tandem fishing kayaks, center the battery between paddlers.
Proper battery placement maintains the stability that makes sit-on-top kayaks popular for fishing while keeping your electronics powered reliably.
How to Wire a Trolling Motor and Fish Finder to Same Battery
Wire a trolling motor and fish finder to the same battery by connecting each device through separate fused circuits directly to the battery terminals, with the trolling motor using 10-8 gauge wire and a 40-60A fuse, and the fish finder using 16-14 gauge wire with a 2-5A fuse. This setup works for small trolling motors (30-45 pounds thrust) on batteries 35Ah or larger.
Wiring steps:
1. Size your battery appropriately
- Small trolling motor (30-40 lb thrust): 35-50Ah minimum
- Medium trolling motor (45-55 lb thrust): 50-75Ah minimum
- Fish finder adds minimal draw (0.5-1A) but plan for 8-10 hour runtime
2. Connect trolling motor circuit
- Use 10 AWG marine wire for motors up to 40 lb thrust
- Use 8 AWG for motors 45-55 lb thrust
- Install 40-60A inline fuse or circuit breaker on positive wire within 7 inches of battery
- Connect trolling motor positive (red) to battery positive through fuse
- Connect trolling motor negative (black) to battery negative
- Most trolling motors use ring terminals or large spade connectors
3. Connect fish finder circuit
- Use 16-14 AWG marine wire
- Install 2-5A inline fuse on positive wire near battery
- Connect fish finder positive to battery positive through fuse
- Connect fish finder negative to battery negative
- Use separate connection points on battery terminals (don’t piggyback on trolling motor wires)
4. Add a battery switch (recommended)
- Install master switch on main positive wire before circuits split
- Allows shutoff of entire system
- Prevents drain when kayak is stored
Runtime expectations:
A 50Ah battery powering a 40 lb thrust trolling motor at 50% speed (drawing 15-20A) plus a fish finder (1A) provides:
- Trolling motor: 2-3 hours continuous use
- Fish finder: 40+ hours continuous use
- Realistic fishing day: 6-8 hours with intermittent trolling motor use
Important considerations:
Voltage sag under load: When the trolling motor draws 20A, battery voltage drops from 12.6V to 11.8-12.2V. Quality fish finders handle this, but cheap units may shut off. Test your setup before a long trip.
Separate batteries recommended for heavy use: If you run the trolling motor more than 2-3 hours per trip, use dedicated batteries:
- Battery 1: Trolling motor only (50-75Ah)
- Battery 2: Fish finder and accessories (10-20Ah)
- Prevents trolling motor from draining fish finder battery
Battery type matters: Lithium batteries maintain voltage better under trolling motor load than AGM. A 50Ah lithium delivers consistent power throughout the discharge cycle, while AGM voltage drops significantly below 50% capacity.
Wire organization: Use different colored wire for each circuit (red/black for trolling motor, yellow/black for fish finder) or label wires clearly. When troubleshooting on the water, you need to identify circuits quickly.
For pedal kayaks with trolling motors, this dual-circuit setup provides propulsion and electronics from one battery, though serious anglers eventually upgrade to separate batteries for each system.
Why Does My Kayak Fish Finder Keep Shutting Off? Battery Issues
A kayak fish finder that keeps shutting off typically suffers from voltage drop caused by wire that’s too thin, corroded connections, or a depleted battery unable to maintain the 11.5V minimum most fish finders require. Check battery voltage under load with a multimeter; if it drops below 11.5V, the battery is undersized, damaged, or needs charging.
Troubleshooting steps:
1. Check battery voltage
- Measure voltage at battery terminals with multimeter: should read 12.4-12.8V (12V battery at rest)
- Turn on fish finder and measure again: voltage should stay above 11.8V
- If voltage drops below 11.5V under load, battery is too small or depleted
- Charge battery fully and retest
2. Measure voltage at fish finder
- With fish finder running, measure voltage at device power terminals
- Should be within 0.3-0.5V of battery voltage
- If voltage is 1V+ lower than battery, you have excessive voltage drop
3. Identify voltage drop causes
Wire too thin: 18-gauge wire on a 15-foot run drops 0.8V at 1A draw. Upgrade to 16-gauge or 14-gauge wire.
Corroded connections: White or green powder on terminals increases resistance. Clean with baking soda solution, dry completely, apply dielectric grease, and reconnect.
Loose connections: Wiggle each connection while fish finder is running. If it flickers, tighten that connection.
Bad crimps: Poorly crimped terminals create high resistance. Re-crimp with proper tool or solder connections.
4. Check for intermittent shorts
- Inspect all wire for damage, especially where it passes through kayak channels
- Look for worn insulation, pinched wire, or wire rubbing against sharp edges
- A short causes fuse to blow or battery voltage to collapse
5. Test with different power source
- Connect fish finder directly to a known-good battery with short wires
- If it runs fine, problem is in your kayak wiring
- If it still shuts off, fish finder may be defective
Common scenarios and fixes:
Shuts off after 30-60 minutes: Battery too small or old. A 10Ah battery that’s 3+ years old may only deliver 6-7Ah actual capacity. Replace battery or upgrade to larger capacity.
Shuts off when trolling motor runs: Voltage sag from trolling motor drops system voltage below fish finder minimum. Use separate batteries or upgrade to larger battery (50Ah+) that handles combined load.
Shuts off randomly, restarts immediately: Loose connection or corroded terminal. Check and clean all connections, especially at battery terminals and fish finder power plug.
Shuts off in cold weather: Batteries deliver less capacity in cold. A 20Ah battery at 40°F delivers only 15-16Ah effective capacity. Keep battery warm or upgrade to lithium (better cold performance).
Won’t turn on at all: Blown fuse, dead battery, or broken wire. Check fuse first (easiest), then battery voltage, then continuity of wires with multimeter.
Prevention:
- Use properly sized wire (16-14 gauge for fish finders)
- Waterproof all connections with marine heat shrink and dielectric grease
- Check battery voltage before each trip (should be 12.4V+)
- Replace AGM batteries every 2-3 years, lithium every 5-7 years
- Keep spare fuses in tackle box
Most fish finder shutdown issues trace to voltage drop from inadequate wiring or corroded connections. Fixing these problems takes 30-60 minutes and prevents frustration on the water.
What Happens If I Use Wire That’s Too Thin for Kayak Battery?
Wire that’s too thin for kayak battery applications causes voltage drop that makes electronics shut off, overheats the wire creating fire risk, and can melt insulation leading to shorts. A fish finder drawing 1 amp through 18-gauge wire over 20 feet loses 1.2V, dropping battery voltage from 12.6V to 11.4V at the device, below the 11.5V minimum most electronics need.
Consequences of undersized wire:
Voltage drop (most common problem):
- Electronics receive lower voltage than battery supplies
- Fish finders shut off intermittently or won’t power on
- LED lights dim significantly
- Trolling motors lose thrust and run inefficiently
- Voltage drop increases with wire length and current draw
Wire overheating:
- Wire resistance creates heat (power loss = I² × R)
- 20-gauge wire carrying 5A gets warm to touch
- Sustained overheating melts insulation
- Can ignite nearby materials in extreme cases
- Especially dangerous in enclosed battery boxes
Reduced system efficiency:
- Power lost as heat in wire is wasted battery capacity
- A 2V drop at 2A wastes 4 watts continuously
- Over 10 hours, that’s 40 watt-hours (3.3Ah) of battery capacity lost to heat
Premature wire failure:
- Overheated wire becomes brittle
- Insulation cracks, exposing bare wire
- Corrosion accelerates at damaged points
- Wire breaks at crimp connections
Voltage drop calculation example:
For 1 amp draw through 20 feet of wire (10 feet each direction):
- 18 AWG: 1.2V drop (unacceptable)
- 16 AWG: 0.8V drop (marginal)
- 14 AWG: 0.5V drop (acceptable)
- 12 AWG: 0.3V drop (excellent)
How to identify undersized wire:
Symptoms:
- Electronics work fine with short test wires but fail with installed wiring
- Wire feels warm after 30+ minutes of use
- Voltage at device is 1V+ lower than at battery
- Lights dim when other accessories turn on
Testing:
- Measure voltage at battery: note reading
- Turn on accessory and measure voltage at device
- Voltage drop = battery voltage – device voltage
- Acceptable drop: under 0.5V for most applications
- If drop exceeds 0.5V, wire is too thin or connections are bad
Fix undersized wire:
- Replace with properly sized marine-grade wire
- Shorten wire runs by relocating battery closer to accessories
- Use thicker wire than minimum requirement for future-proofing
- Check all connections for corrosion (adds resistance like thin wire)
Wire sizing rule of thumb:
When in doubt, go one gauge thicker. The cost difference between 16-gauge and 14-gauge wire is minimal ($0.30-0.50 per foot), but the performance and safety improvement is significant. For kayak gear electrical systems, oversized wire never causes problems, but undersized wire always does.
Common Mistakes When Wiring Kayak Electrical Systems
The most common mistakes when wiring kayak electrical systems include skipping fuse protection, using automotive wire instead of marine-grade, failing to waterproof connections, and mounting batteries in high positions that affect stability. These errors cause system failures, safety hazards, and expensive component damage.
Top wiring mistakes and how to avoid them:
1. No fuse protection
- Mistake: Connecting accessories directly to battery without fuses
- Consequence: Wire short causes battery to dump full current, melting wire and potentially starting fire
- Fix: Install inline fuse on every positive wire within 7 inches of battery, rated 25-50% above normal draw
2. Using automotive wire
- Mistake: Standard automotive wire instead of marine-grade tinned copper
- Consequence: Copper oxidizes rapidly in wet environment, creating high resistance and connection failures
- Fix: Use only marine-grade tinned copper wire with UV-resistant insulation
3. Poor waterproofing
- Mistake: Standard heat shrink or electrical tape on connections
- Consequence: Water penetrates connections, causing corrosion and intermittent failures within weeks
- Fix: Use marine heat shrink with adhesive lining plus dielectric grease on all connections
4. Wire too thin
- Mistake: Using 18-gauge wire for all accessories to save money
- Consequence: Voltage drop causes electronics to shut off, wire overheats
- Fix: Match wire gauge to current draw and run length (16-gauge minimum for most kayak applications)
5. Mixing battery types in parallel
- Mistake: Connecting old and new batteries in parallel, or mixing lithium with AGM
- Consequence: Batteries charge/discharge at different rates, damaging both and reducing capacity
- Fix: Only parallel batteries of same type, age, and capacity
6. High battery mounting
- Mistake: Mounting battery on top of milk crate or in elevated position
- Consequence: Raises center of gravity, reduces stability, increases capsize risk
- Fix: Mount battery as low as possible in kayak, preferably in tank well or below-deck compartment
7. Overtightening connections
- Mistake: Cranking down ring terminals with excessive force
- Consequence: Strips threads on battery terminals, cracks terminal posts, damages wire insulation
- Fix: Tighten until snug, then 1/4 turn more; use torque wrench if available (80-100 in-lbs for battery terminals)
8. No battery switch
- Mistake: Leaving battery connected between trips
- Consequence: Parasitic drain depletes battery, reducing lifespan and leaving you with dead battery on launch day
- Fix: Install battery disconnect switch or remove positive terminal when storing kayak
9. Ignoring polarity
- Mistake: Reversing positive and negative connections
- Consequence: Instantly destroys electronics, blows fuses, can damage battery
- Fix: Always use red wire for positive, black for negative; double-check before connecting; mark terminals clearly
10. Inadequate wire securing
- Mistake: Loose wires flopping around in kayak
- Consequence: Wire rubs against sharp edges, insulation wears through, creates shorts
- Fix: Secure wire every 12 inches with cable ties, route through protected channels, avoid sharp edges
11. Wrong fuse size
- Mistake: Using 20A fuse on 1A fish finder circuit “just to be safe”
- Consequence: Fuse won’t blow during short, allowing wire to melt and potentially start fire
- Fix: Size fuse to 125-150% of normal draw (2A fuse for 1A device, 5A fuse for 3A device)
12. Skipping testing before sealing
- Mistake: Waterproofing all connections before verifying system works
- Consequence: Have to cut open sealed connections to troubleshoot problems
- Fix: Test entire system with temporary connections, verify everything works, then waterproof
Prevention checklist:
- Use marine-grade components throughout
- Fuse every positive circuit individually
- Waterproof every connection with marine heat shrink and dielectric grease
- Size wire appropriately for current and distance
- Mount battery low and secure firmly
- Test before waterproofing
- Label all wires and circuits
- Document your wiring with photos for future reference
Following proper wiring practices the first time saves hours of troubleshooting and prevents the frustration of electrical failures during fishing trips. For fishing kayak safety, reliable electrical systems are as important as proper flotation and safety gear.
Frequently Asked Questions
How long does a 10Ah battery last for a kayak fish finder?
A 10Ah battery powers a typical fish finder drawing 0.8 amps for approximately 10-12 hours of continuous use. Actual runtime depends on fish finder model, screen brightness, and whether you’re using GPS or just sonar. For all-day fishing (8-10 hours), a 10Ah battery provides adequate capacity with a small safety margin.
Can I charge my kayak battery while it’s connected to electronics?
No, disconnect all accessories before charging your kayak battery. Charging while connected can send voltage spikes to electronics, potentially damaging sensitive components. Install a battery switch to easily disconnect the entire system, or remove the positive terminal before connecting the charger.
What’s the difference between marine wire and regular wire?
Marine wire uses tinned copper conductors that resist corrosion in wet environments, while regular wire uses bare copper that oxidizes quickly when exposed to moisture. Marine wire also has UV-resistant, thicker insulation rated for harsh conditions. Standard automotive or household wire fails within months in kayak applications.
Do I need a special charger for lithium kayak batteries?
Yes, lithium batteries require a charger specifically designed for lithium chemistry (LiFePO4 or Li-ion depending on battery type). Using a standard lead-acid charger can overcharge lithium batteries, triggering protection circuits or causing damage. Most lithium kayak batteries come with an appropriate charger or specify compatible charger requirements.
How do I know what size fuse to use?
Size fuses to 125-150% of the accessory’s normal current draw. For a fish finder drawing 1 amp, use a 2-amp fuse. For lights drawing 3 amps, use a 5-amp fuse. Check the device manual for current draw specifications, or measure with a multimeter. Never use a fuse larger than the wire’s ampacity rating.
Can I use a car battery in my kayak?
Technically yes, but car batteries are heavy (40-60 pounds), not designed for deep discharge, and lack the vibration resistance of marine batteries. A car battery will work in an emergency but will fail quickly with regular deep cycling. Use a marine deep-cycle AGM or lithium battery designed for kayak applications instead.
Where should I mount my fish finder transducer?
Mount the transducer on the kayak hull bottom near the centerline, behind the seat but forward of the tank well. The transducer face should be parallel to the water surface when the kayak is loaded and level. Use a transducer mounting kit designed for kayaks, which typically includes a scupper mount or through-hull installation hardware.
How often should I replace my kayak battery?
Replace AGM batteries every 2-3 years or when capacity drops below 80% of rated capacity (measured with a battery tester). Lithium batteries last 5-10 years or 2,000-3,000 charge cycles before needing replacement. Signs of battery failure include reduced runtime, slow charging, and inability to hold voltage under load.
What voltage should my kayak battery read when fully charged?
A fully charged 12V AGM battery reads 12.6-12.8V at rest (no load). A fully charged 12V lithium battery reads 13.2-13.6V. If voltage is below 12.4V (AGM) or 13.0V (lithium) after a full charge cycle, the battery may be damaged or the charger isn’t working properly.
Can I run a trolling motor and fish finder off a 20Ah battery?
A 20Ah battery can power a small trolling motor (30-40 lb thrust) and fish finder simultaneously, but runtime will be limited to 1-2 hours of trolling motor use. For serious trolling motor use, upgrade to a 35-50Ah battery or use separate batteries for the trolling motor and electronics.
Do I need to vent my kayak battery box?
AGM batteries should have minimal venting (small holes near top of box) to allow hydrogen gas to escape during charging, though they produce very little gas. Lithium batteries don’t off-gas and don’t require venting. Never seal any battery box completely airtight; allow some air exchange for safety.
What causes white powder on my battery terminals?
White powder on battery terminals is lead sulfate corrosion (on lead-acid/AGM batteries) or aluminum oxide (on aluminum terminals), caused by moisture exposure and chemical reactions. Clean terminals with a baking soda and water solution, dry completely, apply dielectric grease, and improve waterproofing to prevent recurrence.
Conclusion
Wiring a kayak battery system correctly transforms your fishing experience by providing reliable power for fish finders, lights, and accessories throughout long days on the water. The key steps are choosing the right battery size for your needs (10-20Ah for basic electronics, 35-50Ah for trolling motors), using properly sized marine-grade wire (16-gauge for fish finders, 10-gauge for trolling motors), protecting every circuit with appropriate fuses, and waterproofing all connections with marine heat shrink tubing and dielectric grease.
Start with a simple single-battery setup if you’re new to kayak electrical systems. Mount your battery low and centered in a waterproof box, run fused circuits to each accessory, and test everything before sealing connections. As your needs grow, you can add a fuse block for cleaner organization, install a battery switch for convenience, or upgrade to dual batteries for extended runtime.
The most important takeaway: don’t cut corners on wire quality, fuse protection, or waterproofing. These three elements determine whether your system works reliably for years or fails repeatedly, leaving you without electronics when you need them most. Invest an extra hour during installation to do it right, and you’ll spend your time fishing instead of troubleshooting electrical problems.
Ready to power up your fishing kayak? Gather your materials, follow the steps in this guide, and you’ll have a professional-quality electrical system that keeps your electronics running from launch to takeout. For more guidance on outfitting your kayak, explore our fishing kayak buying guide and kayak gear resources.