
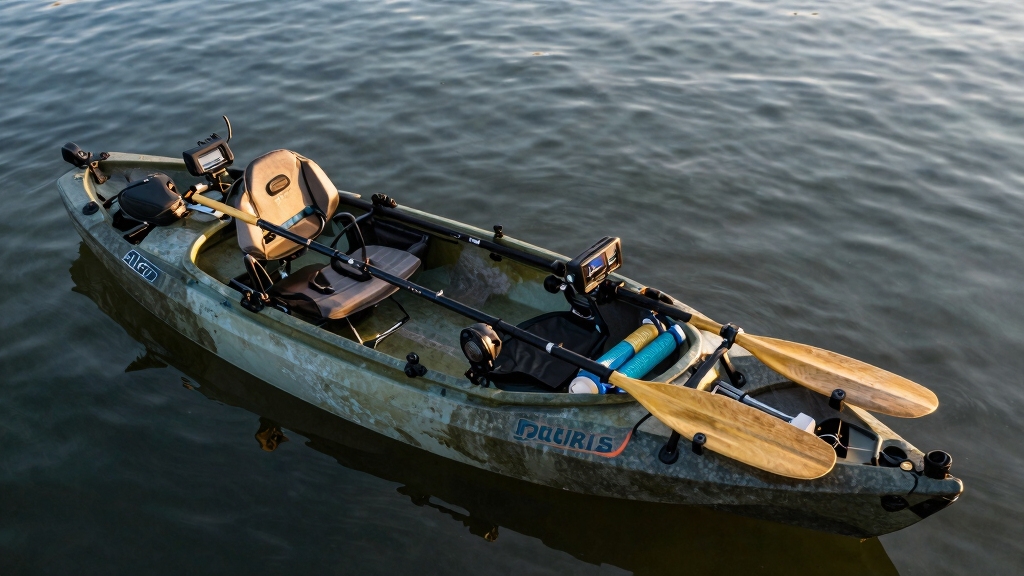
Quick Answer
Rigging a fishing kayak involves installing rod holders, mounting a fish finder, adding storage solutions, and setting up an anchor system to transform a basic kayak into a functional fishing platform. Most anglers can complete a basic rigging setup in 4-6 hours using common tools like a drill, marine sealant, and mounting hardware. The process requires planning your layout, drilling carefully (if needed), and securing accessories with waterproof hardware to ensure everything stays in place during your fishing trips.
Key Takeaways
- Rigging means customizing your kayak with fishing-specific accessories like rod holders, fish finders, and storage systems to match your fishing style
- Basic rigging costs $150-$500 for essential accessories, while advanced setups with electronics can reach $800-$1,200
- Sit-on-top kayaks are easier to rig than sit-inside models because they offer more accessible mounting surfaces and built-in scupper holes
- You don’t always need to drill holes – many accessories use track systems, clamps, or existing scupper holes for installation
- Plan your layout before drilling by placing accessories on the kayak and testing reach and comfort while seated
- Saltwater rigging requires corrosion-resistant hardware and more frequent maintenance than freshwater setups
- Most anglers can DIY their rigging in one weekend with basic tools, saving $300-$600 compared to buying pre-rigged kayaks
- Start with essentials first – rod holders and basic storage – then add electronics and advanced systems as you gain experience
What Does Rigging a Fishing Kayak Mean?
Rigging a fishing kayak means installing and customizing accessories that turn a standard kayak into a specialized fishing vessel. This includes mounting rod holders, fish finders, anchor systems, storage solutions, and safety equipment in positions that work for your fishing style and body mechanics.
The term “rigging” comes from traditional boat outfitting, where anglers customize their vessels with specific gear. For kayaks, rigging is more accessible because you’re working with a smaller platform and can often complete the work yourself without professional help.
What rigging typically includes:
- Rod holders (flush-mount, clamp-on, or track-mounted)
- Fish finder with transducer and display mount
- Anchor trolley system for positioning
- Storage solutions (crates, bags, bungee systems)
- Paddle clips or holders
- Safety gear mounting (lights, flag, whistle)
- Accessory tracks or rails for future additions
The beauty of rigging your own kayak is that you can customize it exactly for your needs. A bass angler fishing small ponds will rig differently than someone targeting offshore species, and that’s perfectly fine. Your rigging should reflect where you fish, what species you target, and how you prefer to fish.
For those just getting started, check out our beginner kayak fishing resources to understand the basics before diving into rigging.
Fishing Kayak Rigging for Beginners: Step-by-Step Process
Rigging a fishing kayak for the first time follows a logical sequence that prevents mistakes and ensures everything fits properly. Start with planning your layout, then install permanent fixtures, and finish with adjustable accessories.
Step 1: Plan Your Layout
Before drilling a single hole, sit in your kayak and physically place accessories where you think they should go. Reach for them while seated. Can you grab your rod without twisting awkwardly? Is the fish finder screen visible without blocking your paddle stroke? Spend 30 minutes testing positions – it saves hours of regret later.
Step 2: Install Rod Holders First
Rod holders are your foundation. Most anglers install 2-4 holders in different positions: one within easy reach for active fishing, others for trolling or storage. Flush-mount holders require drilling through the hull, while track-mounted versions slide into existing rails. Position them at angles that keep rods secure but accessible.
Step 3: Mount Your Fish Finder
Choose a location where the screen is visible but doesn’t interfere with paddling. Most anglers mount displays on the left or right side of the cockpit using RAM mounts or track systems. The transducer typically goes in a scupper hole or mounts through the hull. Run cables neatly along the kayak’s channels and secure them with zip ties.
Step 4: Add Storage Solutions
Milk crates, tackle bags, and bungee systems keep gear organized and accessible. Behind-seat crates work well for tackle boxes and tools. Front deck bungees hold items you need quickly. Use existing mounting points when possible to minimize drilling.
Step 5: Install Anchor System
An anchor trolley lets you adjust anchor position from bow to stern without moving the anchor itself. Install pulleys at bow and stern, run a continuous line through them, and attach your anchor line to a ring that slides along the trolley. This system is essential for staying positioned in current or wind.
Step 6: Test Everything
Before your first fishing trip, take the rigged kayak out for a test paddle. Check that nothing rattles, all mounts are secure, and you can reach everything comfortably. Make adjustments now rather than on the water.
Common beginner mistake: Installing too many accessories at once. Start with essentials and add more as you discover what you actually need. An over-rigged kayak is heavy, cluttered, and harder to paddle.
How Much Does It Cost to Rig a Fishing Kayak?
Rigging a fishing kayak costs between $150 and $1,200 depending on the accessories you choose and whether you install them yourself. A basic setup with essential gear runs $150-$300, while a fully loaded kayak with premium electronics and advanced systems can exceed $1,000.
Budget rigging ($150-$300):
- 2-3 flush-mount rod holders: $30-$60
- Basic paddle clip: $10-$15
- Milk crate or storage bag: $20-$40
- Anchor kit with rope: $30-$50
- Basic safety gear (whistle, light): $20-$30
- Installation supplies (drill bits, sealant): $40-$60
Mid-range rigging ($400-$700):
- Track system with multiple rod holders: $100-$150
- Entry-level fish finder: $150-$250
- Anchor trolley system: $40-$60
- Quality tackle storage crate: $50-$80
- RAM mounting system: $60-$100
- Marine-grade hardware and sealant: $50-$80
Premium rigging ($800-$1,200+):
- Advanced fish finder with GPS: $400-$700
- Multiple track systems: $150-$250
- Electric anchor system: $200-$300
- Specialized rod holder systems: $100-$150
- Premium storage solutions: $80-$120
- Professional-grade mounting hardware: $80-$100
These costs assume DIY installation. Professional rigging services add $200-$500 in labor, though most anglers find the work straightforward enough to handle themselves. The money you save on labor can go toward better accessories.
Choose budget rigging if: You’re new to kayak fishing, fish occasionally, or want to test the sport before investing heavily. Choose premium rigging if: You fish frequently, target species that require specialized gear, or want the convenience of advanced electronics.
For more guidance on selecting the right kayak before rigging, see our fishing kayak buying guide.
Sit-On-Top vs Sit-Inside Kayak for Fishing Rigging
Sit-on-top kayaks are significantly easier to rig for fishing than sit-inside models because they offer more mounting surfaces, better accessibility, and built-in scupper holes that simplify installation. Most fishing-specific kayaks are sit-on-top designs for these exact reasons.
Sit-on-top rigging advantages:
- Flat deck surfaces provide multiple mounting locations
- Scupper holes (drain holes) work perfectly for transducer installation and rod holder mounts
- No cockpit rim to work around when positioning accessories
- Easier to drill and seal because you can access both sides of the hull
- More stable platform for standing and moving gear around
- Tank wells (rear storage areas) accommodate milk crates and large tackle boxes
Sit-inside rigging challenges:
- Limited mounting space around the cockpit rim
- Difficult to install flush-mount rod holders without compromising hull integrity
- Transducer installation requires through-hull mounting or external brackets
- Less storage space for tackle and gear
- Harder to access installed accessories while seated in the cockpit
- Drilling through the hull risks water intrusion into sealed compartments
That said, sit-inside kayaks work fine for minimalist rigging. Clamp-on rod holders attach to the cockpit rim, portable fish finders mount with suction cups, and dry bags provide storage. This approach works well for anglers who prioritize paddling performance and fish calm waters where extensive rigging isn’t necessary.
Choose sit-on-top for rigging if: You want maximum customization options, fish frequently, or plan to install electronics and multiple accessories. Choose sit-inside if: You fish cold water (where the enclosed cockpit keeps you warmer), paddle long distances, or prefer minimal gear.
For more details on kayak styles, visit our sit on top kayak resource page.
What Accessories Do I Need to Rig a Fishing Kayak?
Essential fishing kayak accessories include rod holders, a fish finder, anchor system, storage solutions, and safety gear. These five categories cover the basics that most anglers need regardless of fishing style or location.
Rod holders (essential):
- Flush-mount holders install permanently through the hull
- Track-mounted holders slide into rail systems for adjustability
- Clamp-on holders attach to gunwales without drilling
- Plan for 2-4 holders minimum: one for active fishing, others for trolling or storage
Fish finder (highly recommended):
- Entry-level units ($150-$250) show depth and fish arches
- Mid-range models ($250-$500) add GPS and mapping
- Premium units ($500+) include side-imaging and advanced features
- Requires display mount, transducer, and battery
Anchor system (essential for most fishing):
- Folding grapnel anchor (1.5-3 lbs for kayaks)
- 50-100 feet of anchor line
- Anchor trolley system for positioning control
- Carabiner or clip for quick release
Storage solutions (essential):
- Behind-seat crate or tackle box holder
- Front deck bungee cords for quick-access items
- Dry bags for electronics and valuables
- Rod leashes to prevent losing rods overboard
Safety gear (mandatory):
- Personal flotation device (PFD) – legally required
- Whistle attached to PFD
- 360-degree light for low-light conditions
- Paddle leash to prevent losing your paddle
Optional but useful accessories:
- Paddle holder or clip
- Camera mount for documenting catches
- Cooler or fish bag for keeping catch fresh
- Anchor lock or cleat for securing anchor line
- Additional track systems for future expansion
Start with the essentials and add accessories as you identify specific needs. An over-rigged kayak is heavy, cluttered, and harder to manage on the water. Many experienced anglers run surprisingly minimal setups because they’ve learned what they actually use versus what seemed like a good idea.
For more on organizing your kayak gear, check our dedicated guide.


HIGH QUALITY - The kayak fishing rod holder Made of High Quality Material PC+ABC, strong and durable, corrosion resistant, hard to damage.
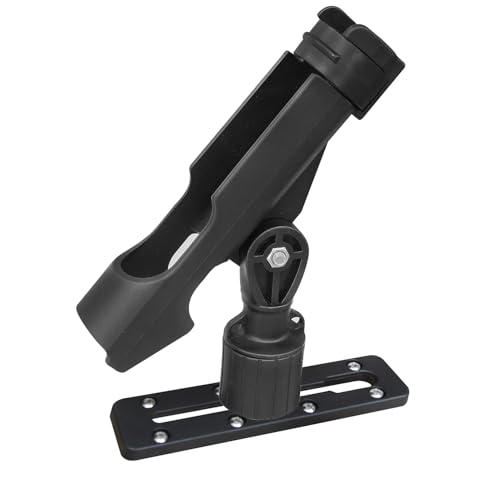
Made of UV stabilized fiberglass reinforced nylon.
How to Install Rod Holders on a Kayak
Installing rod holders on a kayak requires choosing the right holder type, marking precise locations, drilling carefully (if needed), and sealing all penetrations with marine-grade sealant. The entire process takes 30-60 minutes per holder once you’ve planned your layout.
Flush-mount rod holder installation:
Position the holder while seated in the kayak. Mark the location with tape or marker. The holder should be within comfortable reach and angled to keep the rod secure (typically 15-30 degrees from vertical).
Drill the pilot hole from inside the kayak using a small bit (1/8 inch). This ensures you’re drilling in the right spot before committing to the full-size hole.
Drill the full hole using the size specified by your rod holder (usually 1.5-2 inches). Drill from the outside in to prevent the gel coat from chipping. Go slowly and let the hole saw do the work.
Clean the hole and surrounding area. Remove all plastic shavings and wipe with rubbing alcohol to ensure good sealant adhesion.
Apply marine sealant (like 3M 5200 or Sikaflex) generously around the hole and on the rod holder’s flange. Don’t skimp – excess sealant squeezes out and can be cleaned up, but insufficient sealant leads to leaks.
Insert and secure the holder with the provided hardware. Tighten bolts evenly but don’t overtighten, which can crack the plastic. Wipe away excess sealant with a rag and mineral spirits.
Let cure for 24-48 hours before using the kayak. Most marine sealants need time to fully cure and create a waterproof seal.
Track-mounted rod holder installation:
Track systems are easier because they don’t require drilling through the hull. Install the track first (which does require drilling and sealing), then rod holders slide into the track and lock in place. This gives you flexibility to adjust positions later.
Clamp-on rod holder installation:
The no-drill option. These holders clamp onto the kayak’s gunwale or rails using adjustable brackets. They’re less permanent and can be removed or repositioned easily, making them ideal for anglers who want to avoid drilling or who use multiple kayaks.
Common installation mistake: Drilling holes without testing the position first. Always sit in the kayak and physically reach for the holder location before drilling. What looks right when the kayak is empty often feels awkward when you’re seated with a paddle in hand.

Conveniently and securely holds rod grip sizes up to 1 ¾ inches in diameter

【Strong Alumium Rod Holder】- HiUmi Rod holder is constructed from PVC coated aluminum.

[Heavy Duty Flag pole]:The boat flag pole is made of marine stainless steel, Flag pole for boat design with 0.45mm thick wall, Anti-rust and anti-corrosion, our boat flag pole kit is built to withstand harsh marine environments.
Best Way to Mount a Fish Finder on a Kayak
The best way to mount a fish finder on a kayak is using a RAM mounting system attached to a track or existing mounting point, paired with a scupper-hole transducer installation. This combination provides a secure, adjustable display mount and reliable sonar readings without major hull modifications.
Display mounting options:
RAM mount system (most popular): These ball-and-socket mounts attach to tracks, gunwales, or flat surfaces and hold the fish finder display securely while allowing angle adjustments. The system is modular, so you can swap components or reposition the mount as needed. Cost: $60-$120 for a complete setup.
Track-mounted arms: If your kayak has accessory tracks, mounting arms slide into the track and provide a stable platform for the display. These work well because they’re adjustable along the track length and can be removed when not needed.
Dashboard mounts: Some kayaks have molded dashboards with flat mounting surfaces. These work for permanent installations but offer less adjustability than RAM systems.
Transducer installation options:
Scupper-hole mount (easiest): A transducer arm fits into an existing scupper hole (drain hole) and positions the transducer below the kayak hull. This requires no drilling and works well for most kayaks. The transducer reads through the water directly, providing accurate depth and fish detection. Cost: $20-$40 for the mount.
Through-hull installation (most permanent): Drilling through the hull and mounting the transducer inside creates the cleanest installation with the best signal quality. However, it requires careful drilling, sealing, and creates a permanent modification. Best for dedicated fishing kayaks you plan to keep long-term.
Shoot-through-hull (no drilling): Mounting the transducer inside the hull and letting it read through the plastic works for some kayak materials but not all. Test this method before committing because signal quality varies by hull thickness and material.
Installation steps for RAM mount + scupper transducer:
- Install track or mounting base where you want the display (typically left or right side of cockpit)
- Attach RAM mount components and test display position while seated
- Install transducer arm in appropriate scupper hole (usually near your seat)
- Run transducer cable from scupper to display mount, securing with zip ties
- Connect battery (most anglers use a small 12V battery in a waterproof box)
- Test the system on water before finalizing cable routing
Choose scupper-mount if: You want easy installation, plan to remove the fish finder occasionally, or fish multiple kayaks. Choose through-hull if: You want the cleanest installation, fish frequently, and don’t mind permanent modifications.
For more on electronics and kayak fishing tips, see our dedicated guides.

Aluminum Alloy Construction: Crafted from high-temperature die-cast aluminum alloy, this mount boasts a durable polyethylene powder coating, ensuring adaptability to various rigorous environments.

Fishfinder track mount designed for track mounting systems including the RAM Tough-Track and other third party track systems

[Complete Package Included] The Xik Fish Finder Mount comes with a 3.56-inch C-size double-socket arm, a 6.23" x 2" universal marine electronics mounting plate, and a 1.5-inch ball T-bolt base.
Common Mistakes When Rigging a Fishing Kayak
The most common rigging mistakes include drilling holes without planning the layout, using non-marine hardware that corrodes, installing too many accessories at once, and failing to test the setup before a fishing trip. These errors lead to wasted money, damaged kayaks, and frustrating days on the water.
Mistake 1: Drilling without testing positions
Sitting in your kayak and physically reaching for accessories before drilling saves countless headaches. What looks perfect when the kayak is empty often feels awkward when you’re seated with a paddle. Test every position while seated, preferably with someone handing you items to simulate fishing.
Mistake 2: Using automotive or household hardware
Standard steel bolts and screws rust quickly in marine environments, especially saltwater. Always use stainless steel (316 grade for saltwater) or marine-grade hardware. The extra $10-$20 for proper hardware prevents rust stains, corrosion, and failed mounts.
Mistake 3: Insufficient sealant
Skimping on marine sealant leads to leaks. Apply sealant generously around every hole and on mounting flanges. Excess sealant squeezes out and can be cleaned up, but insufficient sealant creates slow leaks that are hard to diagnose later.
Mistake 4: Over-rigging the kayak
Adding every accessory that looks cool creates a heavy, cluttered kayak that’s harder to paddle and transport. Start with essentials (rod holders, basic storage, safety gear) and add more only after you’ve identified specific needs through actual fishing experience.
Mistake 5: Ignoring weight distribution
Mounting heavy accessories (batteries, fish finders, tackle boxes) all in one area affects kayak balance and stability. Distribute weight evenly and keep heavy items low and centered. Test the kayak’s stability after rigging and before heading to open water.
Mistake 6: Not securing loose items
Everything on a kayak should be attached with leashes, bungees, or secured in closed storage. Rods, paddles, tackle boxes, and even fish finders can go overboard during a capsize or rough water. Losing a $300 fish finder because you didn’t use a $5 leash is a painful lesson.
Mistake 7: Drilling in structural areas
Avoid drilling near seams, stress points, or areas that flex significantly. These locations are more likely to crack over time. When in doubt, consult your kayak’s manual or contact the manufacturer about safe drilling locations.
Mistake 8: Forgetting about maintenance access
Install accessories in ways that allow you to reach mounting hardware for tightening or removal. Sealed compartments and hard-to-reach areas make future maintenance difficult or impossible.
Do I Need to Drill Holes in My Kayak to Rig It?
You don’t always need to drill holes to rig a fishing kayak, especially if your kayak has pre-installed track systems or if you choose clamp-on and scupper-mounted accessories. However, drilling provides the most secure and customizable installations for permanent accessories like flush-mount rod holders.
No-drill rigging options:
- Track-mounted accessories: If your kayak came with accessory tracks, rod holders, fish finder mounts, and other gear slide into these tracks without additional drilling
- Clamp-on rod holders: These attach to gunwales or rails using adjustable clamps and can be repositioned or removed easily
- Scupper-mounted accessories: Transducers, rod holders, and camera mounts designed for scupper holes (drain holes) install without drilling
- Suction-cup mounts: Portable fish finders and camera mounts use suction cups for temporary attachment
- Bungee and strap systems: Storage solutions that use existing deck rigging or wrap around the kayak
When drilling makes sense:
- Installing flush-mount rod holders for the cleanest, most secure setup
- Adding accessory tracks to kayaks that don’t have them
- Mounting through-hull transducers for best fish finder performance
- Creating custom mounting points for specialized accessories
- Permanent installations on dedicated fishing kayaks
Drilling best practices:
- Use marine-grade drill bits designed for plastic
- Drill slowly to prevent cracking or melting the plastic
- Always seal holes with marine sealant (3M 5200, Sikaflex, or similar)
- Drill from the outside in to prevent gel coat chipping
- Use backing plates or washers to distribute load and prevent cracking
Choose no-drill rigging if: You’re new to kayak fishing, want to preserve resale value, use multiple kayaks, or aren’t sure about permanent modifications. Choose drilling if: You’ve tested your layout, want the most secure installations, and plan to keep the kayak long-term.
Many anglers start with no-drill options and add drilled installations later once they’ve confirmed what works for their fishing style. This approach minimizes risk while you’re learning.
For more on different fishing kayak types and their rigging options, check our comparison guides.
How to Rig a Kayak for Saltwater vs Freshwater Fishing
Saltwater kayak rigging requires corrosion-resistant hardware, more robust anchor systems, and additional safety equipment compared to freshwater setups. Freshwater rigging can use lighter gear and simpler systems because conditions are generally calmer and less corrosive.
Saltwater rigging requirements:
- 316-grade stainless steel hardware: Regular stainless steel (304 grade) corrodes in saltwater. Spend extra for 316 marine-grade hardware on all bolts, screws, and metal components.
- Heavier anchor system: Saltwater currents and tides require heavier anchors (3-5 lbs) and longer anchor line (100+ feet). An anchor trolley is essential for positioning.
- Enhanced safety gear: VHF radio or communication device, 360-degree light, whistle, and knife are critical for offshore fishing where conditions change quickly.
- Rod leashes: Saltwater fish are stronger and more likely to pull rods overboard. Leash every rod to the kayak.
- Sealed electronics: Ensure all electronics have waterproof ratings (IPX7 or better) and use waterproof battery boxes.
- Rinse system: Bring fresh water to rinse gear after each trip. Saltwater corrosion happens fast without proper maintenance.
Freshwater rigging requirements:
- Standard stainless steel hardware: 304-grade stainless steel works fine for freshwater and costs less than marine-grade.
- Lighter anchor system: A 1.5-2 lb anchor with 50 feet of line handles most freshwater situations. Lakes and rivers rarely need the heavy gear required for ocean fishing.
- Basic safety gear: PFD, whistle, and light cover most freshwater requirements. Communication devices are less critical on small lakes and rivers.
- Simpler storage: Freshwater tackle is often lighter and less specialized, requiring less complex storage solutions.
- Standard electronics: Basic fish finders without GPS work well for small lakes and rivers where navigation is straightforward.
Maintenance differences:
Saltwater kayaks need rinsing with fresh water after every trip and monthly inspections of all hardware for corrosion. Freshwater kayaks require less frequent maintenance but should still be cleaned and inspected regularly.
Choose saltwater rigging if: You fish coastal waters, bays, or offshore areas where corrosion and harsh conditions are concerns. Choose freshwater rigging if: You fish lakes, rivers, and ponds where lighter gear and simpler systems are adequate.
Many anglers who fish both environments maintain two sets of accessories or choose saltwater-grade hardware for everything to simplify their setup. The extra cost for marine-grade hardware is worth it if you fish saltwater even occasionally.
For specific environments, see our guides on ocean kayak fishing and river kayak fishing.
Can You Rig an Inflatable Kayak for Fishing?
Yes, you can rig an inflatable kayak for fishing using specialized accessories designed for inflatable boats, though your options are more limited than with hard-shell kayaks. Clamp-on rod holders, portable fish finders, and strap-based storage systems work well without requiring permanent modifications.
Inflatable kayak rigging options:
- Clamp-on rod holders: These attach to the kayak’s rigid components (seats, frames, or D-rings) without drilling or gluing
- Portable fish finders: Suction-cup transducers and clamp-on display mounts work perfectly for inflatables
- Strap-based storage: Dry bags, tackle boxes, and gear attach using the kayak’s D-rings and bungee systems
- Inflatable rod holders: Some manufacturers make rod holders that attach to inflatable tubes using straps or adhesive patches
- Anchor systems: Small folding anchors work fine, attached to D-rings with carabiners for quick release
What doesn’t work on inflatables:
- Drilling holes (obviously – you’d create leaks)
- Heavy flush-mount accessories that require rigid mounting surfaces
- Through-hull transducers
- Permanent adhesive mounts (these can damage the inflatable material)
Advantages of rigging inflatables:
- No permanent modifications preserve the kayak’s versatility
- Lightweight rigging keeps the kayak portable and easy to transport
- Quick setup and breakdown for anglers who travel or have limited storage
- Lower cost because you’re using simpler, portable accessories
Disadvantages:
- Fewer mounting options compared to hard-shell kayaks
- Less stable platform for standing or moving around
- Accessories may shift or come loose more easily
- Limited weight capacity restricts how much gear you can add
Choose inflatable kayak rigging if: You need portability, have limited storage space, or want a kayak that serves multiple purposes beyond fishing. Choose hard-shell rigging if: You fish frequently, want maximum customization, or need a stable platform for advanced techniques.
For more on inflatable fishing kayaks, see our detailed comparison guide.
How Long Does It Take to Fully Rig a Fishing Kayak?
Fully rigging a fishing kayak takes 4-8 hours for most anglers completing a basic to mid-range setup, spread over one or two days to allow for sealant curing time. Complex installations with multiple electronics, custom modifications, and advanced systems can take 12-16 hours over several days.
Time breakdown by task:
- Planning and layout: 1-2 hours (testing positions, marking locations, gathering tools)
- Installing 3-4 rod holders: 2-3 hours (drilling, sealing, mounting, curing time)
- Fish finder installation: 2-3 hours (mounting display, installing transducer, routing cables, testing)
- Anchor trolley system: 1-2 hours (installing pulleys, running line, testing)
- Storage solutions: 1 hour (attaching crates, installing bungees, organizing gear)
- Final testing and adjustments: 1 hour (on-water testing, repositioning accessories)
Factors that affect rigging time:
- Experience level: First-time riggers take longer as they learn techniques and troubleshoot issues
- Kayak design: Kayaks with pre-installed tracks and mounting points rig faster than bare-hull models
- Complexity of setup: Basic rigging (rod holders and storage) takes half the time of advanced setups with electronics
- Number of accessories: Each additional accessory adds 30-60 minutes
- Drilling vs no-drill: No-drill installations using clamps and tracks save 2-3 hours
- Sealant curing time: Marine sealant needs 24-48 hours to cure, adding waiting time between installation and use
Realistic timeline:
- Weekend 1, Day 1 (Saturday): Plan layout, install rod holders, let sealant cure overnight
- Weekend 1, Day 2 (Sunday): Install fish finder, add storage, install anchor system
- Following week: Test on water, make adjustments, finalize setup
Speed up the process:
- Buy pre-assembled kits (rod holder kits, anchor trolley kits) that include all hardware
- Use track systems instead of drilling individual holes
- Start with essential accessories only and add more later
- Watch installation videos specific to your kayak model before starting
- Have all tools and materials ready before beginning
Choose slow, careful rigging if: This is your first time, you’re drilling expensive kayaks, or you want to avoid mistakes. Choose faster rigging if: You’re experienced, using no-drill accessories, or working with kayaks that have extensive pre-installed mounting options.
Most anglers underestimate rigging time on their first kayak. Plan for the full day and you’ll finish feeling accomplished rather than rushed.
Is Rigging a Kayak Yourself Worth It or Should I Buy Pre-Rigged?
Rigging a kayak yourself saves $300-$600 compared to buying pre-rigged models and allows complete customization for your fishing style, making DIY rigging worth it for most anglers. Pre-rigged kayaks make sense if you’re new to fishing, want immediate use, or lack tools and workspace for DIY installation.
DIY rigging advantages:
- Cost savings: Pre-rigged kayaks charge $300-$600 more than bare models plus the cost of accessories
- Custom configuration: You choose exactly which accessories go where based on your needs
- Quality control: You select premium accessories rather than accepting whatever the manufacturer includes
- Learning experience: Understanding your rigging helps with maintenance and future modifications
- Flexibility: You can start minimal and add accessories as you discover what you need
DIY rigging disadvantages:
- Time investment: 4-8 hours of work plus research and planning
- Tool requirements: Drill, hole saws, marine sealant, and other tools cost $50-$100 if you don’t own them
- Risk of mistakes: Drilling in wrong locations or improper sealing can damage the kayak
- No warranty on modifications: Some manufacturers void warranties if you drill the hull
Pre-rigged kayak advantages:
- Immediate use: Launch and fish the same day you buy it
- Professional installation: Accessories are installed correctly with proper sealing
- Warranty coverage: Manufacturer warranties typically cover pre-installed accessories
- Proven layouts: Rigging positions are tested and optimized by the manufacturer
- No tools needed: Everything is ready to go
Pre-rigged kayak disadvantages:
- Higher cost: You pay premium prices for accessories and installation labor
- Limited customization: You get the manufacturer’s layout, which may not match your preferences
- Lower-quality accessories: Pre-rigged kayaks often include budget accessories to keep costs down
- Unnecessary features: You might pay for accessories you don’t need or want
Choose DIY rigging if: You enjoy hands-on projects, want to save money, have specific accessory preferences, or fish frequently enough to justify the time investment. Choose pre-rigged if: You’re new to kayak fishing, want to start fishing immediately, lack tools or workspace, or prefer professional installation.
Middle-ground option: Buy a kayak with pre-installed track systems and add your own accessories. This gives you customization flexibility without requiring hull modifications. Many modern fishing kayaks come with extensive track systems that accept a wide range of accessories.
For help choosing the right kayak before rigging, see our fishing kayak comparison guide.
How to Organize Fishing Gear on a Small Kayak
Organizing fishing gear on a small kayak requires prioritizing essential items, using vertical storage solutions, and keeping frequently used gear within arm’s reach while storing backup items in sealed compartments. Effective organization maximizes limited space and prevents clutter that interferes with fishing and paddling.
Organization principles for small kayaks:
Keep it minimal: Bring only what you’ll actually use on that specific trip. Small kayaks force you to be selective, which often improves fishing because you’re not distracted by unnecessary gear.
Use vertical space: Milk crates, tackle bags, and rod holders utilize vertical space above the deck rather than spreading gear horizontally. A behind-seat crate holds as much as three horizontal tackle boxes while using less deck space.
Create zones: Designate specific areas for different gear types – rods in holders, tackle in crate, tools in pocket, safety gear in front hatch. Consistent organization means you always know where to find items.
Secure everything: Use rod leashes, gear tethers, and closed storage for anything that could go overboard. Losing gear in a capsize or rough water is frustrating and expensive.
Specific organization solutions:
- Behind-seat crate: Holds 2-3 tackle boxes, pliers, net, and other tools. Bungee cords keep it secure and allow quick removal.
- Front deck bungees: Store items you need frequently – extra lures, sunscreen, water bottle, camera. Keep this area clear enough that bungees don’t interfere with paddling.
- Rod holders: Use multiple holders to keep active rods ready and store backup rods. Angle holders to prevent rods from interfering with each other.
- Dry bags: Store electronics, wallet, keys, and other items that must stay dry. Attach to D-rings so they don’t float away.
- Paddle holder: Clip or strap keeps your paddle secure when fishing so it doesn’t drift away.
- Tool pocket or bag: Keep pliers, knife, hook remover, and other small tools in one accessible location.
What to leave behind on small kayaks:
- Multiple tackle boxes (consolidate into one or two)
- Backup rods beyond what you’ll realistically use
- Large coolers (use a small soft cooler or fish bag instead)
- Excessive electronics (one fish finder is enough for most situations)
- Bulky rain gear (wear it or use a compact dry bag)
Organization mistakes:
- Storing heavy items high or far from center (affects stability)
- Blocking access to essential gear with less important items
- Using open storage for small items that can blow away
- Overloading the kayak beyond its weight capacity
- Forgetting to secure items with leashes or tethers
Choose minimal organization if: You fish small waters, target one species, or prefer simple setups. Choose comprehensive organization if: You fish all day, target multiple species, or need specialized gear for your techniques.
For more on managing fishing gear effectively, see our dedicated guides.
Frequently Asked Questions
What’s the first thing I should install when rigging a fishing kayak?
Install rod holders first because they’re the most essential fishing accessory and their positions affect where other gear can go. Place them while seated in the kayak to ensure comfortable reach, then build the rest of your rigging around these primary mounting points.
Can I use regular screws and bolts for kayak rigging?
No, use marine-grade stainless steel hardware (316 grade for saltwater, 304 for freshwater) because regular hardware corrodes quickly in wet environments. The extra cost is minimal compared to replacing rusted hardware or repairing damage from failed mounts.
How do I know where it’s safe to drill holes in my kayak?
Drill in flat, thick sections of the hull away from seams, stress points, and areas that flex significantly. Consult your kayak’s manual or contact the manufacturer for guidance on safe drilling locations specific to your model.
Do I need a fish finder for kayak fishing?
A fish finder isn’t essential but significantly improves success by showing depth, structure, and fish location. Start without one if you’re on a budget and add it later once you’ve confirmed kayak fishing is for you. Many anglers catch plenty of fish without electronics.
How much weight can I add to my kayak when rigging?
Check your kayak’s weight capacity and subtract your body weight plus paddle and safety gear. The remaining capacity is available for rigging and fishing gear. Most fishing kayaks handle 50-100 lbs of accessories and gear beyond the paddler’s weight, but verify your specific model’s limits.
Should I rig my kayak before or after my first fishing trip?
Take at least one trip with minimal rigging (just rod holders and basic storage) to understand how you fish from a kayak before installing permanent accessories. This experience helps you make better decisions about what to install and where to position it.
Can I remove rigging accessories if I want to use the kayak for recreational paddling?
Track-mounted and clamp-on accessories remove easily for recreational use. Flush-mount rod holders and drilled installations are permanent, though you can cap unused rod holders with plugs. Plan your rigging based on whether you want a dedicated fishing kayak or a multi-purpose vessel.
How often should I check my rigging for loose hardware?
Inspect all mounting hardware before each fishing trip and tighten any loose bolts or screws. Vibration and stress from paddling and fishing gradually loosen hardware over time. Monthly detailed inspections catch issues before they become problems.
What’s the best way to run cables for electronics on a kayak?
Route cables through existing channels or along the kayak’s sides, securing them every 6-12 inches with zip ties or cable clips. Keep cables away from areas where you’ll step or place gear. Leave slight slack to prevent tension from pulling on connections.
Do I need an anchor trolley or can I just tie off to one end?
An anchor trolley is worth the $40 and one hour of installation because it lets you adjust anchor position from bow to stern without moving the anchor. This control is essential for positioning in wind or current. Fixed anchor points work only in calm conditions.
Can I rig a tandem kayak for fishing?
Yes, tandem kayaks rig similarly to solo models but require duplicate accessories (rod holders, storage) for each position. Coordinate rigging with your fishing partner to ensure both positions have access to needed gear without interfering with each other.
How do I prevent my rigging from rattling while paddling?
Use foam padding, rubber washers, or adhesive-backed felt on metal-to-plastic contact points. Secure loose items with bungees or straps. A quiet kayak is more pleasant to paddle and less likely to spook fish in shallow water.
Conclusion
Rigging a fishing kayak transforms a basic paddlecraft into a specialized fishing platform tailored to your exact needs and fishing style. The process requires planning, patience, and attention to detail, but the result is a customized setup that makes every fishing trip more productive and enjoyable.
Start with essential accessories – rod holders, basic storage, and safety gear – then add electronics and advanced systems as you gain experience and identify specific needs. This incremental approach prevents over-rigging while ensuring you have what matters most from day one.
Whether you choose DIY rigging to save money and customize every detail, or buy a pre-rigged kayak for immediate use, understanding the rigging process helps you make better decisions and maintain your setup over time. The best rigging is the one that matches how you actually fish, not what looks impressive in photos.
Take action now:
- Sit in your kayak and test accessory positions before drilling any holes
- Start with 2-3 rod holders and basic storage, then expand your setup
- Use marine-grade hardware and sealant for all installations
- Test your rigged kayak in calm water before heading to your fishing spots
- Join online kayak fishing communities to learn from experienced anglers’ setups
The water is waiting, and your perfectly rigged fishing kayak will help you make the most of every trip. Get started with the basics, learn what works for your fishing style, and build your ideal setup one accessory at a time.





