
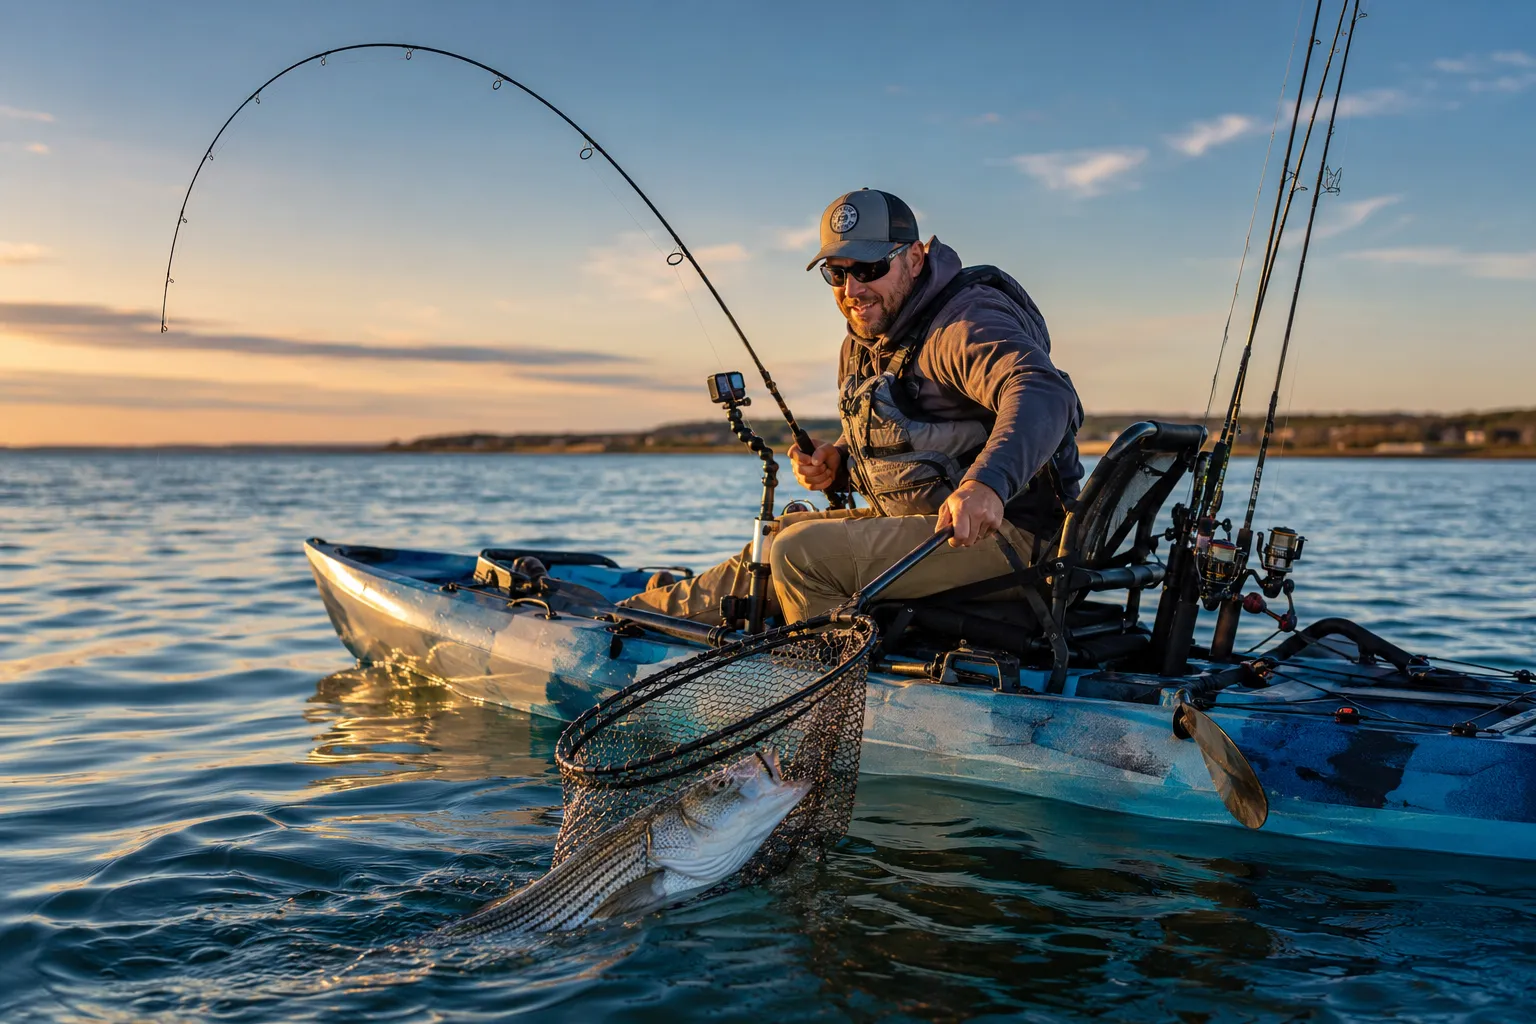
Quick Answer: Landing a big fish from a kayak requires keeping your center of gravity low, positioning the kayak perpendicular to the fish during the final approach, and using a long-handled landing net or lip gripper while maintaining three points of contact with the kayak. Stay seated for most situations, secure your paddle before the final landing attempt, and let the fish tire completely before bringing it within netting range to avoid capsizing.
Key Takeaways
- Stay seated and centered during the fight to maintain stability; standing increases capsize risk significantly
- Use a landing net with a 48-60 inch handle for kayak fishing to reach fish without leaning dangerously over the side
- Position your kayak perpendicular to the fish (T-bone position) during the final landing approach for maximum stability
- Secure your paddle in a holder or across your lap before attempting to net or grip the fish
- Let the fish tire completely before bringing it close; a green fish thrashing near the kayak can flip you
- Lip grippers work better than nets for toothy species like pike or fish you plan to release quickly
- Most fishing kayaks can handle 20+ pound fish if you use proper technique and don’t panic
- Never anchor from the side of your kayak when fighting big fish; use a quick-release anchor trolley system
- Practice the motion of netting on dry land or with small fish before targeting trophy-sized catches
What Gear Do You Need to Land a Big Fish From a Kayak
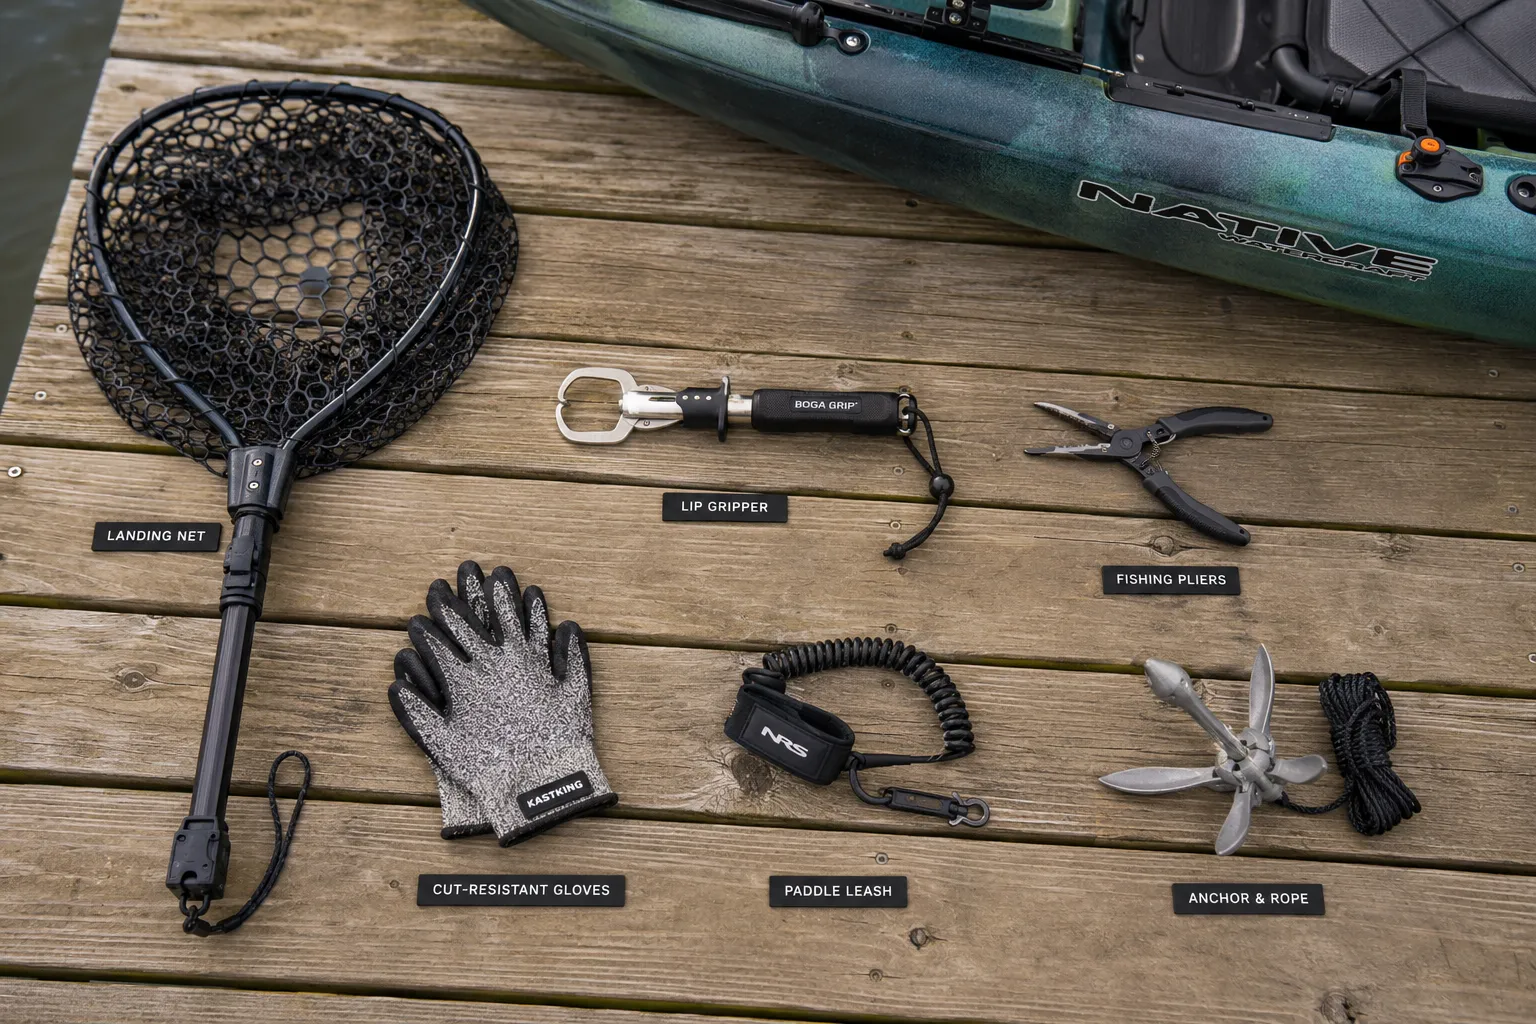
Landing big fish from a kayak requires specialized gear that differs from bank or boat fishing. At minimum, you need a long-handled landing net (48-60 inches), a paddle leash or holder, and either a lip gripper or fish grips for species with teeth.
Essential landing gear includes:
- Landing net: Choose a net with a 48-60 inch telescoping or fixed handle and a hoop diameter of at least 20-24 inches. Rubberized mesh is gentler on fish and prevents hooks from tangling.
- Lip gripper or Boga Grip: For bass, pike, muskie, or any toothy species, a mechanical lip gripper lets you control the fish without putting hands near teeth or gills.
- Paddle leash: A coiled leash keeps your paddle attached when you need both hands free. Alternatively, a paddle holder mounted within arm’s reach works well.
- Cut-resistant gloves: Protect your hands from line cuts, gill plates, and sharp fins when handling big fish.
- Anchor system with quick release: An anchor trolley with a quick-release clip lets you stay positioned but break free instantly if a fish pulls too hard.
- Rod holder: Keeps your rod secure when you need to switch to the net or gripper.
Common mistake: Buying a short-handled net designed for boat fishing. In a kayak, you sit much lower to the water and need the extra reach to avoid leaning dangerously over the side. A 36-inch handle that works fine on a bass boat will force you to lean too far in a kayak, increasing capsize risk.
Choose a lip gripper if you’re targeting bass, pike, or muskie and plan to release them quickly. Choose a net if you’re after species without prominent lower jaws (like trout, redfish, or snook) or if you want to photograph the fish in the net before release.
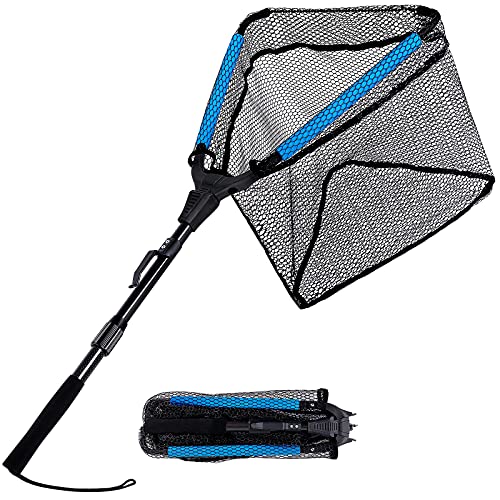
SECOND GENERATION FLOATING FISHING LANDING NET -A new floating net head. Two float tubes added to two of the three triangular sides which can provide buoyancy. With the added floats, there is no need to worry about the net sinking or getting dropped of your kayak or boat.

High-quality Components & Floating Design: KastKing Pontus fish landing nets are built with high-quality 6063 Aluminum alloy handle and durable FBR frame for exceptional performance. The extension handle of 61in is equipped with a reinforced aluminum rib for added strength. The net is designed with floating EVA foam padding, allowing for effortless retrieval from the water while minimizing the risk of loss. Remember: hold the handle and extension pole with both hands and drag the net laterally.

【Collapsible Telescopic Pole Handle】- 15.8" x 11.8" hoop, 9.85" depth and 39"Extended Length (Telescopic Pole)The classical shape and size of the fishing net will surely look good in your pictures. Long handle with excellent grip afford plenty of leverage to land the next fish.
How Do You Keep a Kayak Stable When Fighting a Large Fish
Keeping your kayak stable during a big fish fight comes down to body position, weight distribution, and letting the fish do the work rather than forcing it. Stay seated with your weight centered over the kayak’s midline, keep your rod tip up to absorb surges, and avoid sudden movements.
Stability techniques during the fight:
Sit low and centered: Keep your butt firmly in the seat and your core engaged. Leaning to one side or twisting your torso shifts your center of gravity and reduces stability.
Use your rod as a shock absorber: Keep the rod tip at a 45-60 degree angle. This angle lets the rod bend and absorb the fish’s runs instead of transferring all that force directly to your body and kayak.
Point your knees outward: Brace your knees against the inside walls of a sit-inside kayak or against the thigh braces of a sit-on-top. This creates a stable tripod with your butt as the third point.
Let the fish run: Don’t try to muscle a big fish. Let your drag do the work. Forcing a fish creates erratic movements that destabilize the kayak.
Keep the fish away from the kayak: During the fight, keep the fish at least 10-15 feet away. A big fish thrashing right next to the hull can rock the kayak violently.
Edge case: If you’re in a narrow kayak (under 30 inches wide) and hook a truly massive fish (40+ pounds), consider pointing the bow directly at the fish and fighting it from that angle. This positions the kayak’s longest, most stable axis in line with the pulling force.
Width matters: A kayak that’s 33-36 inches wide provides significantly more stability than a 28-30 inch model when fighting big fish. If you regularly target large species, the extra width is worth the slight loss in paddling speed.
Should You Stand Up or Stay Seated When Landing a Big Fish in a Kayak
Stay seated when landing a big fish from a kayak unless you have a dedicated standing platform, excellent balance, and calm water conditions. Standing raises your center of gravity dramatically and increases capsize risk by 300-400% compared to remaining seated, especially during the critical netting moment when the fish is close to the kayak.
When to stay seated (90% of situations):
- Water has any chop, current, or boat wakes
- Fish is still green (not fully tired)
- You’re in a kayak narrower than 33 inches
- You haven’t practiced standing extensively
- Wind speed exceeds 10 mph
- You’re using a sit-inside kayak
When standing might be acceptable:
- You have a dedicated standing platform or casting deck
- Water is glass-calm with no current
- Fish is completely exhausted
- Kayak is 34+ inches wide with a flat, stable hull design
- You’ve practiced standing hundreds of times
- You need the height advantage to see the fish in murky water
The safest approach: Fight and land the entire fish while seated. Modern long-handled nets (60 inches) give you plenty of reach without standing. The few extra inches of height you gain by standing aren’t worth the risk of capsizing with a trophy fish on the line.
Pro tip: If you absolutely must stand to see the fish in dark water, stand during the fight when the fish is still 20+ feet away, then sit back down before bringing it within netting range. The final landing moment is when kayaks flip most often.
What Size Net Do You Need for Landing Fish From a Kayak
For kayak fishing, you need a landing net with a handle length of 48-60 inches and a hoop diameter of 20-24 inches to effectively land big fish without compromising stability. The extended handle length is critical because you sit much lower in a kayak than in a boat, and leaning over the side to reach a short-handled net creates dangerous instability.
Net specifications for kayak fishing:
| Net Component | Recommended Size | Why It Matters |
|---|---|---|
| Handle length | 48-60 inches | Lets you reach fish without leaning over the side |
| Hoop diameter | 20-24 inches | Accommodates fish up to 30+ inches long |
| Mesh type | Rubberized or knotless | Protects fish slime coat, prevents hook tangles |
| Mesh depth | 18-24 inches deep | Keeps fish contained once netted |
Handle material considerations:
- Telescoping aluminum: Collapses for storage, extends when needed, affordable
- Fixed fiberglass: Stronger and more rigid, but harder to store on a kayak
- Carbon fiber: Lightest option, reduces fatigue, but most expensive
Common mistake: Buying a net with a 36-inch handle because it’s cheaper or easier to store. That extra 12-18 inches of handle length is the difference between safely netting a fish and leaning so far over the side that you capsize.
Storage solution: Mount the net vertically along the side of your kayak using bungee cords or dedicated net holders. Some anglers attach the net to their anchor trolley line so it’s always within reach but doesn’t interfere with paddling.
Choose a 24-inch hoop if you target species that commonly exceed 25 inches (striped bass, redfish, pike, muskie). Choose a 20-inch hoop if you primarily catch bass, trout, or smaller inshore species and want easier storage.

【Collapsible Telescopic Pole Handle】- 15.8" x 11.8" hoop, 11.8" depth and 39" extended Length (Telescopic Pole)The classical shape and size of the fishing net will surely look good in your pictures. Long handle with excellent grip afford plenty of leverage to land the next fish.

High-quality Components & Floating Design: KastKing Pontus fish landing nets are built with high-quality 6063 Aluminum alloy handle and durable FBR frame for exceptional performance. The extension handle of 61in is equipped with a reinforced aluminum rib for added strength. The net is designed with floating EVA foam padding, allowing for effortless retrieval from the water while minimizing the risk of loss. Remember: hold the handle and extension pole with both hands and drag the net laterally.
How to Avoid Tipping Over When Reeling in a Heavy Fish From a Kayak
Avoiding a capsize when reeling in a heavy fish requires maintaining a low center of gravity, keeping the fish on the side of the kayak rather than directly in front or behind, and using smooth, controlled movements instead of jerky rod pumps. The moment of greatest risk is when the fish is within 5-10 feet of the kayak and still has energy to thrash.
Anti-capsize techniques:
Keep your weight centered: Your butt should stay planted in the seat with equal weight on both sides. Resist the urge to lean toward the fish.
Position the fish at your 3 o’clock or 9 o’clock: Having the fish directly beside you (perpendicular to the kayak’s centerline) is the most stable position. Avoid fighting the fish off the bow or stern, which can spin the kayak.
Use your drag, not your muscles: Set your drag to 25-30% of your line’s breaking strength and let it do the work. Trying to muscle a fish creates sudden, destabilizing movements.
Reel only when the fish isn’t pulling: Gain line when the fish pauses or swims toward you. When it runs, let it go and keep the rod tip up.
Brace with your legs: Press your knees or thighs against the kayak’s sides to create a stable base. This engages your core and lower body for balance.
Make the final approach perpendicular: When it’s time to net the fish, position your kayak so the fish approaches from the side (T-bone position). This is far more stable than having it come at the bow or stern.
What to do if you feel the kayak tipping: Immediately stop reeling, drop your center of gravity by hunching forward, and shift your weight to the high side. Let the fish take line if needed. It’s better to lose a fish than swim.
Hull design matters: Pontoon-style hulls and wide, flat-bottomed kayaks are much more forgiving during big fish fights than narrow, V-hulled touring kayaks. If you regularly target 20+ pound fish, prioritize stability over speed when choosing a kayak.
Lip Gripper vs Net for Landing Fish From a Kayak
Lip grippers work best for bass, pike, muskie, and other species with prominent lower jaws and teeth, offering one-handed control and quick releases. Landing nets are better for species without grippable jaws (trout, redfish, snook, flounder) and situations where you want to keep the fish in the water for photos or hook removal.
When to use a lip gripper:
- Species with lower jaws: Largemouth bass, smallmouth bass, pike, muskie, peacock bass
- Toothy fish: Keeps your fingers away from sharp teeth
- Quick releases: Grip, unhook, and release without netting
- One-handed operation: Leaves your other hand free to stabilize yourself
- Vertical lifts: Lets you lift the fish for a quick photo without a net
When to use a landing net:
- Species without prominent jaws: Trout, redfish, snook, flounder, crappie, catfish
- Exhausted fish: A net supports the fish’s entire body, reducing stress
- Hook removal: Easier to unhook fish while they’re cradled in a net
- Photography: Fish can rest in the net while you prepare your camera
- Multiple hooks: Treble hooks are easier to remove when the fish is contained
Hybrid approach: Many kayak anglers carry both. Use the lip gripper as the primary tool for bass and pike, but keep a net handy for species that can’t be gripped or for situations where the fish is deeply hooked.
Safety note: Lip grippers can slip if the fish thrashes violently. Always have a backup plan (net or gloved hand) ready. Never rely solely on a lip gripper for fish over 15 pounds unless you have extensive experience with the tool.
Best lip grippers for kayaks: Boga Grip (includes weight scale), Rapala Mag Spring Grip (affordable and reliable), or Fish Grip (simple and effective). Choose one with a wrist lanyard so you don’t drop it overboard.

Rapala Floating Fish Gripper: Locking fish handling tool designed to provide a secure grip during landing, handling, and release of fish.

MULTI-FUNCTION FISHING PLIERS - The needle nose design can be used to effortlessly deep to reach into toothy fish, can be used as hook remover, press and crimp, split rings, line cutter, tying knots and adjusting lures, etc

【Powerful Elastic Locking Grip Prevents Fish Escape】Upgraded elastic locking structure with serrated jaws delivers stable clamping force to hold fierce freshwater & saltwater game fish securely. Supports easy one-handed operation suits casual and tournament fishing for higher fish landing success
What Mistakes Do Beginners Make When Landing Fish From Kayaks
Beginners most commonly try to land fish too early before they’re fully tired, lean too far over the side while netting, and forget to secure their paddle, which either floats away or gets tangled in the line. These mistakes lead to lost fish, capsizes, and frustrating tangles.
Top beginner mistakes:
Rushing the landing: Trying to net a fish that still has fight left. A green fish thrashing in the net can pull you overboard or flip the kayak. Wait until the fish rolls on its side and shows clear exhaustion.
Leaning over the side: Extending your body over the water to reach the fish instead of using a long-handled net. This shifts your center of gravity dangerously.
Forgetting the paddle: Letting the paddle float away or having it roll under your legs and tangle with the line. Always secure it in a holder or leash before the final landing attempt.
Netting head-first: Trying to scoop the fish from the front, which lets it see the net and bolt. Always net fish head-first by leading them into the net.
Using too much drag: Setting the drag too tight and trying to force the fish. This creates sudden, violent movements that destabilize the kayak.
Standing up too soon: Standing to see the fish before it’s fully controlled. Stand during the fight if you must, but sit down before netting.
Wrong kayak position: Trying to net the fish off the bow or stern instead of positioning it perpendicular to the kayak’s side.
No anchor system: Drifting into structure, other anglers, or dangerous areas while fighting a fish because they have no way to stay positioned.
The most expensive mistake: Dropping your rod overboard during the landing attempt. It happens when anglers try to hold the rod, grab the net, and maintain balance all at once. Use a rod holder or lay the rod across your lap once the fish is within netting range.
Practice drill: Before targeting big fish, practice the entire landing sequence with small fish or even a weighted bag. Go through the motions: secure paddle, grab net, position kayak, make the scoop. Muscle memory prevents mistakes when a trophy fish is on the line.
Can You Land a Tarpon or Shark From a Sit-On-Top Kayak
You can land tarpon up to 80-100 pounds and small sharks (under 50 pounds) from a stable sit-on-top kayak, but it requires advanced skills, proper safety gear, and ideal conditions. Many kayak anglers successfully target these species in calm, shallow water using heavy tackle and quick-release techniques, though the fight often involves being towed considerable distances.
Requirements for landing big game from a kayak:
- Kayak stability: Minimum 33-inch width, preferably 36+ inches, with a flat or pontoon hull
- Heavy tackle: 30-50 pound test line, strong drag system, and a rod with serious backbone
- Safety gear: PFD, whistle, knife for cutting line in emergencies, and a communication device
- Calm conditions: Flat water with minimal current; never attempt in rough seas or strong wind
- Quick-release anchor: Must be able to break free instantly if the fish tows you toward danger
- Experience level: Should have landed dozens of 10-20 pound fish before attempting tarpon or sharks
Tarpon-specific considerations:
Tarpon are acrobatic jumpers that can easily exceed 100 pounds. Most kayak anglers target fish in the 40-80 pound range. The fight often lasts 30-60 minutes and can tow your kayak a quarter mile or more. Use circle hooks for easier releases and keep the fish in the water for photos rather than trying to lift it into the kayak.
Shark-specific considerations:
Small sharks (blacktip, bonnethead, small bull sharks under 50 pounds) are manageable from a kayak. Larger sharks are dangerous and should be avoided. Never bring a shark into the kayak. Use heavy wire leaders, cut the line close to the hook, and let the fish swim away. Sharks can thrash violently and have sandpaper-like skin that can damage your kayak or injure you.
Reality check: Just because you can land these species doesn’t mean you should as a beginner. Work your way up through smaller gamefish (redfish, snook, striped bass) before attempting tarpon or sharks. The consequences of a mistake with a 60-pound tarpon are far more serious than with a 5-pound bass.
Legal note: Check local regulations. Some areas require special permits for targeting tarpon or sharks, and many have strict handling and release requirements to protect these species.
How to Secure Your Paddle While Fighting a Fish in a Kayak
Secure your paddle using a paddle leash attached to the kayak or by placing it in a horizontal rod holder within arm’s reach before you begin the final landing sequence. A loose paddle will drift away, roll under your legs, or tangle with your fishing line at the worst possible moment.
Paddle security options:
Coiled paddle leash: Attaches to the paddle shaft and clips to a D-ring on the kayak. The coiled design keeps it out of the way but prevents the paddle from floating away. Cost: $10-20.
Paddle holder/clip: Mounted on the side of the kayak within arm’s reach. You can quickly stow the paddle and retrieve it when needed. Works best for sit-on-top kayaks with accessible mounting points.
Across-the-lap method: Lay the paddle horizontally across your lap, under your thighs. This keeps it secure and accessible but can interfere with rod movement. Best for short fights with smaller fish.
Behind-the-seat holder: Some kayaks have a paddle park behind the seat. This works well but requires you to reach back, which can be awkward during a fish fight.
The sequence for big fish:
- Fight the fish with the paddle secured by a leash or within easy reach
- When the fish is within 15-20 feet and tiring, place the paddle in a holder or across your lap
- Grab your net or lip gripper with your non-rod hand
- Make the final landing attempt
- Once the fish is secured, retrieve your paddle before dealing with the fish
Common mistake: Waiting until the fish is right next to the kayak before dealing with the paddle. By then, you’re in the critical landing moment and fumbling with the paddle creates instability. Secure it early, when the fish is still 20+ feet away.
For pedal kayaks: This is less of an issue since your hands are free during the fight. However, you should still secure the paddle so it doesn’t slide off the kayak or get tangled in your pedal drive system.
Emergency scenario: If your paddle does float away while fighting a fish, don’t panic. Most fishing kayaks drift slowly. Land the fish first (or cut the line if necessary), then use your hands to paddle back to retrieve the paddle. This is why a brightly colored paddle is worth the investment.
Is a Fishing Kayak Stable Enough for Landing 20-Pound Fish
Most modern fishing kayaks are stable enough to land 20-pound fish if they’re at least 30 inches wide and you use proper technique. Kayaks in the 33-36 inch width range provide excellent stability for fish in this size class, and many anglers regularly land 20-30 pound striped bass, redfish, pike, and catfish without issues.
Stability factors for landing big fish:
- Width: 30-32 inches = adequate for 20-pound fish with good technique; 33-36 inches = comfortable and stable; 36+ inches = very stable but slower to paddle
- Hull design: Pontoon hulls and flat bottoms are more stable than V-hulls or rounded bottoms
- Weight capacity: Should have at least 100 pounds of capacity beyond your body weight plus gear
- Seat height: Lower seats provide better stability but less visibility; higher seats are less stable but more comfortable
Real-world examples:
- Hobie Pro Angler (36″ wide): Extremely stable, anglers regularly land 40+ pound fish
- Old Town Sportsman PDL (34″ wide): Very stable, comfortable for 20-30 pound fish
- Perception Pescador Pro (33″ wide): Good stability, handles 20-pound fish well with proper technique
- Wilderness Systems Radar (34.5″ wide): Excellent stability, designed for standing and big fish
Width trade-offs: A 36-inch wide kayak is noticeably more stable than a 30-inch model, but it’s also slower to paddle and harder to transport. If you primarily target fish under 10 pounds, the extra width may not be worth the trade-off. If you regularly chase 20+ pound fish, the stability is invaluable.
Technique matters more than width: An experienced angler can land a 20-pound fish from a 30-inch kayak by staying seated, keeping weight centered, and using proper landing technique. A beginner might struggle with the same fish in a 34-inch kayak if they stand up, lean over the side, or make sudden movements.
Test before you buy: If possible, demo kayaks before purchasing. Sit in them, rock side to side, and simulate the motions of fighting and landing a fish. What feels stable to one person might feel tippy to another based on height, weight, and experience level.
What to Do If a Big Fish Starts Pulling Your Kayak Around
Let the fish pull you and enjoy the “sleigh ride” while maintaining a safe angle and keeping your rod tip up. Fighting the pull by paddling against it wastes energy and can break your line or rod. Instead, use your paddle as a rudder to steer and keep the kayak pointed in a safe direction, away from structure, other boats, or hazards.
Managing the tow:
- Keep the rod tip up: Maintain a 45-60 degree angle to absorb surges and prevent the line from breaking
- Use the paddle as a rudder: Dip one blade in the water to steer, keeping the kayak angled safely
- Stay calm: Being towed is normal when fighting big fish from a kayak; don’t panic
- Monitor your surroundings: Watch for other boats, shallow water, structure, or hazards
- Let the fish tire itself: The fish is doing the work of tiring itself out by pulling your kayak
- Apply side pressure: Once the fish slows, apply pressure from the side to turn its head and change direction
When to break off:
- Fish is pulling you toward dangerous structure (rocks, pilings, oyster beds)
- You’re drifting into boat traffic or shipping channels
- Weather conditions are deteriorating
- You’re being pulled too far from your launch point
- The fish is clearly too large for your tackle and the fight has exceeded 30-45 minutes
Anchor considerations: If you’re anchored when you hook a big fish, release the anchor immediately using your quick-release system. Never stay anchored while fighting a large fish. The combination of anchor tension and fish pull can capsize the kayak or snap your rod.
Distance record: Some kayak anglers have been towed over a mile by large tarpon, tuna, or sharks. While this makes for a great story, it’s also risky. Know your limits and don’t be afraid to cut the line if the situation becomes dangerous.
After the tow: Once the fish tires and you regain control, you may be far from your starting point. Before landing the fish, take a moment to assess your location and plan your paddle back. Use landmarks or your phone’s GPS to orient yourself.
Do You Need an Anchor When Trying to Land Large Fish From a Kayak
You don’t need an anchor to land large fish from a kayak, and in many situations, being anchored is actually dangerous because it prevents you from drifting with the fish and can lead to capsizing if the fish pulls hard against a fixed position. However, an anchor with a quick-release system is valuable for positioning before the hookup and can be useful in current or wind.
When an anchor helps:
- Pre-positioning: Staying in a productive spot while waiting for fish to bite
- Current or wind: Preventing drift in moving water or windy conditions
- Sight fishing: Holding position while watching for fish in clear water
- Vertical presentations: Keeping the kayak steady for jigging or drop-shotting
When to release the anchor:
- Immediately after hooking a large fish (15+ pounds)
- Any time a fish makes a strong run
- If the kayak starts to lean or feel unstable
- When the fish swims toward structure or hazards
Quick-release anchor systems:
The key is having a system that lets you release the anchor instantly without fumbling with knots or clips. The most common setup is an anchor trolley with a quick-release clip. The anchor line runs through a pulley system along the side of the kayak, and a quick-release clip (like a carabiner with a spring gate) holds it in place. One tug releases the clip, and the anchor drops free.
Alternative: anchor wizard or stake-out pole: In shallow water (under 5 feet), a stake-out pole or Power-Pole-style anchor is faster to deploy and release than a traditional anchor. You can drop it to hold position and pull it up instantly when a fish hits.
Never anchor from the side: Always run your anchor line to the bow or stern, never directly from the side of the kayak. Side anchoring creates a pivot point that can flip the kayak if current or a fish pulls from the wrong angle. An anchor trolley system lets you adjust the anchor point along the kayak’s length while keeping it on the centerline.
Anchor weight: For kayak fishing, a 1.5 to 3-pound anchor is usually sufficient in depths up to 15 feet with moderate current. Heavier anchors are harder to retrieve and add unnecessary weight to your kayak.
Frequently Asked Questions
What’s the best way to revive a big fish before release from a kayak?
Hold the fish upright in the water with one hand supporting its belly and the other holding its tail. Move it gently back and forth to push water through its gills. In a kayak, you can do this alongside the hull without lifting the fish out of the water. Wait until the fish swims away strongly on its own; this can take 30 seconds to several minutes for exhausted fish.
Can you land a fish while drifting or do you need to stop the kayak?
You can land fish while drifting, and in some situations (like drift fishing in current), it’s actually easier because the kayak and fish move together. The key is controlling the drift direction with your paddle and timing the netting attempt when the fish is alongside the kayak. Stop the kayak only if you need precise positioning.
How do you photograph a big fish from a kayak without dropping it?
Use a net to support the fish in the water while you prepare your camera. When ready, lift the fish briefly (10-15 seconds maximum), take the photo, and return it to the water. Better yet, use a camera mount or have a fishing partner take the photo so you can use both hands to support the fish properly.
What pound test line should you use for big fish from a kayak?
Use 15-20 pound test for fish in the 10-20 pound range, 20-30 pound test for fish up to 40 pounds, and 30-50 pound test for larger species like tarpon or big sharks. Heavier line gives you more control and lets you land fish faster, reducing stress on both you and the fish. The kayak’s instability means you can’t fight fish as long as you could from a boat.
Should you use a fish finder to locate big fish before kayak fishing?
A fish finder helps locate structure, depth changes, and schools of baitfish where big fish hunt, but it’s not required. Many successful kayak anglers fish without electronics by reading water conditions, targeting visible structure, and understanding seasonal patterns. If you do use a fish finder, mount the transducer properly to get accurate readings while drifting or pedaling.
How do you handle a fish that dives under the kayak?
Keep your rod tip high and let the line slide along the hull. Don’t try to stop the fish or pull it back; this can break your line on the kayak’s keel or rudder. If possible, stick your rod tip in the water on the opposite side to maintain a better angle. Most fish will swim out from under the kayak on their own if you don’t apply too much pressure.
Can you use a gaff instead of a net for big fish in a kayak?
Gaffs are dangerous in kayaks because they require you to lean over the side and make a stabbing motion, which destabilizes the kayak. They’re also lethal to the fish, so they’re only appropriate if you’re keeping the catch. For kayak fishing, nets and lip grippers are much safer and more versatile. Use a gaff only for large fish you intend to keep, and only if you have extensive experience.
What’s the maximum size fish you can safely land from a kayak?
The practical limit for most kayak anglers is 40-60 pounds, though experienced anglers in stable kayaks have landed fish over 100 pounds. The limiting factors are kayak stability, your physical strength, tackle strength, and fighting time. Fish over 50 pounds often require 30+ minute fights, which is exhausting in a kayak and stressful for the fish.
How do you store a big fish on a kayak after landing it?
For fish you’re keeping, use a stringer attached to the kayak (never to your body) or a fish bag secured to the deck. Keep the fish in the water alongside the kayak rather than on deck, where it adds weight and creates instability. For catch-and-release, photograph and release immediately rather than storing the fish.
Do you need different landing techniques for saltwater vs freshwater kayak fishing?
The basic techniques are the same, but saltwater species often fight harder and longer, requiring more patience and stamina. Saltwater also means dealing with tides, current, and potentially rougher conditions, so stability and safety become even more critical. Saltwater fish like redfish and snook often make powerful runs toward structure, requiring quick reactions to steer the kayak away from hazards.
Conclusion
Landing a big fish from a kayak is one of the most thrilling experiences in fishing, combining the challenge of fighting a powerful fish with the added complexity of maintaining balance in a small, unstable platform. Success comes down to preparation, proper gear, and technique. Stay seated and centered during the fight, use a long-handled net or lip gripper, secure your paddle before the final landing attempt, and let the fish tire completely before bringing it within reach. Position your kayak perpendicular to the fish during the netting attempt, and remember that patience prevents capsizes.
Start by practicing these techniques with smaller fish to build muscle memory and confidence. Invest in a quality landing net with a 48-60 inch handle, consider adding a lip gripper for bass and toothy species, and always use a paddle leash or holder. As you gain experience, you’ll develop an intuitive feel for when a fish is ready to land and how to position your body and kayak for maximum stability.
The most important lesson: don’t rush. A fish that seems ready to land might have one more powerful run left, and that’s when most kayaks flip. Take your time, stay calm, and enjoy the fight. The memory of landing a trophy fish from a kayak will last far longer than the few extra minutes it takes to do it safely and correctly. Get out on the water, practice these techniques, and experience the unique satisfaction of landing a big fish from a kayak.





