
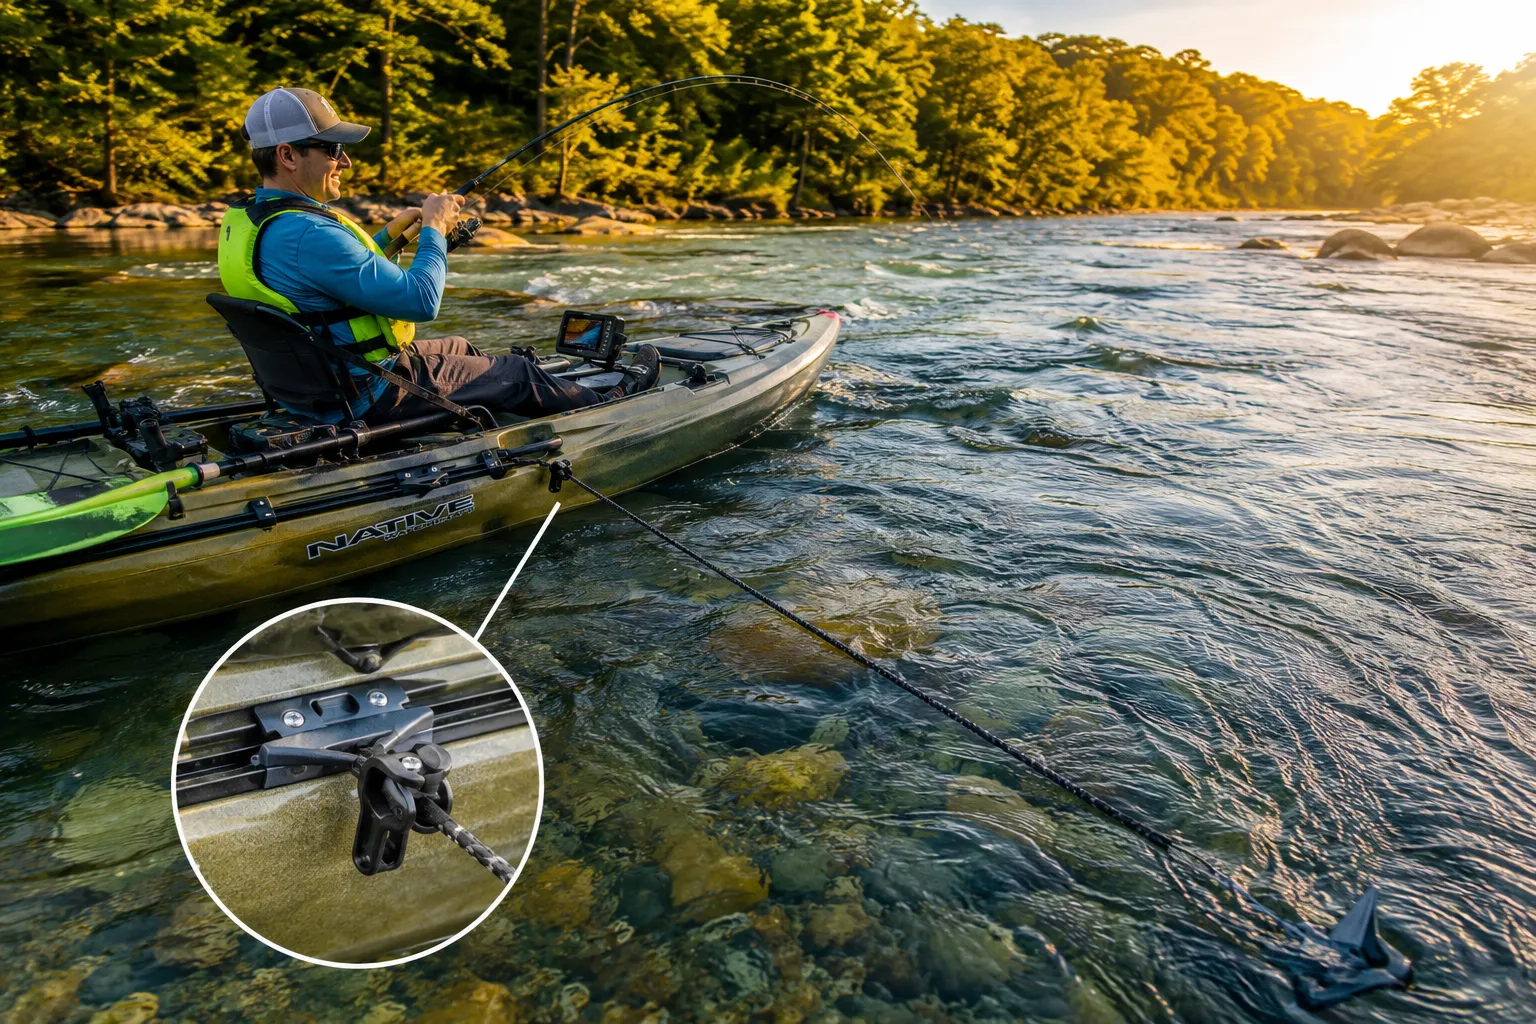
Quick Answer: To anchor a kayak in current, use a 3-5 pound grapnel anchor attached to an anchor trolley system that lets you adjust the anchor point from bow to stern. Deploy the anchor upstream at a 45-degree angle to the current, use 3:1 scope (three feet of line for every foot of depth), and always attach through a trolley rather than directly to the side to prevent capsizing.
Key Takeaways
- Use an anchor trolley system to adjust your anchor point and prevent dangerous side-pulling that can flip your kayak
- Grapnel anchors work best in rivers because their folding tines grip rocks and structure in moving water
- Deploy at a 45-degree angle to the current for the most stable position with minimal drift
- Calculate scope at 3:1 ratio in current (15 feet of line for 5 feet of water depth) to ensure the anchor holds
- Attach a float and quick-release system so you can cut loose in an emergency without losing your anchor
- Never anchor from the side of your kayak, which creates a pivot point that lets current flip you
- Anchor weights of 3-5 pounds handle most river and inshore conditions for kayaks under 100 pounds
What Is the Best Anchor Type for Kayak Fishing in Rivers
Grapnel anchors are the best choice for kayak fishing in rivers and moving water. These folding anchors feature three to four sharp tines that grip rocks, logs, and uneven river bottoms, and their compact design stores easily on a kayak.
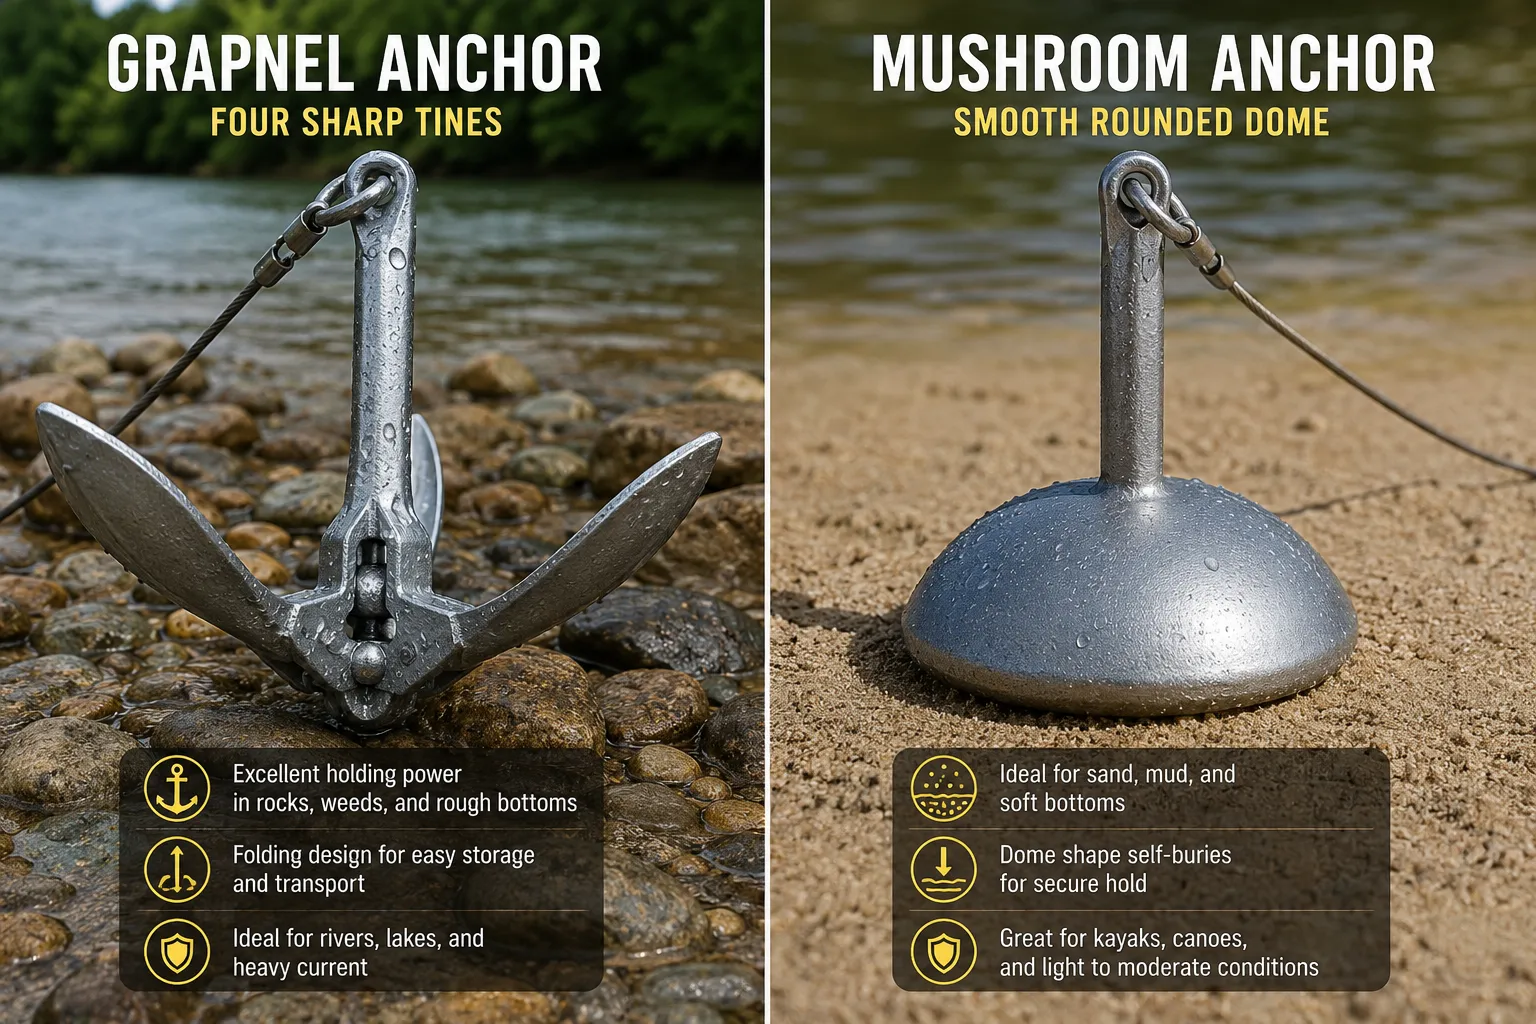
Grapnel anchors excel in current because:
- Tines grip irregular surfaces like rock piles, gravel bars, and submerged structure
- Fold flat for storage in kayak hatches or bungee cords
- Release reliably when pulled from different angles, reducing stuck anchor incidents
- Work in 2-15 feet of depth, covering most river fishing scenarios
Mushroom anchors work better in calm water with soft bottoms (sand, mud, silt) but tend to drag in current or skip across rocky bottoms. Their rounded shape doesn’t grip well on hard structure.
Avoid these anchor types in current:
- Fluke/Danforth anchors designed for larger boats, too heavy and bulky for kayaks
- Drift socks (covered separately below) slow drift but don’t hold position
- Homemade concrete anchors that can’t be released if stuck and add unnecessary weight
Choose a grapnel if: You fish rivers, rocky lakes, or areas with current and structure. Choose a 3-3.5 pound model for kayaks under 12 feet, or 4-5 pounds for kayaks over 13 feet or in strong current.

3 1/3 pound 4 fluke folding anchor will hold in mud, sand, gravel and rock

✔INCLUDE:Complete kayaking/paddle board anchoring kit including anchor(3.5lb), premium 8mm double braided 30ft nylon rope, spring hook, Float and storage bag.

Folding Grapnel Boat Anchor: Perfect for small boats, kayaks, canoes, dinghies, paddle boards, and more. Whether you're anchoring for SUP yoga, jet skiing, or kayak fishing, this versatile anchor ensures stability and reliability on the water.
How Much Anchor Rope Do I Need for Kayaking in Current
You need anchor line equal to three times the maximum depth you’ll fish, plus 10-15 feet for tying and adjustment. For most river kayak fishing in 3-8 feet of water, 30-40 feet of line handles the majority of situations.
The 3:1 scope ratio (three feet of horizontal line for every foot of vertical depth) ensures your anchor pulls at an angle that digs into the bottom rather than lifting straight up. In current, this angle becomes critical because water pressure tries to drag your kayak downstream.
Depth-based line requirements:
- 5 feet deep: 15 feet minimum scope + 10 feet = 25 feet total
- 8 feet deep: 24 feet minimum scope + 10 feet = 34 feet total
- 10 feet deep: 30 feet minimum scope + 10 feet = 40 feet total
- 15 feet deep: 45 feet minimum scope + 10 feet = 55 feet total
In strong current, increase to 4:1 or 5:1 scope to improve holding power. The extra line creates a flatter angle that helps the anchor bite harder.
Line material matters:
- Paracord (550 cord): Lightweight, floats initially, 7/32-inch diameter, easy to grip, most popular for kayaks
- Marine anchor line: Heavier, sinks, 1/4 to 3/8-inch diameter, better in wind but harder to store
- Avoid bungee or elastic cord as your primary anchor line because it stretches unpredictably in current
Common mistake: Using too little line forces a steep angle that pulls the anchor up instead of holding it down. If your kayak drifts after anchoring, let out more line before assuming your anchor is dragging.
Kayak Anchor vs Drift Sock: Which Is Better
An anchor holds you in one spot, while a drift sock slows your drift speed by 50-70 percent but doesn’t stop movement. Use an anchor when you need to stay on a specific piece of structure; use a drift sock when you want to cover water slowly while maintaining boat control.
Anchor advantages:
- Holds position precisely for working a single hole, eddy, or structure
- Hands-free fishing once deployed, no constant adjustments needed
- Works in any current speed with proper weight and scope
- Better for vertical presentations like jigging or live bait fishing
Drift sock advantages:
- Covers more water while maintaining a fishable drift speed
- No risk of getting stuck on bottom structure
- Easier deployment and retrieval, just toss and pull
- Better for trolling or casting while drifting
Choose an anchor if: You’re fishing a specific laydown, rock pile, or current seam and need to stay put. You’re targeting stationary fish like crappie around brush piles or bass on a single ledge.
Choose a drift sock if: You’re searching for fish across a flat, drifting a shoreline, or fishing a long weed edge. You want to slow down in wind or current but keep moving.
Can you use both? Yes. Deploy a drift sock from the bow and a small anchor from the stern to create a controlled, ultra-slow drift. This technique works well for covering structure methodically without constant paddling.

SUPERIOR 4-FLUKE DESIGN - This foldable anchor features a 3.5 lb cast iron body and a 4-fluke design for strong, reliable holding power in different underwater conditions; The twist-lock keeps it secure so it stays steady without constant adjustment

Effortless Single-Handed Control: Say goodbye to complicated anchor adjustments. With an intuitive lock-and-release mechanism, you can secure your position with one hand, leaving the other free for paddling, fishing, or relaxing.

How to Anchor a Kayak Without Drifting Sideways
To prevent sideways drift, deploy your anchor through an anchor trolley system and position the attachment point at a 45-degree angle between the bow and the current direction. This creates a stable orientation where current flows past your kayak rather than pushing against its broadside.
The anchor trolley is essential because it lets you slide your anchor attachment point along the kayak’s rail from bow to stern. Without it, you’re forced to anchor from a fixed point that may not align with current direction.
Step-by-step positioning:
- Deploy anchor upstream while drifting, letting current carry you past the drop point
- Adjust trolley toward the bow (about 2-3 feet back from the very front)
- Let out line slowly until the kayak swings into position
- Fine-tune the trolley position until your kayak sits at 45 degrees to current
- Lock the trolley with the cleat or cam cleat
The 45-degree angle works because:
- Current flows past the kayak’s narrow profile instead of pushing the wide side
- You can cast in multiple directions without repositioning
- The kayak remains stable with minimal rocking
- You maintain access to both sides for landing fish
If your kayak keeps spinning: You’ve likely anchored too far back (toward the stern) or in current that’s too strong for your anchor weight. Move the trolley forward or add more scope to improve the angle.
In very light current, you can anchor from the bow (trolley all the way forward) and sit perpendicular to flow. In moderate to strong current, the 45-degree angle becomes mandatory for stability.
What Weight Anchor Do I Need for a Kayak in Moving Water
Most kayak anglers need a 3-5 pound anchor for moving water, with 3-3.5 pounds handling moderate current and 4-5 pounds required for strong current or kayaks over 80 pounds. Heavier isn’t always better because excess weight makes deployment harder and increases the risk of getting stuck.
Weight selection by conditions:
- 1.5-2.5 pounds: Calm lakes, ponds, very light current only
- 3-3.5 pounds: Rivers with moderate flow, most kayak fishing situations
- 4-5 pounds: Strong current, deep water (10+ feet), or heavy/wide kayaks
- 6+ pounds: Rarely needed, only for extreme conditions or tandem kayaks
Current speed matters more than kayak weight. A 60-pound kayak in 2 mph current needs more holding power than a 90-pound kayak in still water.
Grapnel anchor weight guidelines:
| Kayak Length | Calm Water | Moderate Current | Strong Current |
|---|---|---|---|
| Under 10 ft | 1.5-2 lb | 2.5-3 lb | 3-4 lb |
| 10-12 ft | 2-3 lb | 3-3.5 lb | 4-5 lb |
| 12-14 ft | 3-3.5 lb | 3.5-4 lb | 5-6 lb |
Wind load increases anchor needs. A kayak with a high seat, standing platform, or tall angler catches more wind, requiring an extra pound of anchor weight in exposed conditions.
Test your anchor in safe, shallow water before committing to deeper or faster current. If it drags with 3:1 scope, you need more weight or better bottom composition for your anchor type.
Common mistake: Buying a 7-8 pound anchor “just to be sure.” The extra weight makes one-handed deployment nearly impossible and increases the chance of getting permanently stuck on structure.

【Ideal Size & Sturdy Material 】Weight 1.5 lb/0.7kg,Unlike mushroom anchors, folding characteristics make Kayak Anchor easy to store and carry. Carbon steel galvanized material is not easy to rust
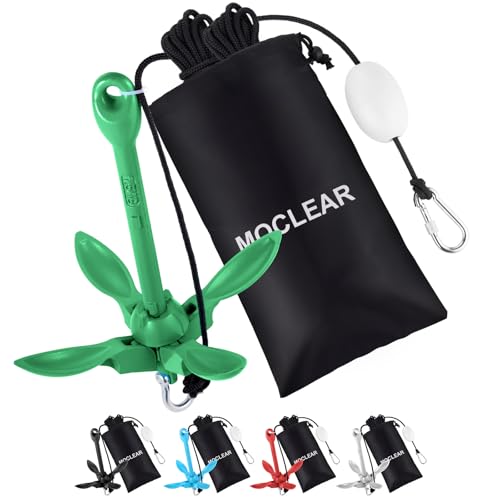
Folding Grapnel Boat Anchor: Perfect for small boats, kayaks, canoes, dinghies, paddle boards, and more. Whether you're anchoring for SUP yoga, jet skiing, or kayak fishing, this versatile anchor ensures stability and reliability on the water.

Great Holding Power Per Pound: Lightweight yet powerful, this Grappling Anchor is made of galvanized iron and will provide years of reliable service, firmly holding small boats in place wherever you go
Can You Anchor a Kayak in Strong Current Safely
Yes, you can anchor safely in strong current if you use an anchor trolley, maintain proper scope, and always have a quick-release system ready. However, currents above 3-4 mph significantly increase risk and require experience and proper technique.
Strong current creates three main dangers:
- Capsizing from side-loading if the anchor pulls from the wrong angle
- Swamping from water piling against the bow if anchored facing directly into current
- Inability to retrieve the anchor if it wedges under rocks or logs
Safety requirements for strong current:
- Anchor trolley is mandatory, never tie directly to a cleat or handle
- Quick-release clip or float system lets you abandon the anchor instantly
- PFD must be worn at all times when anchored in current
- Scout the area first by drifting through to check depth and obstacles
- Anchor in eddies or slower seams rather than the main current channel
The float system works like this: Attach a brightly colored float ball to your anchor with 2-3 feet of cord. If you need to release quickly, unclip the anchor line from your trolley and the float marks where your anchor sits so you can retrieve it later by boat or wading.
Current speed guidelines:
- Under 1 mph: Safe for beginners with basic anchor setup
- 1-2 mph: Manageable with proper technique and trolley system
- 2-3 mph: Requires experience, 4-5 pound anchor, and 4:1 scope
- Over 3 mph: Advanced only, consider drift fishing instead
When NOT to anchor in current:
- Near strainers (downed trees that trap debris and boats)
- Upstream of rapids or drops you can’t see beyond
- In current so strong you can’t paddle against it
- When alone without a communication device
Practice in mild current first. Master your trolley adjustment and quick-release system in 1 mph flow before attempting faster water.
Where to Attach Anchor Line on a Kayak
Always attach your anchor line to an anchor trolley system that runs along the kayak’s rail, never directly to a side cleat, handle, or scupper hole. The trolley lets you adjust the attachment point to match current direction and prevents dangerous side-loading that can flip your kayak.
An anchor trolley consists of:
- Pulleys or pad eyes mounted at bow and stern (one on each end)
- Continuous loop of line (usually paracord) running through both pulleys
- Anchor line clip attached to the trolley loop via carabiner
- Cleat to lock the trolley position after adjustment
Installation points:
- Mount pulleys 6-8 inches from the bow and stern tips
- Position them high enough to clear your thigh when seated
- Run the trolley on the side you prefer (most anglers choose their non-casting side)
- Some kayaks come with factory trolley tracks or mounting points
Why side-mounting is dangerous: When current pushes against a kayak anchored from the side, it creates a pivot point. The current catches the upstream side and rolls the kayak over. This happens fast, often before you can react.
Trolley adjustment technique:
- Start with trolley at midpoint before deploying anchor
- Drop anchor and let out line while drifting downstream
- Slide trolley forward or back until kayak settles at desired angle
- Lock trolley with cleat once position is stable
For fishing while anchored: Position the trolley so your casting side faces the target area. If you’re right-handed and want to cast toward the bank, adjust the trolley until the bank is on your right side.
Emergency release: Use a carabiner or quick-release clip where your anchor line attaches to the trolley loop. In an emergency, flip the clip open and the anchor line separates instantly while the trolley stays attached to your kayak.
My Kayak Keeps Spinning When Anchored in Current: How to Fix
Kayak spinning happens when the anchor attachment point is too far toward the stern or when you don’t have enough scope to create proper holding angle. Move your anchor trolley forward (toward the bow) and let out more line to stabilize your position.
The physics of spinning: Current pushes against your kayak’s surface area. If the anchor pulls from behind the kayak’s center point, the bow swings freely and the current spins you in circles around the anchor point.
Fixes in order of effectiveness:
- Move trolley forward 1-2 feet at a time until spinning stops
- Add more scope by letting out an additional 5-10 feet of line
- Increase anchor weight if you’re already at 4:1 scope and still spinning
- Reposition to slower current if the flow is simply too strong
Ideal trolley position for stability: About 2-3 feet back from the bow tip in moderate current, or all the way forward (bow position) in light current. You want the anchor pull to come from in front of your center of gravity.
If moving forward doesn’t help: Your anchor may not be holding the bottom properly. It could be dragging slowly, causing the spinning sensation. Pull up and check if the anchor has debris or if you’re over a slick bottom (clay, smooth rock) where grapnel tines can’t grip.
Wind compounds the problem. If you have current from one direction and wind from another, your kayak tries to align with both forces. In this situation:
- Position trolley to split the difference between wind and current direction
- Accept some slow rotation as normal
- Consider moving to a more protected spot
Kayak design affects spinning: Wide, flat-bottomed kayaks catch more current and spin more easily than narrow, V-hulled designs. If you fish a wide, stable platform, you may need to anchor in slower water or use a heavier anchor than specifications suggest.
Do I Need an Anchor Trolley for River Kayaking
Yes, an anchor trolley is essential for river kayaking because it prevents capsizing by letting you adjust your anchor point to match current direction. Without a trolley, you’re forced to anchor from a fixed point that may create dangerous side-loading as current direction changes.
Trolleys cost $15-30 for DIY kits or come pre-installed on many fishing kayaks. The small investment dramatically improves safety and fishing effectiveness.
What a trolley does:
- Prevents side-anchoring accidents that cause the majority of kayak flips
- Lets you adjust position without pulling anchor and redeploying
- Enables the 45-degree angle that provides the most stable anchored position
- Works as a drift sock attachment point when you’re not using an anchor
Can you anchor without a trolley? Technically yes, by tying to the bow or stern only, but this severely limits your positioning options. Bow-only anchoring works in light current but becomes unstable as flow increases. Stern anchoring is dangerous because current can push water over the back deck.
DIY trolley installation takes 30-45 minutes and requires:
- Two pulleys or pad eyes with screws
- 20-25 feet of paracord for the trolley loop
- One cleat for locking position
- Drill and sealant for mounting hardware
Pre-made trolley kits include all hardware and instructions. Popular brands include YakGear, Scotty, and Harmony.
Trolley alternatives that DON’T work safely:
- Tying to side handles or cleats (capsizing risk)
- Clipping to scupper holes (can’t adjust, may damage kayak)
- Using rod holder mounts (not designed for anchor loads)
Even if you only anchor occasionally, install a trolley. The safety benefit in an unexpected current situation justifies the minimal cost and installation time.
Grapnel Anchor vs Mushroom Anchor for Kayak in Current
Grapnel anchors outperform mushroom anchors in current because their sharp tines grip rocks and structure, while mushroom anchors drag across hard bottoms and work best in soft sediment with minimal flow. For river and current fishing, choose a grapnel 90 percent of the time.
Grapnel anchor strengths:
- Grips irregular bottoms including rock, gravel, shell, and wood structure
- Releases when pulled from different angles, reducing stuck incidents
- Folds compact for easy storage in kayak hatches or on deck
- Lighter weight holds better than heavier mushroom in current (3 lb grapnel = 5 lb mushroom)
Mushroom anchor strengths:
- Buries in soft bottoms like sand, mud, and silt for excellent holding
- Won’t snag vegetation as easily as grapnel tines
- Smooth shape less likely to damage kayak hull during storage
- Better in calm water where burial rather than grip provides holding power
Performance in current:
| Bottom Type | Grapnel | Mushroom |
|---|---|---|
| Rock/gravel | Excellent | Poor (drags) |
| Sand/mud | Good | Excellent |
| Vegetation | Fair (may snag) | Good |
| Wood/structure | Excellent | Poor |
When to choose mushroom: You fish calm lakes with soft bottoms, anchor in sandy flats, or need to hold position in grass beds where grapnel tines would tangle. Mushroom anchors also work well for drift control in very light current over sand.
Hybrid option: Some kayak anglers carry both. Use the grapnel as primary for current and structure, keep a small mushroom as backup for sandy calm-water spots.
Weight comparison: A 3.5-pound grapnel provides similar holding power to a 5-6 pound mushroom in current because the tines grip rather than relying on weight alone. This makes grapnel easier to deploy and retrieve one-handed.
Stuck anchor risk: Grapnel tines can wedge between rocks, but the folding design usually releases with a strong pull from a different angle. Mushroom anchors rarely get stuck but also rarely hold well in current.
Is Anchoring a Kayak Dangerous for Beginners
Anchoring a kayak is safe for beginners if you use an anchor trolley, start in calm or light current, and always wear a PFD. The main dangers come from improper attachment points and anchoring in current that exceeds your skill level.
Beginner-safe anchoring conditions:
- Water depth under 8 feet
- Current speed under 1 mph
- Clear bottom visible from surface
- Air temperature and water temperature combined over 120°F (the 120 Rule)
- Other paddlers or anglers nearby
The three dangerous mistakes beginners make:
- Anchoring from the side instead of using a trolley (capsizing risk)
- Anchoring in current they can’t paddle against (can’t escape if needed)
- Not having a quick-release system (trapped if anchor gets stuck)
Start your anchoring practice:
- In a calm cove or pond with no current
- In water shallow enough to stand (3-4 feet)
- On a warm day when capsizing isn’t a cold-water risk
- With an experienced kayaker watching from another boat
Build skills progressively:
- Week 1-2: Practice in calm water, master trolley adjustment
- Week 3-4: Try very light current (under 0.5 mph)
- Month 2: Moderate current (1-2 mph) in safe locations
- Month 3+: Stronger current only after mastering basics
Warning signs you’re in over your head:
- You struggle to paddle against the current
- The kayak rocks violently when anchored
- You feel anxious or uncomfortable with the situation
- Water splashes over the bow or sides regularly
If you capsize while anchored: Your quick-release system becomes critical. Practice the release motion on dry land until it’s muscle memory. In the water, release the anchor immediately and focus on self-rescue.
Anchoring is actually safer than constant paddling in many situations because it frees both hands for fishing and reduces fatigue. The key is matching your anchor setup and location choice to your skill level.
How to Quickly Release a Kayak Anchor in Emergency
Install a quick-release carabiner or clip where your anchor line attaches to the trolley, and attach a bright float to your anchor with 3 feet of cord so you can retrieve it later. In an emergency, flip the carabiner gate open and the anchor line separates instantly while the float marks its location.
Quick-release hardware options:
- Panic snap/quick-release clip: Spring-loaded gate opens with thumb pressure, $5-8
- Carabiner with safety gate: Twist-lock or screw-lock, requires two motions, $3-5
- Breakaway link: Designed to fail at specific load, prevents stuck anchor, $8-12
The float system setup:
- Tie a bright float ball (pool toy, foam buoy, or commercial anchor float) to your anchor with 2-3 feet of cord
- Use a color that’s visible in your water (orange, yellow, or bright red)
- Attach your anchor line to the float’s cord, not directly to the anchor
- When you release, the float stays with the anchor and marks the spot
Emergency release situations:
- Unexpected rapid or waterfall ahead
- Kayak taking on water and sinking
- Severe weather approaching quickly
- Anchor stuck and pulling kayak underwater
- Medical emergency requiring immediate shore access
Practice the release motion at home until you can do it without looking. In a real emergency, you may be dealing with waves, current, and stress that make fine motor skills difficult.
Alternative: The anchor knife. Keep a blunt-tip rescue knife attached to your PFD. If your quick-release fails or you can’t reach it, cut the anchor line. A $15 knife is cheaper than a $40 anchor, and both are cheaper than a hospital visit.
After releasing in an emergency:
- Paddle to safety first, don’t try to retrieve the anchor immediately
- Mark the location on your phone’s GPS or note landmarks
- Return later when conditions improve to retrieve using the float
- Wade or use a grappling hook to snag the float if you can’t see the anchor
Float retrieval technique: Paddle slowly toward the float, approach from downstream, and grab it with your paddle blade or a small net. Pull hand-over-hand to bring up the anchor, keeping your weight centered in the kayak.
Cost of a float system: $5-10 for a pool toy float and cord. This small investment can save a $30-50 anchor and prevent dangerous situations.
Common Mistakes When Anchoring a Kayak in Flowing Water
The most common mistake is anchoring from the side of the kayak instead of using a trolley system, which creates a pivot point that lets current flip the kayak. Other frequent errors include using too little scope, wrong anchor type, and anchoring in current too strong for the angler’s skill level.
Top mistakes and fixes:
1. Side-anchoring (most dangerous)
- Mistake: Tying anchor line to a side cleat, handle, or scupper
- Why it fails: Current catches the side and rolls the kayak
- Fix: Install and use an anchor trolley on every trip
2. Insufficient scope
- Mistake: Using 1:1 or 2:1 scope (equal or double the depth)
- Why it fails: Steep angle pulls anchor up instead of holding it down
- Fix: Use minimum 3:1 in current, 4:1 in strong flow
3. Wrong anchor for bottom type
- Mistake: Using mushroom anchor on rocky river bottom
- Why it fails: Smooth shape can’t grip hard surfaces
- Fix: Match anchor to bottom (grapnel for rock/structure, mushroom for sand/mud)
4. Anchoring too far upstream
- Mistake: Dropping anchor while facing upstream in strong current
- Why it fails: Current pushes water over the bow, swamping the kayak
- Fix: Deploy while drifting, let current carry you past the anchor point
5. No quick-release system
- Mistake: Tying anchor line directly to trolley with knots
- Why it fails: Can’t escape if anchor gets stuck or emergency develops
- Fix: Use carabiner or panic snap with float system
6. Anchor too light for conditions
- Mistake: Using 1.5-2 pound anchor in moderate to strong current
- Why it fails: Anchor drags across bottom, kayak drifts constantly
- Fix: Carry 3-5 pound anchor for current fishing
7. Anchoring in the main channel
- Mistake: Dropping anchor in the fastest, deepest current
- Why it fails: Excessive force on kayak and anchor, dangerous if something goes wrong
- Fix: Anchor in eddies, seams, or slower water near structure
8. Not testing anchor hold before committing
- Mistake: Deploying anchor and immediately starting to fish
- Why it fails: Slow drag goes unnoticed until you’ve drifted far from target
- Fix: Watch a landmark for 30 seconds after anchoring to confirm you’re holding
9. Anchoring alone without communication
- Mistake: Solo anchoring in remote areas without phone or radio
- Why it fails: No way to call for help if you capsize or get stuck
- Fix: Carry waterproof communication device, tell someone your plan
10. Ignoring weather changes
- Mistake: Staying anchored as wind picks up or storms approach
- Why it fails: Conditions that were safe become dangerous quickly
- Fix: Monitor weather, pull anchor at first sign of deteriorating conditions
Learning from mistakes: Most experienced kayak anglers have made several of these errors. The key is recognizing them early and adjusting before they become dangerous.
What Happens If My Kayak Anchor Gets Stuck on Rocks
If your anchor gets stuck, first try pulling from multiple angles by paddling in a circle around the anchor point while maintaining tension on the line. If that fails, use your quick-release system to detach the anchor line from your kayak, letting the float mark the location for later retrieval.
Step-by-step stuck anchor procedure:
1. Try the pull-from-different-angles technique
- Paddle slowly in a circle around where the anchor sits
- Keep light tension on the line as you move
- The changing angle often frees tines wedged between rocks
- Works 70-80 percent of the time with grapnel anchors
2. Add slack then snap tight
- Let out 2-3 feet of extra line quickly
- Paddle hard away from the anchor to snap the line tight
- The shock load sometimes pops the anchor free
- Repeat from 2-3 different directions
3. Pull straight up
- Position directly over the anchor (use landmarks or GPS)
- Pull the line straight vertical hand-over-hand
- This collapses grapnel tines and may free them
- Requires calm conditions and stable kayak
4. Use the float system
- If the anchor won’t budge after 5 minutes of trying, release it
- Your float marks the location
- Paddle to shore or safe water
- Return later with help or when conditions improve
Retrieval after releasing:
- Wade to the anchor if water is shallow and safe
- Use a grappling hook on a rope to snag the float from shore
- Return by boat with a partner who can stabilize you while you pull
- Dive to free it only if you’re trained and water is clear and calm
Prevention strategies:
- Choose grapnel over fixed anchors because folding tines release more easily
- Avoid anchoring in known snag areas like logjams or boulder fields
- Use slightly lighter anchor in very rocky areas (easier to pull free, may drag slightly)
- Attach a trip line (second line to the anchor’s crown) for pulling from opposite direction
The trip line technique: Tie a second line to the top of your anchor (the end opposite the tines). Run this line through a float and back to your kayak. If the anchor sticks, pull the trip line to lift it backwards out of the rocks. This works but adds complexity and another line to manage.
When to abandon an anchor: If conditions are deteriorating, you’re getting fatigued, or you feel unsafe, release the anchor and leave it. A $30-50 anchor isn’t worth risking your safety. Mark the GPS coordinates and return another day.
Stuck anchor in strong current: This is the most dangerous scenario because the current adds force that can pull your kayak underwater if you’re attached. Release immediately using your quick-release system. Never tie yourself to a stuck anchor in current.
Recovery success rate: With a float system and GPS coordinates, you can recover 80-90 percent of released anchors within a few days. The longer you wait, the more likely the anchor gets buried or moved by current.
How to Anchor a Kayak in Current: Complete Setup Guide
A complete kayak anchoring system for current includes a 3-5 pound grapnel anchor, 30-40 feet of paracord anchor line, an anchor trolley with pulleys and cleat, a quick-release carabiner, and a bright float attached to the anchor. This setup handles most river and inshore fishing situations safely.
Essential components checklist:
Anchor:
- 3-3.5 lb grapnel for kayaks under 12 feet
- 4-5 lb grapnel for kayaks 12+ feet or strong current
- Folding design for compact storage
Anchor line:
- 30-40 feet of 550 paracord (7/32-inch diameter)
- Bright color for visibility (yellow, orange, or neon green)
- Spliced or knotted loop on one end for carabiner attachment
Anchor trolley:
- Two pulleys or pad eyes (bow and stern mounting)
- 20-25 feet of paracord for trolley loop
- One cleat for locking trolley position
- Stainless steel hardware for saltwater durability
Quick-release system:
- Carabiner or panic snap (rated for 200+ pounds)
- Bright float ball with 3 feet of cord
- Attached between anchor and main anchor line
Optional but recommended:
- Anchor bag or mesh storage bag
- Gloves for handling wet line
- Small bungee for securing anchor to deck
- GPS device for marking anchor release locations
Total cost for complete system: $50-80 if purchased separately, $60-100 for pre-made kits.
Assembly instructions:
- Install trolley pulleys 6-8 inches from bow and stern tips on one side rail
- Thread trolley line through both pulleys to create continuous loop
- Mount cleat at comfortable reach from seated position (usually near cockpit)
- Attach float to anchor with 3 feet of cord tied to anchor eye
- Tie anchor line to float cord using bowline or double fisherman’s knot
- Add carabiner where anchor line meets trolley loop
- Coil excess line and secure with bungee when not in use
Pre-deployment check:
- Trolley slides smoothly from bow to stern
- Cleat holds trolley position under load
- Carabiner opens and closes easily
- Float is bright and visible
- Anchor tines fold and unfold properly
Storage on kayak:
- Coil anchor line in mesh bag attached to deck bungee
- Store anchor in rear tank well or side pocket
- Keep float attached so system is ready to deploy
- Position for one-handed access while seated
Maintenance:
- Rinse anchor and hardware after saltwater use
- Check trolley line for wear every few trips
- Replace carabiner if gate becomes stiff
- Re-tie knots if they show fraying
This complete system takes 1-2 hours to assemble and install the first time, then provides years of reliable service with minimal maintenance.
Frequently Asked Questions
Can I anchor a kayak from the bow only?
Yes, bow-only anchoring works in calm water or very light current (under 0.5 mph). Position your trolley all the way forward so the anchor pulls from the bow tip. This keeps you facing into the current or wind. In moderate to strong current, use the 45-degree angle position instead for better stability.
How do I know if my anchor is dragging?
Pick a stationary landmark (tree, dock post, rock) and watch it for 30-60 seconds after anchoring. If the landmark appears to move relative to your position, you’re dragging. Also watch your anchor line angle, if it gets steeper over time, you’re drifting backward and the anchor isn’t holding.
Should I anchor upstream or downstream of where I want to fish?
Anchor upstream and let current carry you into position. Deploy the anchor while drifting, then let out line as current swings your kayak downstream of the anchor point. This prevents the dangerous situation of current pushing water over your bow.
Can I use a regular boat anchor on a kayak?
Most boat anchors are too heavy (8-15 pounds) for safe one-handed kayak deployment. Stick with kayak-specific anchors in the 1.5-5 pound range. The exception is small folding grapnels designed for dinghies, which work fine if they’re under 5 pounds.
What’s the best way to store anchor line so it doesn’t tangle?
Coil the line in 2-foot loops and secure with a bungee or Velcro strap. Store in a mesh bag that drains water and allows the line to dry. Some anglers use a small anchor line bag with a drawstring that hangs from deck bungees for quick access.
Do I need different anchors for saltwater vs freshwater?
The same anchor works in both, but saltwater requires stainless steel or galvanized hardware to prevent rust. Rinse your anchor, trolley, and carabiner with fresh water after every saltwater trip to extend their life.
How deep is too deep to anchor a kayak?
Most kayak anglers anchor in 2-12 feet of water. Beyond 15 feet, you need 45-60 feet of line (at 3:1 scope), which becomes difficult to manage and retrieve. Very deep anchoring also makes it hard to pull the anchor free if it gets stuck.
Can I anchor in tidal current?
Yes, but be aware that tidal current reverses direction. When the tide changes, your kayak will swing 180 degrees around the anchor point. Use your trolley to adjust position as the current shifts. Strong tidal current (over 2 mph) requires the same precautions as river current.
What should I do if wind and current come from different directions?
Position your trolley to split the difference between wind and current direction. Your kayak will try to align with the stronger force. Accept some slow rotation as normal, or move to a more protected spot where wind and current align.
Is it legal to anchor anywhere?
Anchoring regulations vary by location. Most public waters allow anchoring, but some areas prohibit it near boat channels, swimming areas, or sensitive habitats. Check local boating regulations and respect private property boundaries and no-anchor zones.
How long can I safely stay anchored?
Stay anchored as long as conditions remain safe and you’re comfortable. Monitor weather, current speed, and your fatigue level. Most kayak anglers anchor for 15 minutes to 2 hours per spot. Always pull anchor if weather deteriorates or you feel uncomfortable.
Can I anchor two kayaks together?
Yes, but only in calm water. Anchor one kayak normally, then tie the second kayak to the first with 3-4 feet of line between them. This works for fishing partners who want to stay together. Never do this in current above 1 mph because the combined surface area creates too much force on a single anchor.
Conclusion
Learning how to anchor a kayak in current opens up productive fishing spots that drifting or constant paddling can’t access effectively. The key elements, a proper anchor trolley system, the right anchor weight and type for conditions, adequate scope, and a reliable quick-release setup, work together to keep you safe and positioned exactly where you want to fish.
Start your anchoring practice in calm, shallow water where mistakes have minimal consequences. Master your trolley adjustment and quick-release system until they become second nature. As your confidence builds, gradually progress to light current, then moderate flow, always matching your anchor setup and location choice to your skill level.
Your next steps:
- Install an anchor trolley if your kayak doesn’t have one (30-45 minute DIY project)
- Purchase a 3-3.5 pound grapnel anchor and 30-40 feet of bright paracord
- Add a float and quick-release carabiner to complete your safety system
- Practice in calm water until deployment and retrieval feel comfortable
- Progress to light current (under 1 mph) in safe, familiar locations
Remember that anchoring is a tool, not a requirement. Some situations call for drift fishing or constant repositioning instead. The anglers who catch the most fish know when to anchor, when to drift, and when to keep moving, and that judgment comes from experience on the water.
Stay safe, wear your PFD every time you anchor, and never hesitate to release your anchor if conditions change or you feel uncomfortable. The fish will still be there tomorrow, and no fishing spot is worth risking your safety.





