
Quick Answer
Installing an anchor trolley on your fishing kayak involves mounting two pulleys (one at the bow, one at the stern), threading a continuous rope loop through them, and attaching a ring or carabiner that connects to your anchor line. This system lets you slide your anchor attachment point along either side of the kayak, allowing you to position your boat at any angle to wind or current. Most installations take 1-2 hours and require basic drilling skills, though no-drill options exist for certain kayak types.
Key Takeaways
- An anchor trolley costs $15-45 for a complete kit and takes 1-2 hours to install on most kayaks
- The system uses two pulleys and a continuous rope loop to adjust your anchor position from bow to stern
- Proper pulley placement (6-12 inches from bow and stern tips) prevents rope interference with paddling
- Marine-grade stainless steel hardware and UV-resistant rope are essential for saltwater durability
- No-drill installation is possible on some kayaks using existing screw holes or adhesive pad eyes
- Common mistakes include using rope that’s too short, mounting pulleys too close together, and forgetting to seal drilled holes
- An anchor trolley outperforms a fixed cleat by letting you adjust boat angle without pulling anchor
What Is an Anchor Trolley and How Does It Work
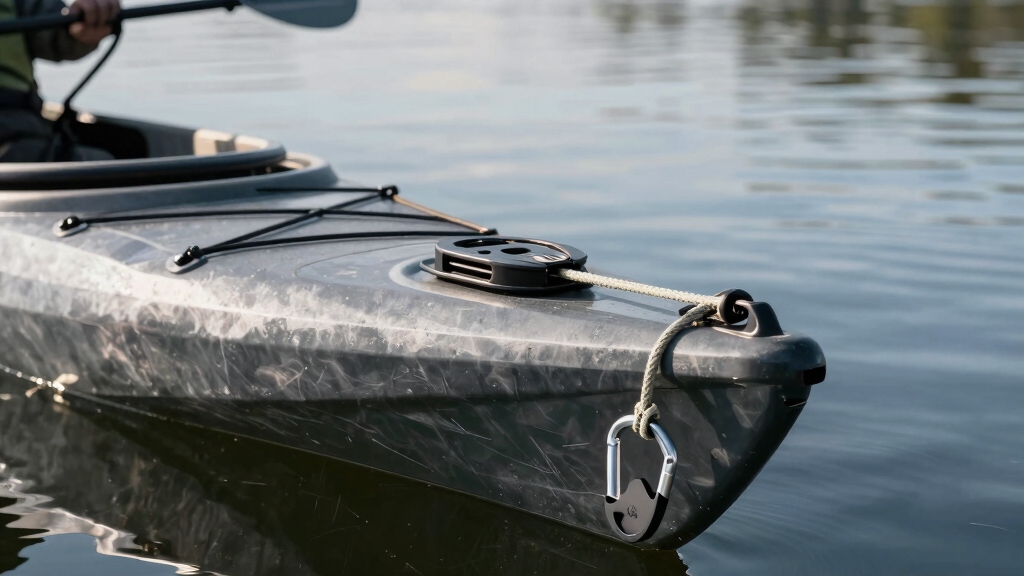
An anchor trolley is a rope-and-pulley system mounted along one side of your kayak that allows you to adjust where your anchor line attaches. The system consists of two pulleys (also called blocks) mounted near the bow and stern, a continuous loop of rope running through both pulleys, and a ring or carabiner that slides along the rope to connect your anchor line.
When you drop anchor, wind and current naturally push your kayak into a specific position. Without a trolley, you’re stuck in whatever angle your fixed anchor point creates. With a trolley, you simply pull the rope to slide the attachment ring forward or backward, repositioning your kayak to face into the wind, present your best casting angle, or avoid obstacles.
How the mechanics work:
- Pull the rope toward the bow, and your kayak pivots to point downstream or downwind
- Pull toward the stern, and your kayak swings to face upstream or upwind
- Position the ring mid-ship for a broadside presentation when fishing structure
The system works because the anchor stays in one spot on the bottom while the trolley changes which part of your kayak the anchor line pulls from. This is especially valuable when conditions change mid-session, you can adjust your position without ever touching the anchor itself.
Most fishing kayak anglers install the trolley on their non-paddle side (right side for right-handed paddlers) to keep the rope clear of paddle strokes. The entire system weighs less than a pound and creates minimal drag when paddling.
Anchor Trolley vs Anchor Cleat: Which Is Better
An anchor trolley beats a fixed cleat for fishing kayaks because it offers infinite positioning options, while a cleat locks you into one angle regardless of changing wind or current. A cleat costs less ($5-10) and installs faster, but it forces you to either accept whatever position the wind pushes you into or pull anchor and reset, both frustrating when fish are biting.
Anchor trolley advantages:
- Adjust boat angle without pulling anchor
- Position bow-into-waves for stability in rough water
- Present different casting angles to the same structure
- Reduce swing radius in crowded anchorages
- Keep kayak parallel to shore when fishing banks
When a cleat makes sense:
- You only anchor in calm, protected water
- You fish exclusively from a drift and rarely anchor
- Your kayak has limited deck space for hardware
- Budget is extremely tight (under $15 total)
For serious kayak anglers who anchor regularly, the trolley’s $30-40 investment pays off in the first few trips. The ability to fine-tune your position means more time with lines in the water and less time repositioning. A cleat works fine for occasional recreational paddlers who anchor once or twice a season in sheltered coves, but anyone fishing current, wind, or structure will immediately notice the trolley’s advantage.
One hybrid approach: install a cleat on one side and a trolley on the other. This gives you a quick-tie option for brief stops while preserving full adjustability when you settle into a fishing spot.
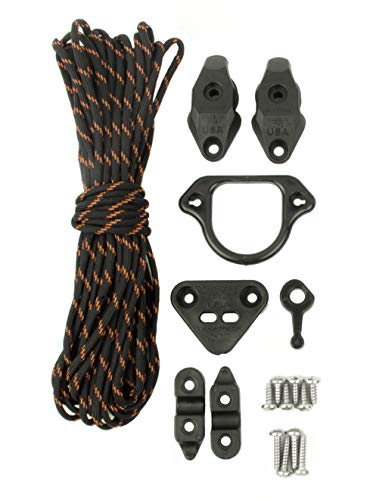
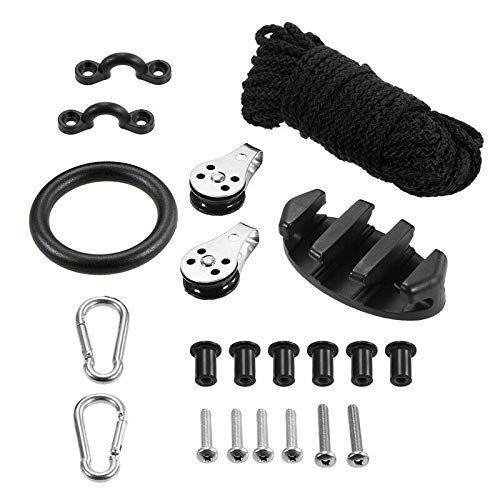
✔Feature:Durable, Seaworthy Materials: Made of tough, corrosion-proof stainless steel, nylon hardware and an ultra-strong paracord (USA made) with a reflective tracer that adds visibility in low-light situations.

MAKE EASIER TO FISH WHEN WINDY: This Kayak Anchor System can easily adjust the direction of the fishing kayak in wind or waves, work with anchor pole can allowing you to always adapt to the current or wind direction. Let you fully enjoy the fishing time
How Much Does an Anchor Trolley Kit Cost
A complete anchor trolley kit costs between $15 and $45 in 2026, with most quality kits in the $25-35 range. Budget kits around $15 typically include basic pulleys and rope but may use lower-grade hardware that corrodes faster in saltwater. Premium kits ($40-45) feature stainless steel pulleys with sealed bearings, UV-resistant marine rope, and reinforced pad eyes.
What’s included in a typical kit:
- Two pulleys or blocks (usually 1-2 inch diameter)
- 30-50 feet of marine-grade rope (often 3/16 inch diameter)
- Two pad eyes (mounting points for pulleys)
- Stainless steel bolts, washers, and nuts
- One anchor ring or carabiner
- Installation instructions
Additional costs to consider:
- Marine sealant ($6-10 per tube) to waterproof drilled holes
- Drill bits if you don’t own them ($8-15 for a set)
- Backing plates or large washers ($3-8) for added strength
- Anchor and anchor line if you don’t already own them ($25-60)
You can also build a DIY system for $12-20 by purchasing components separately from a marine supply store. Buy two small pulleys ($3-5 each), 40 feet of 3/16-inch rope ($8-10), two pad eyes ($2-4 each), and hardware from your local shop. This approach lets you choose exactly the components you want but requires more research to ensure compatibility.
For most anglers, a mid-range kit ($25-35) offers the best value, quality hardware that will last several seasons without the premium price of top-tier components. If you fish saltwater exclusively, spend the extra $10-15 for marine-grade stainless steel to avoid corrosion issues.

H2o Anchor Trolley Kit Marine Grade Fixings

Anchor ring,pad eyes and carabiner of the kayak anchor trolley system are all made of 316 stainless steel,which is more anti-rust and wear resistance,strong and durable,enhance the stability and safety of the anchor trolley system.

Premium Materials: Our kit comes with a solid 0.39in x 32.81ft Rope, providing ample length and exceptional durability. The stainless steel pulley blocks offer resistance to rust and wear, boasting a robust structure manufactured through a stringent process, ensuring reliability and longevity. Additionally, the versatile nylon cleat can be used alongside ropes to securely fix paddles, nets, poles, and other items on your kayak, boat, or canoe.
What Tools Do You Need to Install an Anchor Trolley on a Kayak
Installing an anchor trolley system requires a power drill with bits, a measuring tape, a marker, marine sealant, and basic hand tools, most anglers already own everything needed. The entire tool list costs under $30 if you’re starting from scratch, and the installation process is straightforward enough for beginners with basic DIY skills.
Essential tools:
- Power drill (cordless is easier for working on a kayak)
- Drill bits: 1/8-inch pilot bit and a bit matching your bolt diameter (usually 1/4 inch)
- Measuring tape or ruler
- Permanent marker or pencil
- Marine-grade silicone sealant
- Screwdriver or wrench (to tighten bolts)
- Scissors or knife (to cut rope)
Helpful but optional:
- Backing plates or large fender washers (for added strength)
- Lighter or heat source (to seal rope ends and prevent fraying)
- Sandpaper (to smooth rough edges around drilled holes)
- Masking tape (to mark drill locations and prevent bit slipping)
- Level or straight edge (to align pulleys properly)
The drilling process is the most intimidating part for first-timers, but kayak hulls are designed to be drilled, manufacturers expect you to add accessories. Use a pilot hole first (small 1/8-inch bit) to ensure accurate placement, then enlarge to your final bolt size. This two-step approach prevents the bit from wandering and gives you a chance to verify position before committing to the full-size hole.
Common tool mistakes to avoid:
- Using a drill bit that’s too large, this creates loose, weak mounting points
- Skipping the pilot hole, leads to misaligned or cracked holes
- Forgetting marine sealant, allows water intrusion that can damage foam-filled hulls
- Over-tightening bolts, can crack plastic hulls or strip threads
If you don’t own a drill, consider borrowing one or using a hand drill (brace and bit). The holes are small enough that manual drilling works, though it takes more effort. Some kayak shops also offer installation services for $40-75 if you prefer professional installation.

Professional Formula - This Clear Silicone Adhesive Sealant is a Sensor-Safe, General Purpose Clear RTV Sealant that can be used inside or outside for all your jobs

Sensor-Safe, General Purpose Black Rtv Indoor/Outdoor Sealant

DEVELOPED SPECIFICALLY AS A MARINE SEALANT – Stays tough and flexible for a wide range of uses above the waterline
How to Install an Anchor Trolley: Step-by-Step Process
Installing an anchor trolley takes 1-2 hours and follows a straightforward sequence: plan your layout, mount the pulleys, thread the rope, and test the system. Work on a stable surface with good lighting, and don’t rush the measuring phase, proper pulley placement makes the difference between a smooth-operating system and one that binds or interferes with paddling.
Step 1: Plan your pulley positions
Measure 6-12 inches from your bow tip and mark a spot on the gunwale (side rail) where the front pulley will mount. Repeat at the stern. The pulleys should sit high enough that the rope clears your deck when pulled tight but low enough that you can reach it comfortably while seated. Most anglers mount pulleys 2-4 inches below the top of the gunwale.
Step 2: Drill pilot holes
Place a small piece of masking tape over each mark to prevent the drill bit from slipping. Using a 1/8-inch bit, drill a pilot hole straight through the hull at each pulley location. Drill slowly and steadily, rushing creates rough, uneven holes.
Step 3: Enlarge to final size
Switch to your final bit size (typically 1/4 inch to match your bolts) and carefully enlarge each pilot hole. Drill from the outside in to minimize rough edges on the interior surface.
Step 4: Seal and mount pad eyes
Apply marine sealant around each hole and on the threads of your bolts. Position a pad eye over each hole, insert the bolt from outside, add a washer and nut on the inside, and tighten firmly (but don’t over-torque). Wipe away excess sealant. Let cure for 24 hours before use.
Step 5: Attach pulleys
Connect each pulley to its pad eye using the provided shackle or carabiner. Ensure the pulley wheel spins freely and faces the correct direction (rope should run parallel to the kayak’s length).
Step 6: Thread the rope
Cut your rope to length (typically 30-40 feet for most kayaks). Thread one end through the front pulley, run it back to the stern pulley, through that pulley, and back to the bow. Tie the two ends together with a secure knot (double fisherman’s or figure-eight loop). Attach your anchor ring or carabiner to the rope loop.
Step 7: Test and adjust
Pull the rope in both directions to ensure smooth operation. The ring should slide easily from bow to stern without binding. If the rope is too loose, untie and shorten it by 1-2 feet. If it binds, check that pulleys are aligned and spinning freely.
For detailed guidance on kayak anchor setup and related modifications, explore our comprehensive installation resources.
Where to Position Anchor Trolley Pulleys on Your Kayak
Position your front pulley 6-12 inches from the bow tip and your rear pulley 6-12 inches from the stern tip, both mounted on the same side of the kayak at a height that keeps the rope clear of your paddle stroke. This placement provides maximum adjustment range while preventing the rope from interfering with paddling, gear, or rod holders.
Height considerations:
- Mount 2-4 inches below the gunwale top for easy reach while seated
- Keep rope high enough to clear deck-mounted gear when pulled tight
- Ensure the rope doesn’t cross your paddle path on the pull stroke
Side selection:
- Right-handed paddlers typically install on the right (starboard) side
- Left-handed paddlers prefer the left (port) side
- Choose the side opposite your primary paddle hand to minimize interference
Distance from ends:
- Too close to tips (under 6 inches): limited adjustment range, rope may interfere with bow/stern gear
- Too far from tips (over 12 inches): reduced positioning options, less effective angle adjustment
- Sweet spot (8-10 inches): balances range with clearance
Some kayak models have pre-molded gear tracks or existing mounting points that influence pulley placement. If your kayak has tracks, consider using track-mounted pulleys instead of drilling, these slide into position and can be adjusted or removed without permanent modification.
Special considerations for specific kayak types:
- Sit-on-top kayaks: mount pulleys on the side rail or tank well edges
- Sit-inside kayaks: mount on the cockpit coaming or deck rigging points
- Inflatable kayaks: use adhesive pad eyes or existing D-rings (see no-drill section below)
Test your planned positions before drilling by temporarily taping the pulleys in place and running a test rope. Sit in your normal fishing position and verify the rope doesn’t interfere with casting, paddling, or accessing gear. This five-minute test prevents permanent mistakes.
How Long Should Anchor Trolley Rope Be
Your anchor trolley rope should measure 2.5 to 3 times the length of your kayak for optimal performance. For a 12-foot kayak, use 30-36 feet of rope; for a 14-foot kayak, use 35-42 feet. This length provides enough slack for smooth operation while keeping excess rope manageable and preventing tangles.
Why length matters:
- Too short: rope pulls tight, making adjustment difficult and creating excessive wear on pulleys
- Too long: excess rope creates tangles, gets caught on gear, and adds unnecessary weight
- Just right: smooth sliding action with minimal slack when positioned at either extreme
Measuring formula:
- Measure your kayak’s length from bow to stern
- Multiply by 2.5 for minimum functional length
- Multiply by 3 for comfortable working length with some extra
- Add 1-2 feet if you want extra slack for easier handling
Most anchor trolley kits include 40-50 feet of rope, which works for kayaks up to 16 feet. If your kayak is shorter, you’ll trim the excess after threading the system. Always thread first, test the operation, then cut, you can’t add rope back once it’s cut.
Rope diameter recommendations:
- 3/16 inch (5mm): standard for most kayaks, good balance of strength and flexibility
- 1/4 inch (6mm): heavier-duty for larger kayaks or rough conditions, slightly stiffer
- 1/8 inch (3mm): too thin for most applications, wears quickly and cuts into hands
Choose marine-grade rope with UV resistance, standard hardware store rope degrades quickly in sun and saltwater. Polyester or nylon blends work well. Some anglers prefer brightly colored rope (yellow, orange, red) for visibility, while others choose black or gray to blend with their kayak’s color scheme.
After cutting your rope to final length, seal the ends with a lighter or heat source to prevent fraying. Melt the fibers together for 2-3 seconds, then let cool. This simple step extends rope life significantly.
Can You Install an Anchor Trolley Without Drilling Holes
Yes, you can install an anchor trolley without drilling by using adhesive-backed pad eyes, existing screw holes, or gear track mounts, though these methods work best on certain kayak types and may not be as secure as through-bolted installations. No-drill options are ideal for anglers who want to avoid permanent modifications, fish from rental kayaks, or own inflatable models where drilling isn’t possible.
Adhesive pad eye method:
Marine-grade adhesive pad eyes (also called stick-on pad eyes) bond to smooth plastic or fiberglass surfaces using 3M VHB tape or marine epoxy. Clean the mounting area thoroughly with alcohol, apply the adhesive pad eye, and let cure for 24-48 hours before use. This method works well on sit-on-top kayaks with smooth, flat gunwales but may fail on textured or curved surfaces.
Limitations: Adhesive mounts are less secure than bolted installations and can fail under heavy loads or in extreme heat. They work fine for typical kayak anchoring in calm to moderate conditions but aren’t recommended for rough water or strong current.
Existing hole method:
Many kayaks have pre-drilled holes for accessories, rod holders, or gear tracks. If your kayak has unused holes near the bow and stern, you may be able to mount pad eyes using these existing points. Measure carefully to ensure the holes align with your desired pulley positions.
Gear track method:
If your kayak has molded-in gear tracks (common on fishing-specific models), purchase track-mounted pulleys designed to slide into the track system. These require no drilling and can be repositioned or removed easily. This is the most secure no-drill option and works excellently on compatible kayaks.
For inflatable kayaks:
Most inflatable fishing kayaks include D-rings or attachment points molded into the hull. Use these existing points to attach pulleys via carabiners or shackles. If your inflatable lacks suitable attachment points, adhesive pad eyes designed for PVC or Hypalon can work, but test the bond strength before trusting it with your anchor system.
Trade-offs to consider:
- Security: bolted installations are stronger and more reliable
- Permanence: no-drill methods allow easy removal and leave no marks
- Resale value: some buyers prefer unmodified kayaks, others value pre-installed accessories
- Warranty: drilling may void some kayak warranties (check before modifying)
For serious anglers who plan to keep their kayak long-term, drilling and through-bolting provides the most reliable system. For casual users, renters, or those who frequently switch kayaks, no-drill methods offer adequate performance with maximum flexibility.
How to Install an Anchor Trolley on an Inflatable Kayak
Installing an anchor trolley on an inflatable kayak requires using existing D-rings, adhesive PVC pad eyes, or gear track mounts, never drill through inflatable material. Most inflatable fishing kayaks include multiple D-rings along the sides specifically for anchor trolley installation, making the process simpler than on hard-shell kayaks.
Using existing D-rings (best method):
- Identify D-rings near bow and stern on the same side of your kayak
- Attach pulleys directly to D-rings using stainless steel carabiners or shackles
- Thread rope through pulleys as described in the standard installation section
- Test operation, the system should work identically to a hard-shell installation
If D-rings aren’t positioned correctly:
Purchase adhesive PVC pad eyes designed specifically for inflatable boats. These use specialized adhesive that bonds to PVC or Hypalon material. Clean the mounting area with MEK (methyl ethyl ketone) or the manufacturer’s recommended cleaner, apply the adhesive pad eye, and let cure for 48-72 hours before use. Some manufacturers recommend applying heat during curing for maximum bond strength.
Important considerations for inflatables:
- Never drill, puncture, or pierce inflatable material
- Use lightweight pulleys to minimize stress on attachment points
- Check D-ring and pad eye security before each trip
- Consider a shorter rope length since inflatables are typically smaller (8-12 feet)
- Be aware that attachment points may shift slightly as the kayak flexes
Alternative approach:
Some inflatable kayak owners run the trolley rope through existing deck rigging or bungee attachment points instead of installing dedicated pulleys. This creates a more basic system with more friction but requires zero installation and works adequately for light-duty anchoring.
The key advantage of inflatables is that most models come pre-equipped with attachment points, eliminating the need for drilling or permanent modification. The trade-off is that these attachment points may not be positioned as precisely as custom-drilled locations on a hard-shell kayak.
Anchor Trolley Installation Mistakes to Avoid
The most common anchor trolley installation mistake is mounting pulleys too close together, which limits your adjustment range and defeats the purpose of the system. Pulleys should be positioned near the extreme bow and stern (6-12 inches from tips) to provide maximum positioning flexibility, mounting them mid-ship or only a few feet apart creates a system that barely adjusts your kayak’s angle.
Critical mistakes that compromise function:
Using rope that’s too short: Creates excessive tension, makes adjustment difficult, and wears out pulleys faster. Always start with more rope than you think you need, you can trim excess but can’t add length later.
Forgetting to seal drilled holes: Water intrusion through unsealed holes can saturate foam-filled hulls, adding weight and potentially causing structural damage over time. Always use marine sealant on bolts and around holes.
Over-tightening bolts: Plastic kayak hulls can crack under excessive torque. Tighten bolts firmly but stop when you feel resistance, you’re compressing plastic, not metal.
Mounting pulleys at different heights: Misaligned pulleys cause the rope to run at an angle, creating friction and uneven wear. Use a measuring tape to ensure both pulleys sit at the same height relative to the waterline.
Installing on the wrong side: Right-handed paddlers who install trolleys on their left side find the rope interferes with paddle strokes. Choose the side opposite your primary paddle hand.
Hardware and material mistakes:
- Using non-marine hardware that corrodes in saltwater
- Choosing rope that’s too thick (binds in pulleys) or too thin (cuts into hands)
- Skipping backing plates or washers on the interior, which can cause bolts to pull through under load
- Failing to seal rope ends, leading to rapid fraying
Operational mistakes:
- Not testing the system before heading out, always do a dry run to verify smooth operation
- Attaching the anchor line directly to the trolley rope instead of using a ring or carabiner (this tangles the system)
- Running the trolley on both sides of the kayak (unnecessary and creates confusion, one side is sufficient)
One mistake that’s easy to overlook: forgetting to account for deck-mounted gear when planning pulley positions. Rod holders, fish finders, and gear tracks can interfere with rope operation if pulleys are positioned without considering existing accessories. Mock up your installation with tape and test rope before drilling.
For comprehensive guidance on kayak fishing setup and avoiding common rigging mistakes, explore our detailed installation resources.
How to Fix Anchor Trolley Rope Slipping or Jamming
Anchor trolley rope slipping or jamming usually results from incorrect rope length, misaligned pulleys, or debris in the pulley wheels, all fixable issues that don’t require reinstallation. Start by identifying whether your problem is slipping (rope slides through pulleys when you don’t want it to) or jamming (rope won’t slide smoothly when you pull it).
Fixing slipping issues:
Slipping occurs when the rope is too loose or the anchor ring isn’t creating enough friction. Untie the rope connection, remove 1-2 feet of length, and retie. The rope should have slight tension when the ring is positioned at either extreme but shouldn’t be tight enough to make sliding difficult. If shortening doesn’t help, your pulleys may be too large for your rope diameter, switch to thicker rope (from 3/16 inch to 1/4 inch) or smaller pulleys.
Fixing jamming issues:
Jamming happens when pulleys are misaligned, rope is kinked, or debris blocks the pulley wheel. Check these in order:
Inspect pulleys for debris: Sand, salt, and algae can build up in pulley wheels. Rinse with fresh water and spin the wheel to ensure free movement. If the wheel doesn’t spin smoothly, disassemble and clean or replace the pulley.
Check pulley alignment: Both pulleys should face the same direction with wheels parallel to the kayak’s length. If one pulley is twisted or mounted at an angle, the rope will bind. Loosen the mounting hardware, realign, and retighten.
Look for rope kinks or damage: Rope that’s been over-tightened or twisted can develop permanent kinks that catch in pulleys. Run your hand along the entire rope length feeling for rough spots, kinks, or fraying. Replace damaged rope, it’s inexpensive and prevents failure at critical moments.
Verify rope diameter matches pulleys: Pulleys designed for 1/4-inch rope will jam with 3/16-inch rope, and vice versa. Check your pulley specifications and ensure your rope diameter matches.
Preventive maintenance:
- Rinse the entire system with fresh water after saltwater use
- Apply silicone spray to pulley wheels every few trips (avoid oil-based lubricants that attract dirt)
- Inspect rope for wear every season and replace when you see fraying
- Check that bolts remain tight, vibration can loosen hardware over time
If you’ve addressed all these issues and still experience problems, your pulleys may be low-quality with rough or misshapen wheels. Upgrade to marine-grade pulleys with sealed bearings, the $10-15 investment eliminates most operational issues.
What Size Pad Eyes for Anchor Trolley Installation
Use 1/4-inch pad eyes for most kayak anchor trolley installations, this size provides adequate strength for typical anchoring loads while using common bolt sizes that are easy to work with. Pad eyes are rated by the diameter of the bolt hole (not the overall size), and 1/4-inch holes accept standard 1/4-inch stainless steel bolts available at any hardware store.
Pad eye size guidelines:
- 1/4 inch (6mm): Standard for kayaks up to 14 feet, handles anchors up to 3-5 pounds in moderate conditions
- 5/16 inch (8mm): Heavy-duty option for larger kayaks (14+ feet) or rough water anchoring
- 3/16 inch (5mm): Minimum size, suitable only for very light-duty use in calm water
Material considerations:
Choose marine-grade stainless steel (304 or 316 grade) for saltwater use, regular steel or zinc-plated hardware corrodes quickly in marine environments. Stainless steel costs $2-4 per pad eye versus $0.50-1 for regular steel, but the longevity difference is dramatic. In saltwater, regular steel can show rust within weeks; stainless steel lasts years.
Pad eye style options:
- Folding pad eyes: Lie flat when not in use, reducing snag hazards
- Fixed pad eyes: Permanently raised, slightly stronger but more likely to catch clothing or gear
- Welded vs. stamped: Welded pad eyes are stronger but cost more; stamped pad eyes work fine for kayak applications
Backing plate recommendations:
Always use a backing plate or large fender washer on the interior side of your pad eye installation. This distributes load across a larger area and prevents bolts from pulling through the hull under stress. A 1.5-inch fender washer costs $0.25 and significantly increases installation strength.
Load capacity reality check:
Even small 1/4-inch pad eyes are rated for 500-1000 pounds of load, far more than any kayak anchoring scenario will generate. Your anchor, rope, and the kayak itself will fail long before properly installed pad eyes do. The real concern isn’t strength but corrosion resistance and proper installation technique.
If you’re unsure what size your kit includes, measure the bolt diameter with calipers or compare to a ruler. Most pre-packaged anchor trolley kits include 1/4-inch pad eyes and matching hardware, which works perfectly for 95% of kayak fishing applications.
Is an Anchor Trolley Worth It for Fishing Kayaks
An anchor trolley is absolutely worth it for fishing kayaks if you anchor regularly in current or wind, the ability to adjust your boat angle without pulling anchor saves time and keeps you in the strike zone longer. For anglers who primarily drift fish or only anchor occasionally in calm water, the $30-40 investment and installation time may not provide enough benefit to justify the modification.
Clear “yes” scenarios:
- You fish rivers, tidal creeks, or areas with consistent current
- You target structure (docks, pilings, drop-offs) that requires precise positioning
- You anchor in wind and need to adjust for changing conditions
- You fish from a sit-on-top kayak where repositioning is difficult
- You frequently fish the same spots and want to dial in perfect angles
Probably not worth it scenarios:
- You drift fish 90% of the time and rarely anchor
- You only fish small, protected ponds with no current or wind
- Your kayak has extremely limited deck space for hardware
- You’re a casual recreational paddler who anchors once or twice per season
The time-savings calculation:
Without a trolley, adjusting your kayak’s angle requires pulling anchor, repositioning, and re-setting, a process that takes 2-5 minutes and often spooks fish. With a trolley, the same adjustment takes 5-10 seconds. If you make this adjustment even three times per trip, you’ve saved 10-15 minutes of productive fishing time. Over a season, that adds up to hours of additional time with lines in the water.
Beyond positioning:
A trolley also improves safety by letting you quickly pivot bow-into-waves if conditions deteriorate. This single feature has helped many kayak anglers ride out sudden wind shifts or boat wakes that would otherwise swamp a broadside kayak.
For dedicated kayak anglers who fish diverse conditions and anchor frequently, an anchor trolley ranks among the most valuable modifications you can make, right alongside a quality kayak anchor system and proper rod holders. The installation pays for itself in convenience within the first few trips.
Anchor Trolley vs Power Pole for Kayak Anchoring
An anchor trolley costs $30-40 and works in any depth, while a kayak Power-Pole (shallow-water anchor) costs $300-500 and only functions in water less than 8 feet deep, making them complementary systems rather than direct alternatives. Most serious kayak anglers who fish both shallow and deep water eventually install both systems for maximum versatility.
Anchor trolley advantages:
- Works in any water depth (shallow to deep)
- No depth limitations or bottom-type restrictions
- Significantly less expensive ($30-40 vs $300-500)
- Lighter weight (under 1 pound vs 10-15 pounds)
- No moving parts to break or maintain
- Allows angle adjustment from bow to stern
Power-Pole/shallow-water anchor advantages:
- Instant deployment and retrieval (push-button operation)
- No anchor line to manage or tangle
- Holds position in strong current better than light anchors
- Quieter deployment (doesn’t splash like dropping anchor)
- Pins kayak in exact spot without swing radius
- Leaves hands free (no rope to hold during deployment)
When to choose each:
- Anchor trolley: Primary system for anglers who fish varied depths, need maximum adjustment range, or want the most affordable solution
- Power-Pole: Best for shallow-water specialists (flats, marshes, grass beds) who anchor and move frequently and can justify the cost
- Both systems: Ideal for anglers who fish both shallow structure and deep water, using the Power-Pole for quick shallow stops and the trolley for deep-water anchoring
Practical reality:
Most kayak anglers start with an anchor trolley because it’s affordable and works everywhere. Those who develop a specialized focus on shallow-water fishing (redfish, speckled trout, bass in grass) often add a Power-Pole later. The two systems don’t compete, they serve different scenarios within a complete kayak fishing setup.
One consideration: Power-Poles add significant weight (10-15 pounds) to one side of your kayak, which affects stability and paddling balance. An anchor trolley adds negligible weight and doesn’t change your kayak’s handling characteristics.
Do You Need an Anchor Trolley for a Canoe or Just Kayaks
Anchor trolleys work on canoes but are less common because canoes typically use a different anchoring strategy, most canoe anglers anchor from the bow only and let the boat weathervane naturally into wind or current. Kayaks benefit more from trolleys because their lower profile and shorter length make them harder to position with a fixed anchor point.
Why canoes use different systems:
- Canoes have higher profiles that catch more wind, making them naturally weathervane into the breeze
- Greater length (14-17 feet typical) provides more directional stability
- Higher seating position gives better visibility and casting range regardless of boat angle
- Traditional canoe anchoring from the bow works well in most conditions
When a trolley makes sense on a canoe:
- You fish solo and want to adjust position without moving to the bow
- You frequently fish strong current where precise angle control matters
- Your canoe is shorter (under 14 feet) and doesn’t weathervane reliably
- You fish from a seated position near the center and want easy access to anchor adjustment
Installation differences:
Canoes often have less suitable mounting locations than kayaks, gunwales may be too narrow or curved for standard pad eyes. Some canoe anglers install trolleys on the interior hull sides instead, though this creates a trip hazard for anyone moving around the boat.
Alternative for canoes:
Many canoe anglers achieve similar results using a bow anchor with a long painter (rope) that they can adjust from their seated position. This simpler system provides some angle adjustment without requiring hardware installation.
If you primarily fish from a canoe and are considering an anchor trolley, try the traditional bow-anchor method first. If you find yourself constantly wishing you could adjust your angle without moving forward, then a trolley installation makes sense. For kayaks, the trolley’s benefits are more immediately obvious and universally applicable.
Frequently Asked Questions
How long does it take to install an anchor trolley?
Most anglers complete an anchor trolley installation in 1-2 hours, including measuring, drilling, mounting hardware, and threading rope. First-time installers may take closer to 2 hours, while experienced DIYers can finish in under an hour. No-drill installations using adhesive pad eyes or existing mounting points take 30-45 minutes plus 24-48 hours curing time.
Can you install an anchor trolley on both sides of a kayak?
You can install trolleys on both sides, but it’s unnecessary and creates confusion, one trolley provides all the adjustment you need. Some anglers install a trolley on one side and a fixed cleat on the other for quick-tie convenience, but dual trolleys offer no functional advantage and double your hardware cost.
What type of rope is best for anchor trolleys?
Marine-grade polyester or nylon rope in 3/16-inch diameter works best for most kayak anchor trolleys. Choose UV-resistant rope rated for marine use, standard hardware store rope degrades quickly in sun and saltwater. Brightly colored rope (yellow, orange, red) improves visibility, while black or gray blends with your kayak’s appearance.
Do anchor trolleys work with all anchor types?
Yes, anchor trolleys work with any anchor type including grapnel anchors, mushroom anchors, fluke anchors, and DIY anchors. The trolley adjusts your kayak’s position relative to the anchor, it doesn’t matter what’s holding the bottom. Match your anchor weight and style to your typical fishing conditions, not to your trolley system.
How do you maintain an anchor trolley?
Rinse the entire system with fresh water after each saltwater use, paying special attention to pulleys. Apply silicone spray to pulley wheels every 3-4 trips to ensure smooth operation. Inspect rope for fraying every few months and replace when you see wear. Check that mounting bolts remain tight, vibration can loosen hardware over time.
Can you remove an anchor trolley if you change your mind?
Yes, anchor trolleys are easily removable, simply unbolt the pad eyes and pulleys. The drilled holes will remain visible, though you can fill them with marine epoxy or plastic welding if you want to restore the original appearance. No-drill installations (adhesive pad eyes or track mounts) remove completely with no permanent marks.
Will drilling holes for an anchor trolley void my kayak warranty?
Some kayak manufacturers void warranties if you drill holes, while others explicitly allow accessory installation. Check your warranty documentation before drilling, or contact the manufacturer directly. Most fishing-specific kayaks are designed with the expectation that owners will add accessories, but recreational kayaks may have stricter warranty terms.
How much weight can an anchor trolley handle?
Properly installed anchor trolleys easily handle 50-100 pounds of load, far more than any realistic kayak anchoring scenario generates. The limiting factor is usually your anchor weight (1.5-5 pounds) and the force of current or wind, not the trolley’s strength. Marine-grade hardware and correct installation technique ensure the system won’t fail under normal use.
Do you need different trolley setups for saltwater vs freshwater?
The main difference is hardware material, saltwater requires marine-grade stainless steel (304 or 316 grade) to prevent corrosion, while freshwater allows more flexibility with hardware choices. The rope, pulleys, and installation process remain identical. If you fish both environments, install saltwater-grade hardware from the start.
Can you use an anchor trolley with a drift sock?
Yes, many kayak anglers use an anchor trolley to attach a drift sock (sea anchor) for controlled drifting. Position the trolley ring at the bow to slow your drift and keep the kayak pointed downwind, or at the stern to drift stern-first. This technique works especially well when fishing wind-blown shorelines or drifting over structure.
What’s the difference between a kayak anchor trolley and a boat anchor trolley?
The concepts are identical, both use pulleys and rope to adjust anchor attachment points. Kayak trolleys use smaller, lighter hardware appropriate for small craft, while boat trolleys use heavier-duty components for larger vessels. The installation principles and operational benefits remain the same across all vessel sizes.
How do you prevent your anchor trolley from making noise?
Wrap the rope with foam pipe insulation where it contacts the kayak hull, or install small rubber bumpers at the pulley mounting points. Some anglers use adhesive-backed felt or neoprene strips to cushion contact points. The anchor ring or carabiner creates most noise, choose rubber-coated hardware or wrap metal components with electrical tape to reduce clanking.
Conclusion
Installing an anchor trolley transforms your kayak fishing experience by giving you precise control over boat positioning without the hassle of constantly pulling and resetting your anchor. The system costs $30-40, takes 1-2 hours to install, and works in any water depth or condition, making it one of the most valuable modifications you can make to a fishing kayak.
The installation process is straightforward: mount two pulleys near your bow and stern, thread a continuous rope loop through them, and attach a ring that connects to your anchor line. Whether you choose a traditional through-bolted installation or a no-drill approach using adhesive pad eyes or gear tracks, the result is the same, infinite positioning adjustment at your fingertips.
Your next steps:
- Choose your kit: Purchase a complete anchor trolley kit ($25-35 for quality components) or source individual parts if you prefer specific hardware
- Gather tools: Ensure you have a drill, appropriate bits, marine sealant, and basic hand tools
- Plan your layout: Measure and mark pulley positions 6-12 inches from bow and stern on your non-paddle side
- Install carefully: Follow the step-by-step process, taking time to align pulleys properly and seal all drilled holes
- Test thoroughly: Verify smooth operation before your first fishing trip, adjusting rope length if needed
For anglers who anchor regularly in current or wind, an anchor trolley quickly becomes indispensable, the time savings and positioning precision pay dividends on every trip. Even if you’re new to kayak fishing, this modification is beginner-friendly and immediately improves your on-water experience.
The difference between fighting your kayak’s position and dialing in the perfect angle is often the difference between a frustrating day and a productive one. Install an anchor trolley, and you’ll wonder how you ever fished without it.





