
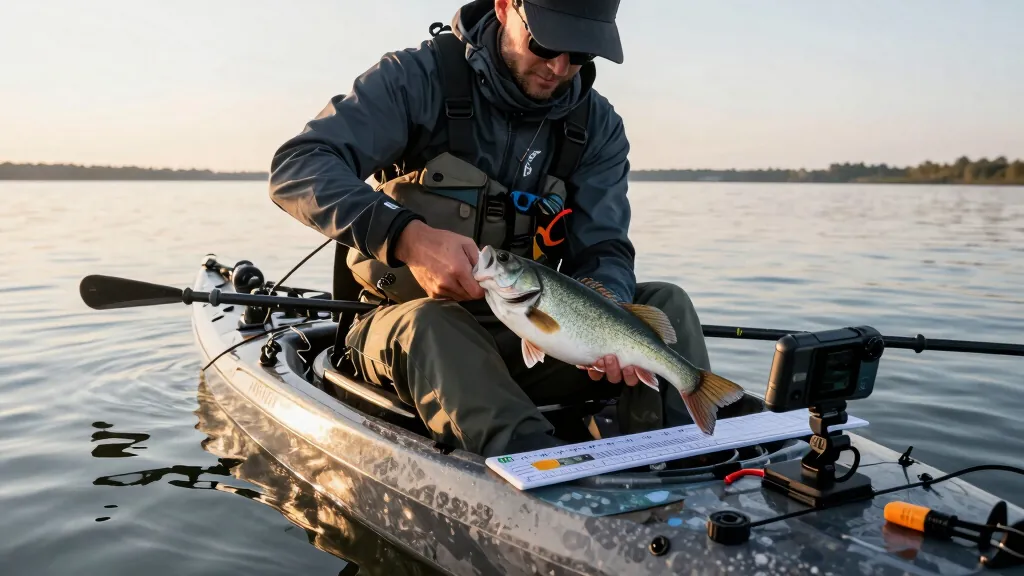
Conservation-minded kayak anglers are releasing more fish than ever, but tournament participation and personal records still require proof. How kayak catch-photo-release measurement works is a system that combines specialized measuring boards, proper fish handling techniques, and photographic documentation to verify fish length from a kayak without bringing the catch to a weigh-in station. The process relies on standardized equipment, correct camera angles, and sometimes digital verification apps to ensure measurements are accurate and accepted by tournament directors.
Key Takeaways
- Measuring boards with closed-end bumps (like Hawg Troughs or bump boards) are the gold standard for kayak CPR measurement because they prevent fish from sliding during measurement
- Overhead camera angles at 90 degrees to the measuring surface eliminate perspective distortion that can add or subtract inches from your measurement
- Tournament-legal measurements require the fish’s mouth closed, tail pinched, and nose firmly against the measuring board’s zero-end bump
- Dedicated measuring boards outperform makeshift solutions like paddle measurements or ruler decals because they provide consistent, verifiable results
- Proper fish handling during measurement protects the fish’s slime coat and increases survival rates after release
- Photo verification apps are increasingly used by tournament organizers to timestamp and validate measurements in real-time
- Common mistakes include angled camera shots, open mouths, and measuring on uneven kayak surfaces that all inflate length readings
- Most tournament directors accept photo measurements from kayaks when anglers follow specific documentation protocols
What Is Kayak Catch-Photo-Release Measurement
Kayak catch-photo-release (CPR) measurement is a documentation method that allows anglers to verify fish length through photographs taken on the water, eliminating the need to transport live fish to weigh stations. This approach combines a standardized measuring device mounted or placed on the kayak with photographic evidence that tournament directors or fellow anglers can review to confirm the catch meets minimum size requirements or qualifies for leaderboard placement.
The system emerged as kayak fishing tournaments grew in popularity during the 2010s and organizers needed a way to verify catches from anglers spread across large bodies of water. Unlike boat tournaments where anglers return to a central weigh-in, kayak fishing events often cover miles of shoreline, making live wells impractical and fish survival a priority.
Key components of CPR measurement include:
- A measuring board or ruler with clear, high-contrast markings (typically in 1/4-inch or 1/8-inch increments)
- A closed-end bump or stop that prevents the fish from sliding past the zero mark
- A camera or smartphone positioned to capture the entire fish and measurement scale
- Proper fish positioning with mouth closed and tail pinched to maximum length
- Documentation that includes the angler’s identifier (tournament number, face, or unique kayak feature)
The method works because it creates a permanent, reviewable record. Tournament directors can examine photos for rule compliance, verify measurements against the scale, and even use digital tools to double-check length claims. For recreational anglers, CPR measurement provides proof for personal bests and social media documentation while prioritizing fish health through quick release.
How Do You Measure a Fish From a Kayak for CPR
Measuring a fish from a kayak for CPR requires stabilizing your kayak, positioning the fish correctly on a measuring board, and capturing a clear overhead photo that shows the entire fish against the measurement scale. The process takes 15-30 seconds when done efficiently, minimizing stress on the fish while ensuring your measurement will be accepted.
Step-by-step measurement process:
Stabilize your kayak before bringing the fish aboard. Drop an anchor, use a stake-out pole, or position yourself in calm water away from current. A rocking kayak makes accurate measurement nearly impossible.
Wet your hands and the measuring board to protect the fish’s protective slime coat. Dry surfaces strip this coating and reduce survival rates after release.
Position the measuring board on a flat section of your kayak deck. Most anglers mount boards permanently between their legs or on the front deck for quick access.
Place the fish on the board with its nose firmly against the closed-end bump. The bump prevents the fish from sliding backward, which would add false length.
Close the fish’s mouth completely. An open mouth can add 1/2 inch to 1 inch depending on species. Gently press the jaw closed without forcing it.
Pinch the tail fin to maximum natural extension. Don’t pull or stretch the tail, but ensure it’s fully extended as it would be when swimming.
Position your camera directly overhead at a 90-degree angle to the board. Angled shots create perspective distortion that tournament directors will reject.
Take multiple photos from the same angle. Shoot 3-5 images to ensure at least one is perfectly clear and shows all required elements.
Include your identifier in the frame. Most tournaments require your tournament number card, face, or a unique kayak feature visible in the same photo.
Release the fish immediately after photographing. Support the fish in the water until it swims away strongly.
Common mistake: Many anglers measure on their lap or thigh instead of a flat surface. This creates a curved measurement plane that can add 1/4 to 1/2 inch to the reading. Always measure on the flattest part of your kayak deck.
Choose this method if: You’re fishing tournaments that accept CPR entries, practicing catch-and-release conservation, or fishing alone without a witness for personal record documentation.
Best Measuring Boards for Kayak Fishing
The best measuring boards for kayak fishing feature a closed-end bump, high-contrast measurement markings, and a non-slip surface that keeps fish in place during photography. Purpose-built boards like the Hawg Trough, Ketch Board, and Tournament Grade bump boards dominate competitive kayak fishing because they meet tournament standards and provide consistent, verifiable measurements.
Top measuring board features to prioritize:
Closed-end bump: A raised barrier at the zero mark prevents fish from sliding backward. This single feature is the difference between tournament-legal and rejected measurements.
High-contrast markings: Black numbers on white or yellow backgrounds photograph clearly even in low light. Avoid boards with faded or low-contrast scales.
Measurement increments: Tournament boards typically show 1/4-inch or 1/8-inch graduations. Finer increments help when fish length falls near a slot limit or minimum size.
Non-slip surface: Textured or rubberized surfaces keep wet fish from sliding during measurement. Smooth plastic boards require constant hand pressure.
Mounting options: Built-in mounting points or adhesive backing allow permanent installation on your kayak deck. Loose boards can shift during measurement.
Width: Boards should be 6-8 inches wide to accommodate most gamefish species. Narrow boards work for bass but fail for wider-bodied species like redfish or stripers.
Popular kayak measuring boards in 2026:
| Board Model | Length | Key Feature | Best For |
|---|---|---|---|
| Hawg Trough | 36″ | Trough design contains fish | Bass, walleye, smaller species |
| Ketch Board Pro | 48″ | Flat with high sides | Redfish, snook, larger inshore |
| Tournament Grade Bump Board | 40″ | Ultra-high contrast markings | Multi-species tournament use |
| iAngler Measuring Board | 36″ | Integrated app compatibility | Tech-focused tournament anglers |
Decision rule: Choose a 36-inch board if you primarily target bass, crappie, or trout. Upgrade to a 40-48 inch board if you fish for redfish, snook, striped bass, or other species that commonly exceed 30 inches. For beginner kayak fishing setups, a basic 36-inch bump board covers most freshwater applications.
Avoid: Generic ruler decals applied directly to kayak hulls. While these seem convenient, they rarely meet tournament standards because the curved hull surface creates measurement distortion, and they lack the closed-end bump required for official measurements.

Convenient Retractable Design: Features a built-in retractable mechanism for easy access and secure storage, perfect for on-the-go anglers

Frabill | Trusted By Anglers Since 1938
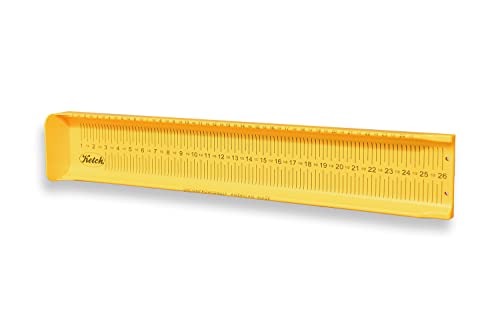
High contrast, high visibility
Hawg Trough vs Bump Board: Which Is Better
Hawg Troughs and flat bump boards both provide tournament-legal measurements, but Hawg Troughs contain fish better during measurement while flat bump boards accommodate wider-bodied species and cost less. The choice depends on target species, kayak deck space, and whether you need the fish-containment features of a trough design.
Hawg Trough advantages:
- Trough design creates a channel that keeps fish centered on the board without hand pressure
- Raised sides prevent fish from flopping off during photography, especially important in rocking kayaks
- Easier solo measurement because the trough holds the fish in position while you position the camera
- Better for narrow-bodied fish like bass, walleye, and pike that fit comfortably in the channel
Hawg Trough limitations:
- Width restrictions make measuring wide-bodied species like redfish or striped bass difficult
- Higher cost compared to flat bump boards (typically $40-60 vs $20-35)
- More deck space required due to the raised sides and overall footprint
- Harder to clean because the trough collects slime, scales, and debris
Flat bump board advantages:
- Accommodates any species width from crappie to bull redfish
- Lower profile fits on smaller kayak decks and doesn’t interfere with rod holders
- Easier to clean with a quick rinse after each fish
- More mounting options because the flat design adheres easily to any deck surface
- Budget-friendly with quality options available for under $30
Flat bump board limitations:
- Requires hand pressure to keep fish positioned during measurement
- Fish can flop off more easily in unstable conditions
- Harder for solo anglers who need one hand for the fish and one for the camera
Choose a Hawg Trough if: You primarily target bass or other narrow-bodied species, fish from a stable kayak with ample deck space, and frequently fish alone where the containment feature justifies the higher cost.
Choose a flat bump board if: You target multiple species including wide-bodied fish, have limited deck space on your kayak, or want a budget-friendly option that still meets tournament standards.
Edge case: Some tournament anglers carry both types, using the Hawg Trough for bass and a flat 48-inch board for larger species. This dual-board approach works best on larger fishing kayaks with extensive deck space.

1. BOAT & KAYAK READY — This 32-inch fish measuring board folds to 16 inches for easier storage in a kayak compartment, boat locker, backpack, or gear bag. Check your available space before packing

High Density EVA Material – Crafted from premium high-density EVA foam, this fish ruler is built to withstand harsh marine environments. It is waterproof, slip-resistant, and far more durable than standard foam rulers, ensuring long-lasting performance in fresh or saltwater conditions

Integrated Bump board Corrosion Resistant Aluminum Construction Pre Drilled Lanyard Hole Good for Fresh and Salt Water Use
How to Get Accurate Fish Measurements in a Kayak
Accurate fish measurements in a kayak require a stable platform, proper fish positioning, and correct camera angle to eliminate the variables that add or subtract length from your reading. The difference between an accepted and rejected tournament measurement often comes down to controlling these three factors during the 20-30 seconds you have the fish on deck.
Critical accuracy factors:
1. Kayak stability during measurement
Your kayak must be stationary and level when you measure. Even slight rocking creates movement blur in photos and shifts the fish on the board. Use an anchor, stake-out pole, or position yourself in protected water before bringing the fish aboard. Kayak stability directly impacts measurement quality, especially in current or wind.
2. Flat measurement surface
Measure on the flattest section of your kayak deck. Curved surfaces, tank wells, or your lap create a measurement plane that doesn’t match the board’s scale. If your kayak lacks a flat area, consider mounting a small cutting board or flat panel specifically for measurements.
3. Fish positioning checklist
- Nose pressed firmly against the closed-end bump
- Mouth completely closed (not forced, but naturally closed)
- Body straight along the centerline of the board
- Tail pinched to natural maximum extension without pulling
- Fins laid flat against the body
4. Camera angle precision
Position your camera or smartphone directly above the fish at a perfect 90-degree angle to the board. Even a 10-15 degree tilt creates perspective distortion that can add or subtract 1/4 to 1/2 inch. Many tournament anglers use a RAM mount or GoPro mount positioned overhead to ensure consistent angle across all measurements.
5. Lighting considerations
Photograph in bright, even lighting that eliminates shadows across the measurement markings. Shadows obscure numbers and give tournament directors reason to question your measurement. Overcast days provide the most even lighting, while direct sun creates harsh shadows. If fishing in bright sun, position yourself so your body shades the board during photography.
6. Photo clarity requirements
Your photo must show:
- The entire fish from nose to tail tip
- All measurement markings from zero to the tail
- Clear, readable numbers at the measurement point
- Your tournament identifier (number card, face, or kayak feature)
- No fingers or hands obscuring the measurement reading
Common mistake: Anglers often pinch the tail too hard, compressing the fin rays and losing 1/4 inch. Pinch just enough to extend the tail naturally, as if the fish were swimming. Don’t pull or stretch the tail beyond its natural length.
Verification tip: Take photos from multiple angles (overhead, slight left, slight right) to prove the fish was measured correctly. If a tournament director questions your measurement, additional angles provide supporting evidence.

***NOTE: 1. Acetone and other chemicals will destroy the adhesive, so preparing the surface with clean water is enough. 2. An overheated surface will also destroy the adhesive. Please apply the ruler sticker at night or cool down the surface to under 95 Fahrenheit degree/35 Celsius degree in advance.***

THE ULTIMATE FISH MEASURING TAPE TOOL: Say goodbye to the bulky fish measuring board! Introducing our Roll-Up Ruler—the only fish-measuring device designed to make every catch count! Extend it long and strong to support your fish while you measure, then slap it around an object or even your wrist to stow.

【Graduations】PAPZOO fish measuring board is designed with both inches and metric measurements, suitable for most people and regions, providing accurate measurements for your catch
Do Tournament Directors Accept Photo Measurements From Kayaks
Most kayak fishing tournament directors accept photo measurements from kayaks as the primary or only submission method, provided anglers follow specific documentation protocols that ensure measurement accuracy and prevent cheating. Major tournament trails including Kayak Bass Fishing (KBF), Hobie Bass Open Series, and regional kayak circuits have standardized CPR measurement rules that prioritize fish conservation while maintaining competitive integrity.
Standard tournament photo requirements:
- Fish measured on an approved measuring board with closed-end bump
- Entire fish visible from nose to tail tip
- Measurement markings clearly readable in the photo
- Angler’s tournament identifier visible in the same frame (number card, face, or registered kayak)
- Photo taken from directly overhead at 90-degree angle
- Mouth closed and tail pinched to natural extension
- Timestamp metadata intact (no edited or altered photos)
Tournament-specific variations:
Some tournaments require additional documentation beyond basic measurement photos. KBF events, for example, require anglers to submit through the TourneyX app, which captures GPS coordinates and timestamps automatically. Other tournaments require a witness signature or second angler verification for fish over certain lengths.
Rejection reasons tournament directors cite:
- Angled camera shots that create perspective distortion
- Shadows or poor lighting obscuring measurement markings
- Fish positioned incorrectly (mouth open, not against bump, tail not extended)
- Missing or unclear tournament identifier
- Edited photo metadata or obvious image manipulation
- Measuring board that doesn’t meet tournament specifications
Choose photo measurement if: You’re fishing a tournament that explicitly allows CPR entries, you have the required measuring board and camera equipment, and you’ve practiced the measurement process before tournament day. Most modern kayak tournaments have eliminated live weigh-ins entirely, making photo measurement the only option.
Alternative for high-stakes events: Some championship-level tournaments still require live weigh-ins or have hybrid formats where top finishers must present fish live for verification. Check your specific tournament rules before assuming photo measurement is accepted.
What Angle Should I Take Fish Photos for Measurement
Fish measurement photos must be taken from directly overhead at a 90-degree angle to the measuring board to eliminate perspective distortion that adds or subtracts length from the actual measurement. Any deviation from this perpendicular angle creates foreshortening or elongation that tournament directors will flag as invalid, even if the fish legitimately meets the required length.
Correct camera positioning:
Height: Position the camera 24-36 inches directly above the fish, depending on your lens. Too close creates barrel distortion, too far reduces detail clarity.
Angle: The camera lens must be parallel to the measuring board surface. Use your kayak’s flat deck as a reference plane and position the camera perpendicular to it.
Alignment: Center the fish in the frame with equal space on all sides. Off-center composition suggests an angled shot even if the camera is overhead.
Horizon check: If any horizon or background is visible, it should appear level in the frame. A tilted horizon indicates a tilted camera angle.
Tools for consistent angles:
- RAM mounts or GoPro arms positioned overhead provide repeatable camera placement for every fish
- Smartphone levels (built into camera apps) show when your phone is perfectly horizontal
- Overhead camera rigs that some tournament anglers build using PVC or aluminum frames guarantee 90-degree shots
Visual test: If you can see the side of the fish’s body in the photo, your angle is wrong. A perfect overhead shot shows only the top of the fish, with the body appearing flat and two-dimensional against the board.
Common mistake: Anglers often hold their phone at chest height and tilt it downward, creating a 45-60 degree angle instead of 90 degrees. This angle makes fish appear 1/2 to 1 inch longer than actual measurement. Always extend your arm fully overhead or use a mount.
Edge case for curved kayaks: If your kayak deck has significant curve and you can’t find a flat surface, photograph from an angle that’s perpendicular to the measuring board itself, not the kayak hull. The board’s flat surface is your reference plane, not the kayak’s shape.
Common Mistakes When Measuring Fish in Kayaks
The most common mistakes when measuring fish in kayaks include angled camera shots, measuring on curved surfaces, open fish mouths, and failing to press the nose firmly against the measuring board’s bump. These errors can add 1/2 to 1 inch to measurements, leading to disqualifications in tournaments or inaccurate personal records.
Top measurement errors and fixes:
1. Angled camera position
- Mistake: Holding the camera at 45-60 degrees instead of directly overhead
- Result: Adds 1/4 to 3/4 inch through perspective distortion
- Fix: Use a mount or extend your arm fully overhead, checking that the horizon appears level
2. Open fish mouth
- Mistake: Photographing with the jaw extended or mouth open
- Result: Adds 1/2 to 1 inch depending on species (bass mouths add the most)
- Fix: Gently close the mouth before photographing, ensuring the jaw is in natural closed position
3. Nose not against bump
- Mistake: Leaving a gap between the fish’s nose and the measuring board’s zero-end bump
- Result: Subtracts actual length, ironically hurting the angler
- Fix: Press the nose firmly against the bump, ensuring no gap is visible in the photo
4. Tail not fully extended
- Mistake: Failing to pinch the tail fin to maximum natural length
- Result: Subtracts 1/4 to 1/2 inch from actual measurement
- Fix: Pinch the tail gently but firmly, extending it as it would appear when swimming
5. Measuring on curved surfaces
- Mistake: Placing the measuring board on a curved tank well, thigh, or rounded deck
- Result: Creates a curved measurement plane that adds 1/4 to 1/2 inch
- Fix: Only measure on the flattest section of your kayak deck
6. Shadows obscuring measurements
- Mistake: Photographing in harsh sun that casts shadows across the ruler markings
- Result: Tournament directors can’t verify the exact measurement point
- Fix: Position your body to shade the board or wait for cloud cover
7. Fingers covering measurement markings
- Mistake: Holding the fish in a way that obscures the ruler numbers at the tail
- Result: Measurement can’t be verified, photo is rejected
- Fix: Hold the fish by pinching the tail only, keeping fingers away from measurement markings
8. Unstable kayak during photography
- Mistake: Attempting to measure while drifting or rocking in current
- Result: Blurry photos and fish sliding on the board
- Fix: Anchor or stake out before bringing fish aboard
9. Wet or dirty measuring board
- Mistake: Not wiping slime or debris from previous fish off the board
- Result: Obscured markings that make measurements unreadable
- Fix: Quick rinse and wipe between each fish
10. Missing tournament identifier
- Mistake: Forgetting to include tournament number card or face in the photo
- Result: Automatic disqualification even if measurement is perfect
- Fix: Set up your identifier card in a consistent position before each tournament day
Prevention strategy: Practice the entire measurement process with undersized fish or fish you’re releasing anyway. Take 10-20 practice photos during recreational fishing trips to identify your personal error patterns before tournament day.
Can I Use My Paddle as a Measuring Tool for Fish
Using your paddle as a measuring tool for fish is not acceptable for tournament submissions and provides unreliable measurements for personal records because paddles lack the standardized markings, closed-end bump, and flat measurement surface required for accurate length verification. While some anglers mark their paddle shaft with tape at common length intervals for quick field estimates, these measurements won’t be accepted by tournament directors and typically vary by 1-2 inches from actual length.
Why paddles fail as measuring tools:
- No closed-end bump: Fish slide along the paddle shaft, making it impossible to establish a consistent zero point
- Curved surface: Paddle shafts are round or oval, creating a curved measurement plane that adds length
- Inconsistent markings: Hand-applied tape or marker lines lack the precision of manufactured measuring boards
- Difficult photography: Capturing a clear overhead photo of a fish on a paddle is nearly impossible in a kayak
- Tournament rejection: No major kayak fishing tournament accepts paddle measurements
When paddle marks are useful:
Paddle length marks serve one legitimate purpose: quick field estimates to determine if a fish is worth the effort of proper measurement. If you mark your paddle at your target species’ minimum length (for example, 15 inches for bass), you can quickly check if a fish is close before setting up your measuring board.
Better alternatives:
- Invest in a proper measuring board ($20-60) that mounts on your kayak deck
- Use ruler decals on flat sections of your kayak for quick estimates, then confirm with a measuring board for keepers
- Carry a flexible measuring tape designed for fish (under $10) as a backup to your primary board
Edge case: In survival or subsistence fishing situations where you need to verify legal harvest size and lack proper equipment, a paddle with marked intervals is better than guessing. However, this scenario doesn’t apply to sport fishing or tournaments.
How to Handle Fish Properly During Kayak CPR
Proper fish handling during kayak CPR requires wet hands, minimal air exposure, supporting the fish’s weight horizontally, and completing the measurement process in under 30 seconds to maximize post-release survival rates. The goal is to document your catch while treating the fish as carefully as you would if you planned to release it without measurement.
Step-by-step handling protocol:
Before bringing the fish aboard:
- Stabilize your kayak completely using an anchor or stake-out pole
- Wet your hands thoroughly and wet the measuring board surface
- Have your camera ready and positioned for quick photography
- Clear your deck of any obstacles that might injure the fish
During measurement:
- Lift the fish horizontally supporting its weight with both hands, never vertically by the jaw alone
- Minimize air exposure by working quickly and efficiently
- Place the fish gently on the wet measuring board
- Position and photograph in one smooth sequence, taking 3-5 quick shots
- Keep the fish wet by splashing water over it if measurement takes longer than 15 seconds
After photography:
- Return the fish to the water immediately after the last photo
- Support the fish upright in the water, facing into any current
- Move the fish gently forward and backward to push water through its gills
- Wait for strong swimming before releasing your grip
- Watch the fish swim away to confirm it’s recovered
Critical handling rules:
- Never touch the gills or insert fingers into the gill plates
- Don’t squeeze the body which can damage internal organs
- Avoid dropping the fish on hard kayak surfaces
- Don’t hold fish vertically by the jaw for extended periods (bass can tolerate brief vertical holds, but horizontal is always safer)
- Keep fingers out of eye sockets when gripping for photos
Temperature considerations:
Water temperature affects fish stress levels during handling. In water above 75°F, fish stress increases rapidly. Complete your measurement in under 20 seconds in warm water, and consider skipping measurement entirely for deeply hooked fish or those showing signs of stress.
Species-specific handling:
- Bass: Can be held briefly by the lower jaw (lip grip) but should be supported horizontally for measurement
- Trout: Extremely sensitive to handling; keep in water as much as possible and measure quickly
- Redfish: Support horizontally with both hands; never hold vertically
- Pike/Musky: Use a jaw spreader or fish grips; teeth are sharp and fish are powerful
- Saltwater species: Many have sharp spines or gill plates; use fish grips and gloves
Common mistake: Anglers often spend 60-90 seconds fumbling with camera settings, adjusting the fish position multiple times, and taking dozens of photos. This extended air exposure significantly reduces survival rates. Practice the entire process until you can complete it in under 30 seconds.
Choose this approach if: You care about conservation, fish in tournaments with CPR requirements, or want to maintain healthy fish populations in your local waters. Proper handling isn’t just ethical; it’s often required by tournament rules and fishing regulations.
What Apps Verify Fish Length From Photos
Several apps verify fish length from photos by analyzing measurement board markings, checking photo metadata for tampering, and providing GPS-stamped submissions that tournament directors can review in real-time. TourneyX, iAngler Tournament, and FishDonkey are the most widely used platforms in competitive kayak fishing as of 2026, with each offering slightly different features for measurement verification and tournament management.
Major fish measurement verification apps:
TourneyX
- Primary use: Official app for Kayak Bass Fishing (KBF) tournaments
- Key features: GPS location capture, timestamp verification, photo metadata analysis, automatic leaderboard updates
- Verification method: Requires photos showing fish on approved measuring board with tournament identifier visible
- Cost: Free for anglers; tournament directors pay hosting fees
- Advantage: Integrated with the largest kayak fishing tournament circuit
iAngler Tournament
- Primary use: Multi-species tournaments and citizen science data collection
- Key features: AI-assisted species identification, length estimation tools, catch logging with environmental data
- Verification method: Photo review by tournament directors with optional AI pre-screening
- Cost: Free for basic use; premium features for tournament organizers
- Advantage: Works for any species and includes conservation data tracking
FishDonkey
- Primary use: Tournament management and social fishing platform
- Key features: Live leaderboards, team tournaments, photo verification, polygonal fishing boundaries
- Verification method: Manual review by tournament staff with photo timestamp checking
- Cost: Free for anglers; tournament entry fees apply
- Advantage: Strong social features and team tournament support
Fishbrain
- Primary use: Social fishing network with catch logging
- Key features: Catch mapping, species identification, fishing forecasts
- Verification method: Community-based verification, not tournament-grade
- Cost: Free with premium subscription option
- Limitation: Not designed for competitive tournament verification
How verification apps work:
- Photo capture: Apps use your phone’s camera to capture measurement photos with embedded metadata
- GPS stamping: Location data is automatically recorded and encrypted to prevent spoofing
- Timestamp locking: Photo capture time is recorded and cannot be altered without detection
- Metadata analysis: Apps check for signs of photo editing or manipulation
- Submission: Photos are uploaded to tournament servers where directors review them
- Verification: Tournament staff confirm measurements meet rules before posting to leaderboards
Choose an app if: You’re fishing tournaments that require digital submission, want automatic GPS and timestamp documentation, or need real-time leaderboard updates during competition. Most serious tournament anglers use whichever app their specific tournament requires.
Limitation: Apps can’t verify that the fish was measured correctly (mouth closed, tail extended, etc.). They only confirm the photo is authentic and unedited. Tournament directors still manually review each submission for rule compliance.
Do I Need a Witness for Kayak Tournament Fish Measurements
Most kayak fishing tournaments do not require a witness for fish measurements because the photo documentation system provides sufficient verification through measuring board standards, tournament identifiers, and metadata analysis. However, some high-stakes tournaments or specific fish over certain lengths may require witness verification or polygraph testing for top finishers to prevent cheating.
Standard tournament witness requirements:
No witness required:
- Most regional and national kayak tournaments (KBF, Hobie BOS, local trails)
- Fish measured on approved boards with proper photo documentation
- Submissions through verified apps like TourneyX or iAngler
- Standard tournament entries where prize money is under $10,000
Witness required:
- Some championship events for fish over specific lengths (often 20+ inches)
- Team tournaments where partner verification is mandatory
- Events with significant prize purses (over $25,000 total)
- Tournaments in areas with known cheating problems
Witness verification methods:
When witnesses are required, tournaments typically accept:
- Another registered tournament angler who signs off on your measurement
- A fishing partner in a tandem kayak who appears in the photo
- A shore-based witness who can verify via video call
- Tournament officials who patrol fishing areas and can be called for verification
Self-verification safeguards:
Tournaments that don’t require witnesses implement other anti-cheating measures:
- Polygraph testing for top finishers (common in high-stakes events)
- Photo metadata analysis to detect edited or manipulated images
- GPS verification to confirm catches came from legal tournament waters
- Measurement board registration requiring anglers to photograph their board before the tournament
- Random spot checks where tournament officials review suspicious submissions
Common mistake: Anglers sometimes assume they need a witness because traditional boat tournaments require them. Kayak tournaments evolved differently, prioritizing photo documentation over witness verification because kayak anglers typically fish alone and spread across large areas.
Choose witness verification if: You’re fishing a tournament that explicitly requires it in the rules, you’re targeting a potential winning fish and want extra documentation to prevent disputes, or you’re fishing with a partner who can easily provide verification.
Edge case: Some anglers voluntarily include witnesses in their photos even when not required, especially for personal-best fish or catches that might be questioned. A quick video showing the measurement process provides additional proof if your photo is challenged.
Measuring Fish on Uneven Kayak Surface Problems
Measuring fish on uneven kayak surfaces creates a curved measurement plane that can add 1/4 to 3/4 inch to length readings, leading to rejected tournament submissions and inaccurate personal records. The problem occurs because measuring boards conform to the kayak’s hull curve, tank well shape, or seat contours, causing the fish to follow a curved path instead of a straight line from nose to tail.
How surface curves affect measurements:
When a measuring board sits on a curved surface, the fish’s body follows that curve. Because the measurement markings are printed on a flat board, the curved positioning makes the fish appear longer than it actually is when measured in a straight line. The effect is similar to measuring around the outside of a curve versus measuring straight across it.
Problem areas on kayaks:
- Tank wells: The recessed areas behind seats often have curved bottoms that create significant measurement distortion
- Rounded decks: Many kayak hulls curve from side to side, especially on narrower models
- Seat areas: Measuring on your lap or thigh creates the worst curve distortion
- Bow and stern: The pointed ends of kayaks are never flat enough for accurate measurement
Solutions for uneven surfaces:
1. Identify the flattest deck area
Walk your hands across your kayak deck before your first fishing trip to find the flattest section. This is usually between your legs on sit-on-top kayaks or on the front deck of wider models.
2. Install a flat mounting panel
Mount a small cutting board, starboard panel, or flat plastic sheet (12″ x 40″) on your deck specifically for measurements. This creates a guaranteed flat surface regardless of your kayak’s hull shape.
3. Use a rigid measuring board
Stiff boards resist conforming to curved surfaces better than flexible ones. Look for boards made from rigid plastic or aluminum rather than thin, flexible materials.
4. Add support underneath
Place a foam pad or folded towel under your measuring board to fill gaps and create a level surface. This works best on tank wells with moderate curves.
5. Verify with a level
Before tournament day, place a small level on your measuring board in its mounted position. If the bubble isn’t centered, your surface isn’t flat enough.
Testing your setup:
Measure a known-length object (a ruler, a piece of PVC pipe, or a fish-shaped cutout) on your kayak’s measuring surface. If the measurement doesn’t match the object’s actual length, your surface is curved. Adjust your setup until measurements are accurate.
Choose a flat surface if: You’re fishing tournaments where 1/4 inch can mean the difference between a legal fish and disqualification, or you care about accurate personal records. For casual fishing where you’re releasing everything anyway, minor curve distortion matters less.
Are Ruler Decals on Kayaks Tournament Legal
Ruler decals applied directly to kayak hulls are rarely tournament legal because they lack the closed-end bump required for standardized measurements, conform to curved hull surfaces that distort length readings, and don’t provide the consistent measurement plane that tournament directors require for verification. While decals work for quick field estimates, they won’t be accepted for official tournament submissions in most competitive circuits.
Why ruler decals fail tournament standards:
- No closed-end bump: Fish can slide along the decal, making it impossible to establish a consistent zero point
- Hull curve distortion: Decals follow the kayak’s curved surface, adding length through the same curve problem that affects uneven surfaces
- Inconsistent placement: Decals applied by individual anglers vary in position and accuracy
- Difficult photography: Capturing a clear overhead photo of a fish against a hull-mounted decal is challenging
- Wear and fading: Decals deteriorate over time, making markings unclear in photos
Tournament-approved alternatives:
Instead of hull decals, tournaments require:
- Removable measuring boards with closed-end bumps (Hawg Trough, bump boards)
- Boards mounted on flat deck surfaces, not curved hulls
- Standardized measurement tools that can be verified before tournaments
- Clear, high-contrast markings that photograph well
When decals are useful:
Ruler decals serve as quick reference tools for:
- Field estimates to determine if a fish is worth proper measurement
- Teaching new anglers approximate fish sizes
- Quick checks against slot limits before setting up a measuring board
- Backup reference if your primary measuring board is lost or damaged
Installation tip for estimates:
If you want decals for quick estimates, apply them to the flattest section of your deck (not the curved hull sides) and verify their accuracy with a tape measure before trusting them. Even for estimates, a decal on a curved surface will be consistently wrong.
Common mistake: New kayak anglers often assume the ruler decals that come pre-installed on some fishing kayaks are tournament legal. They’re not. These decals are marketing features, not measurement tools. Always use a proper measuring board for any fish you plan to submit to a tournament or claim as a personal record.
Choose a proper measuring board if: You fish any tournaments, want accurate personal records, or care about verifiable measurements. Decals are fine for casual “about this big” estimates but nothing more.
Conclusion
Understanding how kayak catch-photo-release measurement works gives you the skills to document catches accurately while prioritizing fish health and conservation. The system combines specialized measuring boards with closed-end bumps, proper fish handling techniques, overhead photography at 90-degree angles, and often digital verification apps to create tournament-legal documentation that replaces traditional live weigh-ins.
Success with CPR measurement comes down to preparation and practice. Mount a quality measuring board on the flattest section of your kayak deck, practice the measurement process with undersized fish during recreational trips, and verify your camera angle produces clear, overhead shots before tournament day. Most measurement errors stem from angled photos, curved surfaces, and improper fish positioning—all preventable with the right setup and technique.
Take these next steps:
- Invest in a proper measuring board suited to your target species (36-inch for bass, 40-48 inch for larger inshore fish)
- Practice the measurement process during your next 3-5 fishing trips to identify and fix your personal error patterns
- Set up a camera mount or practice overhead phone positioning to ensure consistent 90-degree angles
- Download your tournament’s required app (TourneyX, iAngler, or FishDonkey) and practice submissions before competition
- Review your tournament’s specific rules for photo requirements, identifier placement, and measurement standards
- Test your setup by measuring known-length objects to verify your surface is flat and your measurements are accurate
The kayak fishing community has embraced CPR measurement because it works. Fish survival rates increase dramatically when anglers release immediately after photography instead of transporting to weigh-ins. Tournament participation has grown because anglers can compete across vast water bodies without returning to a central location. And the photo documentation system has proven reliable enough that major tournaments now award tens of thousands of dollars based solely on properly executed CPR measurements.
Whether you’re chasing tournament wins or personal bests, mastering kayak catch-photo-release measurement lets you prove your catches while giving every fish its best chance at survival. The 30 seconds you spend perfecting your measurement technique pays dividends in accepted tournament entries, accurate records, and healthier fish populations for future trips.





