Quick Answer
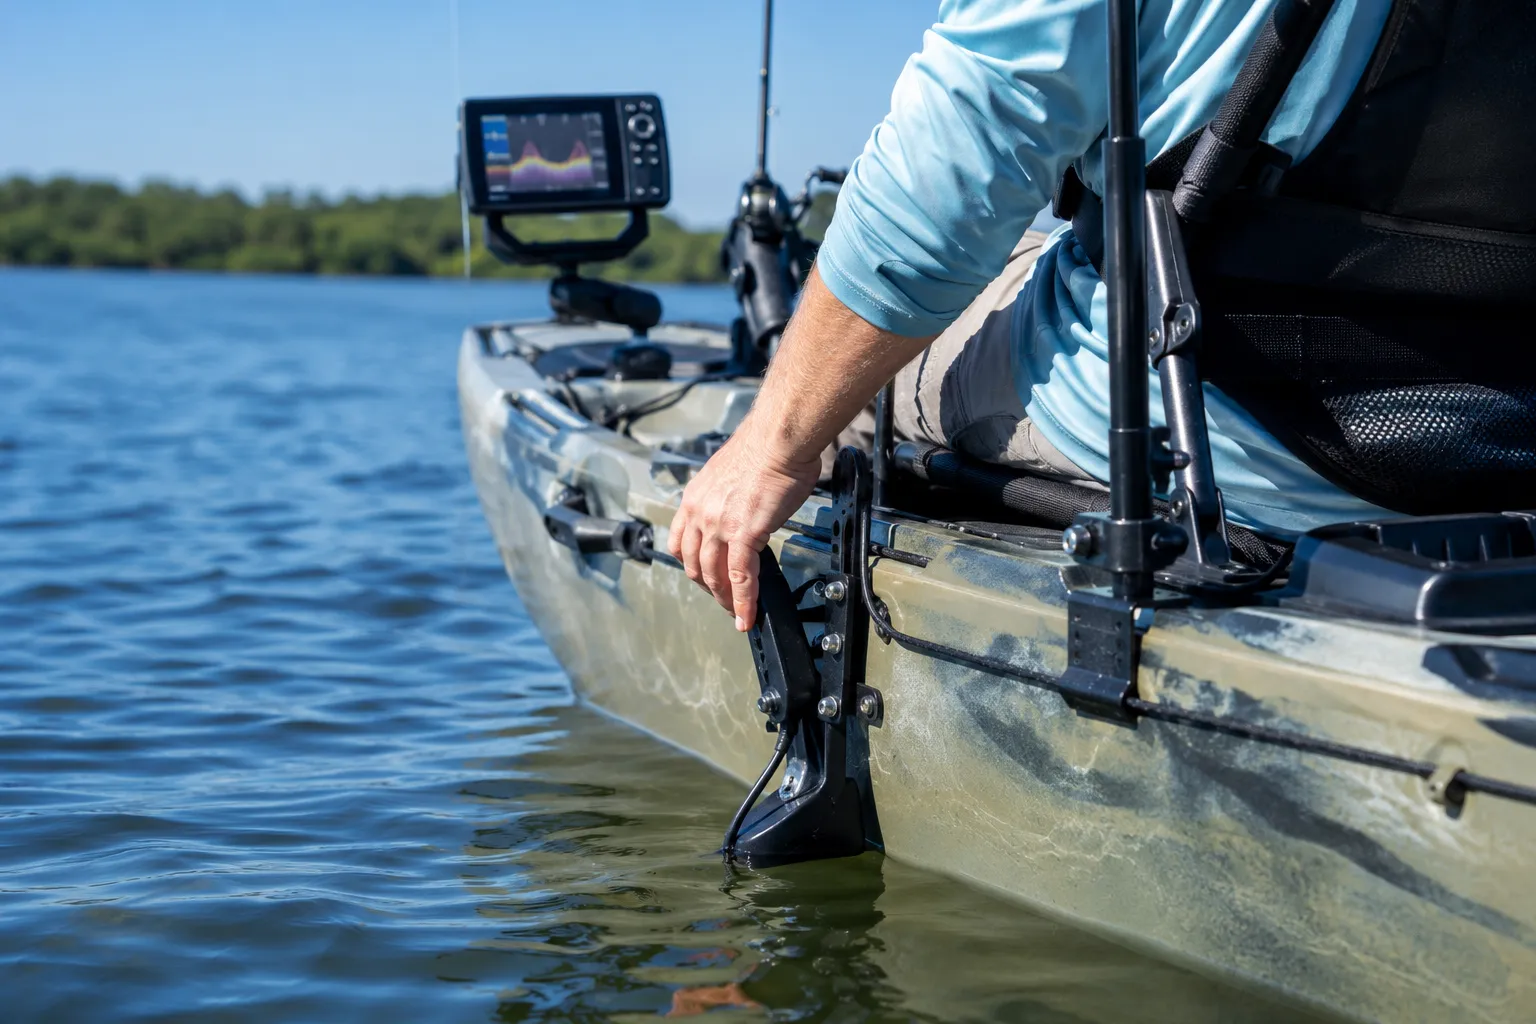
The best location to mount a transducer on a kayak is on the hull bottom near the stern, offset 6-12 inches from the centerline to avoid turbulence from the keel. For sit-on-top kayaks, scupper hole mounts or adjustable arms work well, while sit-inside kayaks typically use through-hull (shoot-through) installations or external arm mounts. The transducer face must remain submerged, level with the hull, and positioned where it won’t interfere with your paddle stroke or create drag.
Key Takeaways
- Mount location matters: Position transducers 6-12 inches from centerline near the stern to minimize turbulence and paddle interference
- Scupper mounts are easiest: For sit-on-top kayaks, scupper hole mounts require no drilling and can be repositioned
- Through-hull works for plastic: Transducers can read through polyethylene hulls up to 1/4 inch thick when properly bonded with marine epoxy or silicone
- Arm mounts offer flexibility: Adjustable mounting arms let you fine-tune transducer angle and depth but may catch weeds
- Air bubbles ruin readings: Ensure the transducer face sits flush against the hull or water with no air gaps
- Test before permanent install: Use temporary mounts or suction cups to verify signal quality before drilling holes
- Shallow water still benefits: Even in water under 10 feet, transducers help locate structure, temperature breaks, and fish
- Cost ranges $15-$80: Basic scupper mounts start around $15-25, while premium adjustable arm systems cost $50-80
What Is a Transducer on a Kayak?
A transducer is the sensor component of a fish finder that sends sonar signals into the water and receives the echoes that bounce back. It converts electrical pulses into sound waves, then translates returning echoes into depth readings, bottom contour maps, and fish arches on your display screen.
For kayak anglers, the transducer serves as your underwater eyes. It reveals bottom structure like drop-offs, humps, and channels that hold fish. It also displays water temperature, which helps locate thermoclines where baitfish and predators concentrate.
Key transducer functions for kayak fishing:
- Measure water depth from 2 feet to several hundred feet
- Identify bottom composition (hard, soft, rocky, weedy)
- Mark suspended fish and baitfish schools
- Track water temperature changes
- Display your kayak’s speed over ground
Most kayak fish finders use single-beam or dual-beam transducers operating at 200 kHz (narrow, deep cone) or 83 kHz (wide, shallow cone). Higher-end units offer CHIRP sonar, side imaging, or down imaging, but these require more careful mounting to function properly.
Best Location to Mount a Transducer on a Sit-On-Top Kayak
The optimal mounting location on a sit-on-top kayak is in a rear scupper hole or on the hull bottom 12-18 inches forward of the stern, offset 6-12 inches from the centerline. This position keeps the transducer away from paddle turbulence, maintains clean water flow across the sensor face, and stays submerged even when the bow lifts in waves.
Scupper hole mounting (most popular for sit-on-tops):
- Uses existing drain holes, no drilling required
- Positions transducer in clean water flow
- Allows easy removal for transport or replacement
- Works best in rear scupper holes behind the seat
- Requires scupper hole diameter match (most are 1.5-2 inches)
Hull-side mounting with adjustable arm:
- Bolts to the hull side near the stern
- Lets you adjust transducer angle and depth
- Keeps sensor below hull line for clean readings
- May catch weeds or debris in heavy vegetation
- Provides best signal quality in rough water
Avoid these locations:
- Forward scupper holes (paddle drip and turbulence)
- Directly on centerline (keel turbulence)
- Near rudder or skeg (interference and damage risk)
- Inside gear tracks (blocks accessory mounting)
Choose the side opposite your paddle caddy or rod holders to maximize deck space. Right-handed anglers typically mount on the port (left) side.

NO-DRILL SCUPPER MOUNTING: Uses an existing kayak scupper or drain opening, allowing transducer installation without drilling or permanent hull changes

Complete Kit + Broad Compatibility: Everything you need is in the box—mount base, kayak gear track, transducer arm, and hardware. Compatible with most Garmin, Lowrance, and Humminbird fish finders. One mount, endless possibilities.

For use mounting transducers in kayak scuppers
Inside Hull vs Outside Hull Transducer Mounting
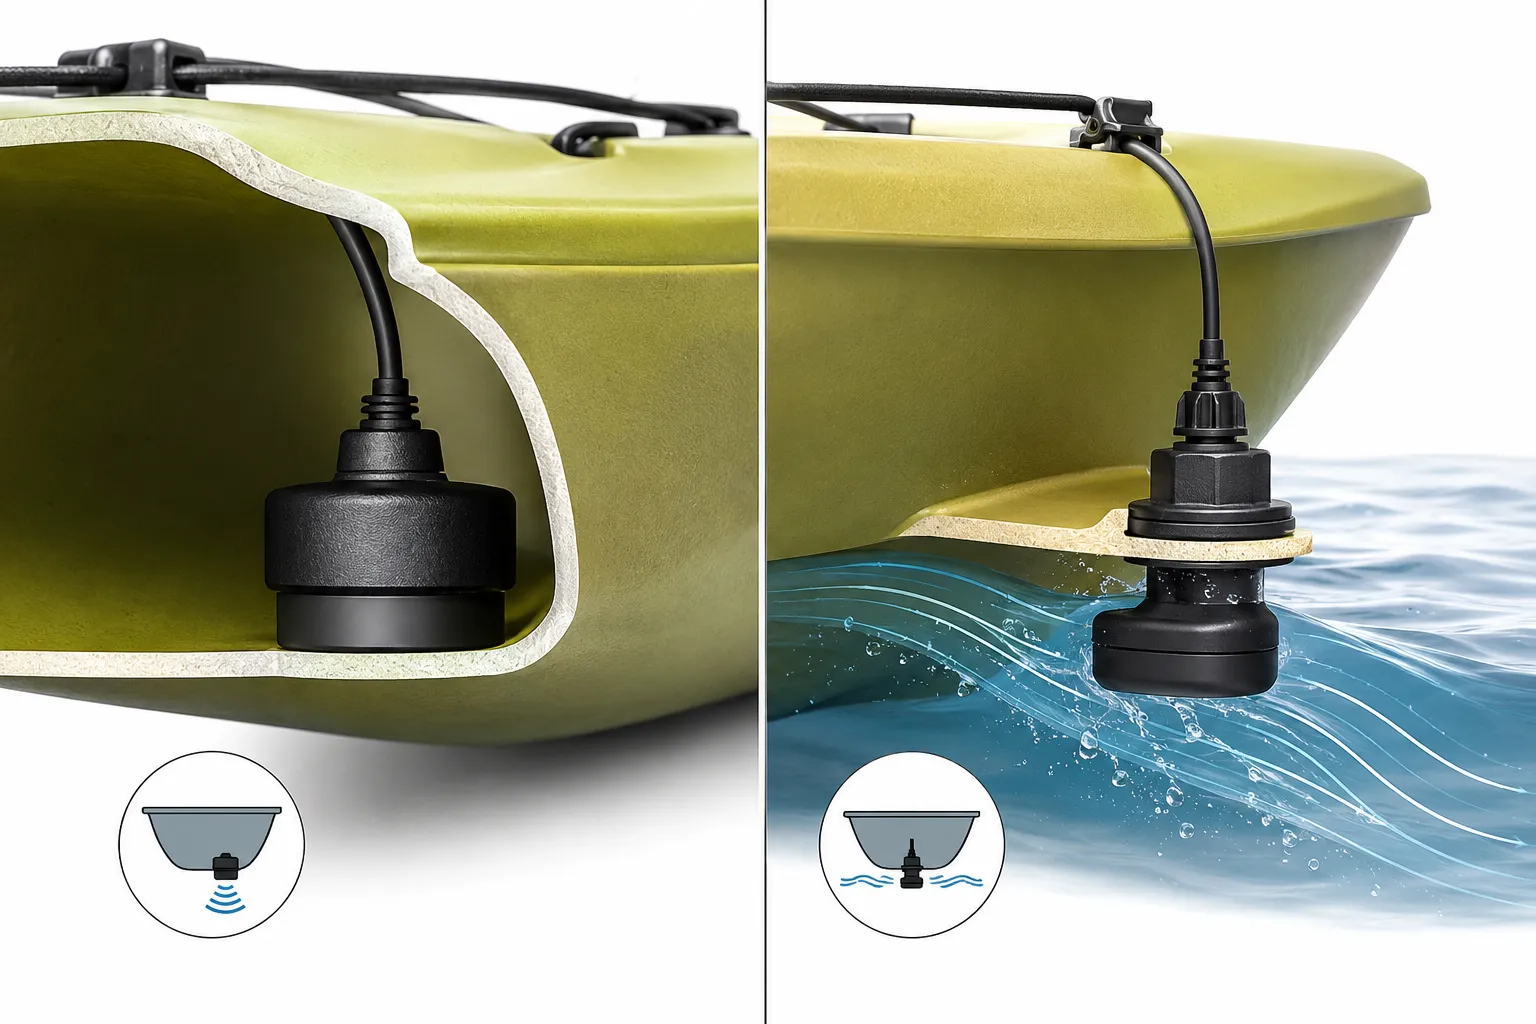
Through-hull (inside) mounting works by shooting sonar signals through the kayak’s plastic hull, while outside mounting places the transducer directly in the water. Through-hull installations eliminate drag and snag risk but lose 10-20% signal strength, while external mounts provide full signal clarity but create minor drag and vulnerability to impacts.
Through-hull (shoot-through) mounting:
This method bonds the transducer face to the interior hull using marine epoxy, silicone, or vegetable oil in a sealed compartment. It works reliably through polyethylene and ABS plastic up to 1/4 inch thick.
Advantages:
- No drag or water resistance
- Protected from rocks, logs, and debris
- No holes drilled in hull
- Clean, streamlined appearance
- No risk of snagging weeds
Limitations:
- Reduced signal strength (typically 10-20% loss)
- Won’t work through foam-core or composite hulls
- Air bubbles between transducer and hull ruin readings
- Difficult to reposition once bonded
- May not work well at high speeds (above 5 mph)
External mounting:
Mounting the transducer outside the hull via scupper plug, arm mount, or direct bonding provides maximum signal quality.
Advantages:
- Full signal strength and clarity
- Works with all transducer types (CHIRP, imaging)
- Easy to adjust angle and position
- Reliable readings at all speeds
- Better performance in deep water (over 100 feet)
Limitations:
- Creates minor drag (negligible under 3 mph)
- Can catch weeds, grass, or debris
- Vulnerable to impact damage on rocks
- Requires drilling for some mount types
- Cable routing exposed to elements
Decision rule: Choose through-hull mounting if you fish rocky areas with heavy structure or frequently beach-launch over shallow gravel. Choose external mounting if you need maximum signal quality, fish deep water (over 50 feet), or use advanced sonar features like side imaging.
How to Mount a Transducer on a Kayak Without Drilling
You can mount a transducer without drilling by using scupper hole mounts, suction cup mounts, or through-hull installation with marine adhesive. Scupper mounts are the most reliable no-drill option, fitting into existing drain holes with adjustable arms that position the transducer in clean water flow.
Scupper hole mount installation (no drilling required):
- Choose a rear scupper hole 12-24 inches behind your seat
- Measure the scupper diameter (typically 1.5 or 2 inches)
- Insert the scupper plug portion of the mount
- Attach the transducer to the adjustable arm
- Position the transducer face parallel to water flow
- Route the cable along the hull to your fish finder
- Secure the cable with adhesive clips or zip ties
Popular scupper mount brands include RAM Mounts, Scotty, and YakAttack. Prices range from $15-40 depending on adjustability.
Suction cup mounts:
Heavy-duty suction cups can temporarily secure transducers to smooth hull sections. This method works for testing locations before permanent installation but isn’t reliable for all-day fishing. Suction cups lose grip in hot weather, on textured hulls, or after 2-3 hours of use.
Through-hull with silicone or epoxy:
Bond the transducer to the interior hull using marine-grade silicone or two-part epoxy. This creates a permanent mount without drilling but requires careful surface preparation and air bubble elimination.
Portable transducer pods:
Some anglers build removable transducer housings using PVC pipe sections filled with water or mineral oil. The transducer sits inside the sealed tube, which mounts to the kayak with suction cups or straps. This method allows quick removal but adds complexity.

[Probe Compatibility] A precision mount custom-tailored for four specific sonar probe sizes, designed to securely anchor the probe within the drain hole.

🛥️[Product Overview] Stern Pad, Screwless Transducer Mounting Plate kit, Marine-Grade Transducer Mounting Board Hardware Kit.

NO-DRILL SCUPPER INSTALLATION:Installs through an existing kayak scupper or drain hole, eliminating the need to drill into the hull or make permanent modifications to your kayak
Transducer Mounting Arm vs Scupper Hole Mount
Adjustable arm mounts bolt to the hull side and offer precise angle and depth control, making them ideal for rough water and high-speed trolling, while scupper hole mounts install tool-free in existing drain holes and work best for calm water and casual fishing. Arm mounts cost $40-80 and require drilling, whereas scupper mounts cost $15-30 and install in minutes without tools.
Adjustable arm mount characteristics:
- Bolts through hull with stainless hardware (requires 2-4 holes)
- Articulating arm adjusts transducer angle in multiple axes
- Positions transducer 2-6 inches below hull bottom
- Stays submerged in waves and chop
- Best for speeds above 3 mph or rough conditions
- May catch vegetation in weedy lakes
- More complex installation (30-60 minutes)
Scupper hole mount characteristics:
- Friction-fit or threaded plug design (no drilling)
- Fixed or limited angle adjustment
- Transducer sits at or slightly below hull level
- May lose water contact in steep waves
- Best for speeds under 3 mph in calm water
- Less likely to snag weeds (lower profile)
- Quick installation (5-10 minutes)
Choose an arm mount if:
- You fish in rough or choppy water regularly
- You troll at speeds above 2.5 mph
- You need side-imaging or down-imaging capability
- You want maximum signal quality in all conditions
Choose a scupper mount if:
- You want zero-commitment installation
- You fish primarily calm lakes or slow rivers
- You need to remove the transducer for transport
- You’re testing transducer location before permanent install
- Budget is a primary concern
Both mount types work reliably when installed correctly. The scupper mount’s ease of installation and removal makes it the top choice for most recreational kayak anglers.
Will a Transducer Work Through a Plastic Kayak Hull?
Yes, transducers work through polyethylene and ABS plastic kayak hulls up to 1/4 inch thick when properly bonded with no air gaps. Signal loss ranges from 10-20%, which is acceptable for depths up to 100 feet and basic fish finding, but through-hull mounting won’t work with foam-core hulls, composite materials, or advanced imaging sonar.
Hull materials that work:
- Rotomolded polyethylene (most common kayak material)
- Thermoformed ABS plastic
- Solid fiberglass (single-layer, no core)
Hull materials that don’t work:
- Foam-core composite hulls
- Honeycomb-core construction
- Multi-layer laminates with air gaps
- Inflatable kayak materials
Proper through-hull installation technique:
- Choose the location: Find a flat hull section near the stern with minimal curvature
- Clean thoroughly: Sand the interior surface with 220-grit sandpaper, then clean with isopropyl alcohol
- Test the spot: Fill a plastic bag with water, place it on the hull interior, and press the transducer against it while running your fish finder to verify signal quality
- Create the bond: Apply marine silicone, epoxy, or mineral oil between the transducer face and hull
- Eliminate air bubbles: Press firmly and work out all air pockets (even tiny bubbles block sonar)
- Secure the transducer: Use weight or clamps to maintain pressure while adhesive cures (24-48 hours)
Signal quality factors:
- Hull thickness: Under 1/8 inch is ideal; over 1/4 inch significantly degrades signal
- Surface contact: 100% of the transducer face must contact the bonding medium
- Hull texture: Smooth interior surfaces work better than heavily textured ones
- Water temperature: Cold water improves signal transmission slightly
Through-hull mounting works well for depths up to 100 feet and basic 2D sonar. For deeper water, CHIRP sonar, or side-imaging features, external mounting provides noticeably better performance.
How Much Does a Kayak Transducer Mounting Kit Cost?
Basic scupper hole transducer mounts cost $15-30, mid-range adjustable arm mounts run $40-60, and premium articulating arm systems with multiple adjustment points cost $60-80. Complete installation kits that include mounting hardware, cable clips, and waterproof connectors typically add $10-20 to the base mount price.
Price breakdown by mount type:
- Basic scupper plug mount: $15-25 (friction-fit design, limited adjustment)
- Adjustable scupper mount: $25-40 (threaded design, angle adjustment)
- Side-mount arm (basic): $40-50 (fixed-length arm, simple pivot)
- Adjustable arm mount: $50-70 (telescoping arm, multi-axis adjustment)
- Premium articulating mount: $70-100 (ball-joint design, infinite positioning)
- Through-hull installation supplies: $5-15 (marine silicone or epoxy only)
Additional costs to consider:
- Stainless steel mounting bolts and backing plates: $8-15
- Marine-grade cable clips and zip ties: $5-10
- Waterproof cable connectors: $10-20
- Drill bits for hull penetration: $8-12
- Transducer shield or guard: $15-30
Most anglers spend $30-50 total for a reliable mounting solution that includes the mount, hardware, and cable management supplies. Premium systems with maximum adjustability push costs toward $80-100 but offer better performance in challenging conditions.
Budget tip: Start with a basic scupper mount ($20-30) to test transducer location and verify your fish finder works properly. You can always upgrade to an adjustable arm mount later if you need better performance in rough water or at higher speeds.
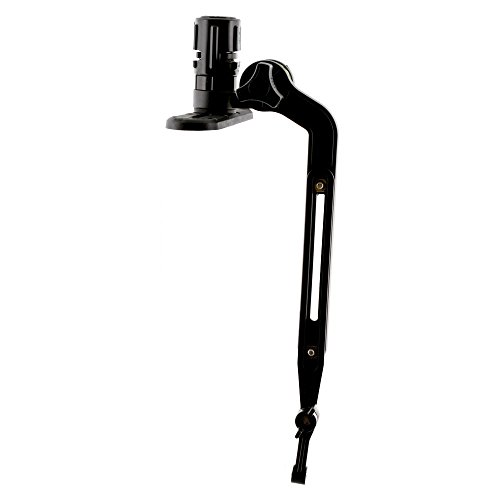
Designed for kayak and SUP anglers needing an easy way to install transducers for Transport as well as other Scotty accessories

Designed for kayak and SUP anglers needing an easy way to install transducers for transport; Transducer NOT included

Complete Kit for Easy Installation: Our no drill transducer mount kit includes all necessary accessories for a seamless installation: 1 transducer pad block, 1 scouring pad, 1 cleaning wipe, and 3 black cable clips; Simply clean the installation surface, peel off the adhesive, align the position, and press firmly for a few minutes; (Note: Please wait 18 hours before mounting the transducer to ensure the adhesive sets firmly, reducing the risk of detachment during use
Transducer Mount Interfering With Paddle Stroke
Mount your transducer on the hull side opposite your dominant paddling side, positioned at least 18 inches behind your seat to prevent paddle blade contact. Right-handed paddlers should mount on the port (left) side, while left-handed paddlers should use the starboard (right) side, keeping the transducer outside the paddle’s swing arc.
Paddle clearance guidelines:
- Minimum distance from seat: 18 inches behind the seat back
- Lateral offset from centerline: 8-12 inches to the side
- Vertical clearance: Transducer should not extend above hull bottom line
- Arm mount positioning: Angle the arm toward the stern, not perpendicular to hull
Common interference problems:
- Forward mounting: Transducers mounted near the cockpit catch paddle drips and blade tips during aggressive strokes
- Centerline placement: Mounts directly under the paddler interfere with feet, paddle shaft, and landing nets
- Excessive arm extension: Long mounting arms that extend far from the hull catch paddle blades during turning strokes
- Wrong-side mounting: Mounting on your power-stroke side increases contact risk
Testing for clearance:
Before finalizing your mount location, sit in your kayak and practice your full range of paddle strokes:
- Forward stroke (normal and aggressive)
- Sweep strokes (turning)
- Draw strokes (moving sideways)
- Reverse strokes (backing up)
Mark the paddle blade’s maximum reach on the hull with tape, then position your transducer mount outside this zone.
Pedal kayak considerations:
Pedal-drive kayaks eliminate paddle interference concerns, allowing more flexible transducer placement. You can mount closer to the cockpit or even on the centerline if it doesn’t interfere with the drive mechanism. Check that the transducer arm won’t contact the pedal drive’s moving parts or rudder cables.
Do You Need a Transducer If You Only Fish Shallow Water?
Yes, a transducer provides valuable information even in shallow water under 10 feet by revealing bottom composition, underwater structure like stumps and rocks, temperature changes, and suspended fish that aren’t visible from the surface. Depth reading is only one function; structure mapping and fish location matter more for catching fish in shallow environments.
Shallow-water benefits of fish finders:
- Bottom composition: Distinguish between mud, sand, gravel, and rock bottoms (different species prefer different substrates)
- Structure identification: Locate submerged logs, stumps, boulders, and drop-offs that concentrate fish
- Vegetation mapping: Identify weed edges, grass lines, and clear pockets where predators ambush prey
- Temperature monitoring: Find warm or cool pockets that attract baitfish and gamefish
- Fish location: Mark suspended fish in the water column, not just on bottom
Shallow-water scenarios where transducers excel:
- Grass flats (2-6 feet): Identify depth changes of just 6-12 inches that create ambush points
- River channels (3-8 feet): Map the channel edge where current breaks attract feeding fish
- Stained water: “See” structure you can’t visually identify through murky water
- Unfamiliar waters: Quickly learn new lake or river bottom contours without hours of exploration
When you might skip a transducer:
- Crystal-clear water where you can see bottom structure and fish visually
- Very small ponds (under 2 acres) where you know every feature
- Ultra-shallow marshes (under 2 feet) where most transducers lose bottom lock
- Tight, snag-filled creeks where any protrusion catches debris
Even in these situations, many anglers appreciate the water temperature reading and the ability to mark waypoints on GPS-enabled fish finders.
Shallow-water transducer settings:
- Use 200 kHz frequency for better detail in shallow water
- Reduce sensitivity to minimize clutter from suspended particles
- Narrow the depth range (0-15 feet instead of auto-range)
- Enable bottom zoom to see detail in the bottom 3-5 feet
Common Mistakes When Installing a Transducer on a Kayak
The most common transducer installation mistakes include mounting too far forward where paddle turbulence disrupts readings, failing to eliminate air bubbles under through-hull installations, angling the transducer face incorrectly relative to water flow, and routing cables where they interfere with paddling or gear access. These errors cause weak signals, intermittent readings, or complete loss of bottom contact.
Critical installation mistakes:
1. Air bubbles under through-hull mounts
- Problem: Even tiny air pockets block sonar signals completely
- Solution: Use generous silicone or epoxy, press firmly, and work out all bubbles before curing
- Verification: Test with fish finder running before adhesive fully cures
2. Incorrect transducer angle
- Problem: Transducer face not parallel to water flow creates turbulence and weak signal
- Solution: Mount transducer level with hull bottom or angled slightly toward stern (never toward bow)
- Test: Readings should remain consistent at speeds from 0-3 mph
3. Mounting in turbulent water flow
- Problem: Keel line, scupper drain streams, and paddle drip create bubble interference
- Solution: Offset 6-12 inches from centerline in smooth water flow area
- Indicator: Frequent loss of bottom signal or erratic depth readings
4. Cable routing errors
- Problem: Cables crossing the cockpit create trip hazards and paddle interference
- Solution: Route cables along hull sides under bungee cords or adhesive clips
- Best practice: Create drip loops at connections to prevent water intrusion
5. Mounting too low on adjustable arms
- Problem: Transducer extends below hull and catches on bottom during launches
- Solution: Position transducer face flush with or slightly above hull bottom line
- Clearance check: Measure ground clearance when kayak is on launch cart
6. Wrong scupper hole selection
- Problem: Forward scupper holes receive paddle drip and turbulence
- Solution: Always use rear scupper holes behind the seat
- Alternative: If rear scuppers are occupied, use side-mount arm instead
7. Inadequate cable strain relief
- Problem: Cable tension at transducer connection causes intermittent signal loss
- Solution: Create a service loop near the transducer and secure cable every 12 inches
- Protection: Use split loom or cable sleeve in high-wear areas
8. Skipping the test phase
- Problem: Permanent installation in wrong location requires difficult removal
- Solution: Test with temporary mount (suction cup or loose scupper plug) before drilling or bonding
- Validation: Verify signal quality in actual fishing conditions, not just in the driveway
9. Over-tightening mounting hardware
- Problem: Excessive bolt tension cracks plastic hulls or distorts scupper holes
- Solution: Tighten until snug, then add 1/4 turn; use backing plates to distribute pressure
- Material consideration: Plastic hulls require less torque than fiberglass
10. Ignoring cable length
- Problem: Transducer cable too short to reach fish finder location
- Solution: Measure cable route before purchasing; most transducers come with 20-foot cables
- Extension option: Some brands offer cable extensions, but signal quality may degrade
Transducer Placement for Inflatable Kayaks
Inflatable kayaks require external transducer mounting using portable solutions like suction cups, transom-style mounts attached to rigid accessories, or floating transducer pods that trail behind the kayak. Through-hull mounting doesn’t work with inflatable materials, and permanent drilling isn’t possible, so all installations must be removable and non-invasive.
Effective inflatable kayak transducer solutions:
Suction cup mounting:
- Heavy-duty suction cups attach to smooth PVC or Hypalon hull sections
- Works best on flat areas near the stern
- Requires reattachment every 2-3 hours as suction weakens
- Not reliable in hot weather (above 85°F)
- Best for calm water and short fishing sessions
Portable transducer arm with clamp:
- Clamps to inflatable kayak’s rigid accessories (seat frame, gear tracks)
- Positions transducer in water beside the kayak
- Adjustable arm allows angle and depth changes
- More secure than suction cups
- May interfere with paddle stroke if poorly positioned
Floating transducer pod:
- Waterproof housing that floats behind kayak on 6-10 foot tether
- Transducer sits in water-filled chamber
- No hull attachment required
- Can tangle in vegetation or drift into paddle path
- Adds drag and affects kayak handling
Trolling motor mount adapter:
- If your inflatable has a trolling motor mount, use a transducer bracket designed for motor shafts
- Positions transducer in clean water flow
- Stable and secure
- Only works if you have motor mount hardware
Best practices for inflatable kayak transducers:
- Test multiple locations before settling on final placement
- Bring backup attachment supplies (extra suction cups, zip ties)
- Route cables carefully to avoid puncture risk on sharp transducer edges
- Remove transducer before deflating to prevent damage
- Consider a portable fish finder with built-in GPS instead of permanent installation
Inflatable kayak anglers often accept slightly reduced transducer performance in exchange for portability and ease of setup. Focus on finding a secure mounting method that survives your typical fishing conditions rather than pursuing perfect signal quality.
How to Avoid Air Bubbles Under a Kayak Transducer
Eliminate air bubbles under through-hull transducers by thoroughly cleaning and sanding the hull interior, applying a thick layer of marine silicone or epoxy, pressing the transducer firmly while working outward from the center, and maintaining pressure with weight or clamps for 24-48 hours while the adhesive cures. Even microscopic air gaps block sonar signals and cause complete signal loss.
Step-by-step bubble elimination process:
Surface preparation (critical):
- Sand the interior hull with 220-grit sandpaper to create texture
- Clean with isopropyl alcohol to remove oils and residue
- Dry completely (wait 30 minutes after cleaning)
Test the location:
- Fill a heavy-duty plastic bag with water
- Place it on the prepared hull spot
- Press the transducer against the bag from inside
- Run your fish finder to verify signal quality
- Mark the exact position with tape
Apply bonding medium generously:
- Use marine-grade silicone, two-part epoxy, or mineral oil
- Apply more than you think necessary (excess squeezes out)
- Cover the entire transducer face plus 1/4 inch beyond edges
Press and work out bubbles:
- Place transducer on the bonding medium
- Press firmly with rotating motion
- Work from center outward to push air to edges
- Lift and reposition if you see bubbles, adding more adhesive
Maintain pressure during cure:
- Place 5-10 pounds of weight on the transducer
- Use a board to distribute weight evenly
- Don’t move the kayak for 24-48 hours
- Check periodically for adhesive squeeze-out (good sign)
Bonding medium comparison:
- Marine silicone: Permanent bond, allows some repositioning during cure, easiest to apply, 24-hour cure time
- Two-part epoxy: Strongest bond, no repositioning after 5 minutes, requires mixing, 48-hour full cure
- Mineral oil: Non-permanent, allows future repositioning, requires sealed compartment to contain oil, immediate use
- Vegetable oil: Budget alternative to mineral oil, may degrade over time, requires replacement annually
Verification test:
After the adhesive cures, run your fish finder in a bathtub or pool before taking the kayak to the water. You should see a clear bottom reading at 1-2 feet depth. If readings are weak or absent, air bubbles are present and you’ll need to remove and reinstall the transducer.
Troubleshooting poor through-hull signals:
- Weak or intermittent readings: Small air bubbles present
- No reading at all: Large air gap or hull too thick
- Reading disappears at speed: Turbulence pulling transducer away from hull
- Reading only works when stationary: Inadequate bonding pressure
Best Transducer Mount for Fishing in Weeds and Rocks
Low-profile scupper hole mounts work best in heavy weeds because they sit close to the hull with minimal protrusion, while adjustable arm mounts with quick-release features excel in rocky areas by allowing you to raise the transducer when approaching shallow structure. For extreme snag conditions, through-hull mounting eliminates external protrusions entirely but sacrifices some signal quality.
Weed-fishing transducer solutions:
Low-profile scupper mount:
- Transducer sits at or slightly below hull level
- Minimal surface area to catch vegetation
- Weeds slide past rather than accumulating
- May lose signal in very thick weed mats
- Best for: Sparse to moderate vegetation
Kick-up or breakaway arm mount:
- Spring-loaded arm pivots backward when it hits resistance
- Returns to position after clearing obstruction
- Prevents transducer damage from impacts
- More expensive ($60-90)
- Best for: Mixed weed and wood structure
Through-hull (shoot-through):
- Zero external protrusion
- Completely snag-proof
- 10-20% signal loss through hull
- Best for: Extremely heavy vegetation or snag-filled waters
Rocky-area transducer solutions:
Adjustable arm with depth control:
- Raise transducer above hull level in shallow water
- Lower for optimal signal in deeper areas
- Requires manual adjustment (stop and reposition)
- Best for: Transitioning between shallow rock and deeper water
Transom-style mount with tilt mechanism:
- Tilts up when contacting bottom
- Protects transducer from hard impacts
- Requires stern-mounted bracket
- Best for: Frequent shallow launches over gravel or rock
Transducer guard or shield:
- Protective cage around transducer face
- Prevents direct rock contact
- May slightly reduce signal quality
- Adds $15-30 to installation cost
- Best for: Rocky rivers and boulder fields
Hybrid strategy for mixed conditions:
Many kayak anglers use a scupper mount for general fishing and carry a backup portable transducer (suction cup or floating pod) for extreme snag conditions. This approach costs $40-60 total but provides maximum flexibility.
Maintenance for snag-prone areas:
- Inspect transducer face for scratches after each trip
- Clean accumulated algae and debris immediately
- Check mounting hardware for looseness from impacts
- Carry spare mounting hardware in your tackle
- Consider a protective film (clear vinyl) on transducer face
Can You Move Your Transducer After Mounting It?
Yes, you can move scupper-mounted and arm-mounted transducers by removing mounting hardware and reinstalling in a new location, though you’ll need to fill old bolt holes with marine epoxy and may need to purchase new mounting hardware. Through-hull transducers bonded with silicone can be carefully removed and repositioned, but epoxy-bonded installations are permanent and require cutting the transducer free.
Repositioning different mount types:
Scupper hole mounts (easiest to move):
- Simply pull the mount from the current scupper hole
- Insert into a different scupper hole
- No tools required, takes 2-3 minutes
- No hull damage or repair needed
- Limitation: Can only move to other scupper hole locations
Bolt-through arm mounts (moderate difficulty):
- Remove mounting bolts and backing plate
- Fill old holes with marine epoxy or G/flex
- Sand flush after epoxy cures (24 hours)
- Drill new holes in desired location
- Reinstall with new stainless hardware
- Time required: 1-2 hours plus cure time
Silicone-bonded through-hull (difficult but possible):
- Carefully cut through silicone bond with thin wire or fishing line
- Clean old silicone from transducer face with mineral spirits
- Prepare new location following proper installation procedure
- Rebond with fresh marine silicone
- Time required: 2-3 hours plus 24-hour cure
Epoxy-bonded through-hull (permanent):
- Cannot be removed without destroying transducer
- Attempting removal will crack transducer housing
- Must purchase new transducer if relocation needed
- Old epoxy can be ground down flush with hull interior
When to consider moving your transducer:
- Readings are weak or intermittent (wrong location)
- Transducer interferes with paddle stroke
- You’ve added accessories that block the current location
- You’re upgrading to a different transducer type
- You’ve switched from paddle to pedal drive
Testing before permanent installation:
Always test transducer location with temporary mounting before committing to permanent installation:
- Use suction cups or loose scupper plug for initial testing
- Fish for 2-3 hours in typical conditions
- Verify signal quality at various speeds
- Confirm no interference with paddling or gear
- Only then proceed with permanent mounting
Cost of repositioning:
- Scupper mount move: $0 (no new parts needed)
- Arm mount move: $10-20 (new bolts, backing plate, epoxy)
- Through-hull move: $5-15 (new silicone) or $50-150 (new transducer if epoxy-bonded)
Frequently Asked Questions
How deep does the water need to be for a kayak transducer to work?
Most kayak transducers require a minimum depth of 2-3 feet to maintain bottom lock and provide accurate readings. In shallower water, the transducer may lose signal or show erratic depths. High-frequency (200 kHz) transducers work better in shallow water than low-frequency (83 kHz) models.
Can I use the same transducer for multiple kayaks?
Yes, if you use a removable mounting system like a scupper plug mount or suction cup mount. Simply move the transducer and fish finder between kayaks as needed. Permanent installations like through-hull or bolt-through arm mounts are kayak-specific and can’t be easily transferred.
Will a transducer drain my kayak battery quickly?
No, transducers draw minimal power (typically 0.1-0.5 amps). The fish finder display consumes most of the power. A 12V 7Ah battery will run a typical kayak fish finder for 8-15 hours of continuous use, and most fishing trips involve intermittent use that extends battery life further.
Do I need a special transducer for saltwater kayak fishing?
Standard freshwater transducers work fine in saltwater, but ensure all mounting hardware is stainless steel or marine-grade plastic to prevent corrosion. Rinse the transducer and connections with fresh water after each saltwater trip to extend component life.
Can I mount two transducers on one kayak?
Yes, you can run multiple transducers if your fish finder supports it (check manufacturer specifications). Some anglers mount a traditional 2D sonar transducer and a separate side-imaging transducer, or use one transducer for a fish finder and another for a standalone depth gauge.
What happens if my transducer cable gets cut or damaged?
Most transducer cables cannot be repaired or spliced because they contain multiple wires and shielding that must maintain specific impedance. You’ll need to replace the entire transducer. Protect cables with split loom tubing and secure them away from sharp edges and high-wear areas.
How do I know if my transducer is working properly?
A properly functioning transducer shows consistent depth readings, clear bottom definition, and fish arches when fish are present. Test in known depths (boat ramp, dock) to verify accuracy. Weak signals, intermittent readings, or complete loss of bottom contact indicate installation problems or transducer failure.
Can I paint my kayak after installing a through-hull transducer?
Yes, but avoid painting over the transducer bonding area on the hull exterior. Paint on the outside of the hull (opposite the transducer) can slightly reduce signal strength. If you must paint, use thin coats and avoid metallic or thick textured paints in the transducer area.
Will a transducer work on a kayak with a textured hull bottom?
External mounts work fine on textured hulls. Through-hull installations perform poorly on heavily textured interior surfaces because texture creates air gaps between the transducer and hull. If your kayak has a textured interior, sand the bonding area smooth or choose an external mount.
How often should I replace my kayak transducer?
Transducers typically last 5-10 years with proper care. Replace when you notice degraded performance (weak signals, erratic readings), physical damage to the transducer face, or when upgrading to newer sonar technology. Regular cleaning and impact protection extend transducer life.
Can I use a portable fish finder with a suction cup transducer on a kayak?
Yes, portable fish finders with suction cup transducers work on kayaks for temporary or occasional use. However, suction cups lose grip in hot weather and rough water, making them unreliable for serious fishing. They’re best for testing locations before permanent installation or for rental kayaks.
Do pedal kayaks need different transducer mounting than paddle kayaks?
Pedal kayaks offer more mounting flexibility because there’s no paddle interference concern. However, ensure the transducer and mount don’t interfere with the pedal drive mechanism, propeller, or rudder cables. Many pedal kayaks have factory transducer mounting locations built into the hull.
Conclusion
Mounting a transducer on your kayak transforms your fishing by revealing underwater structure, fish location, and depth information that’s invisible from the surface. The best mounting location depends on your kayak type, fishing conditions, and budget, but most anglers find success with rear scupper hole mounts on sit-on-top kayaks or adjustable arm mounts positioned 12-18 inches forward of the stern, offset from the centerline.
Start with a removable mounting solution like a scupper plug mount to test transducer placement before committing to permanent installation. This approach costs $20-40, requires no drilling, and lets you verify signal quality and paddle clearance in real fishing conditions. Once you’ve confirmed the optimal location, you can upgrade to a more permanent solution if needed.
Your next steps:
- Measure your kayak: Identify scupper hole sizes and potential mounting locations that won’t interfere with paddling
- Choose your mount type: Select scupper, arm, or through-hull mounting based on your kayak design and fishing style
- Test before permanent install: Use temporary mounting to verify location and signal quality
- Install carefully: Follow proper installation procedures, eliminate air bubbles, and secure all cables
- Verify performance: Test in various depths and speeds before your first fishing trip
Remember that even a basic transducer installation provides enormous advantages over fishing blind. You don’t need the most expensive mount or perfect placement to catch more fish, you just need reliable depth readings and structure identification. Start simple, learn what works for your fishing style, and refine your setup over time.
The difference between guessing where fish might be and knowing where they are is the difference between hoping for bites and consistently catching fish. Your transducer is the tool that closes that gap.